
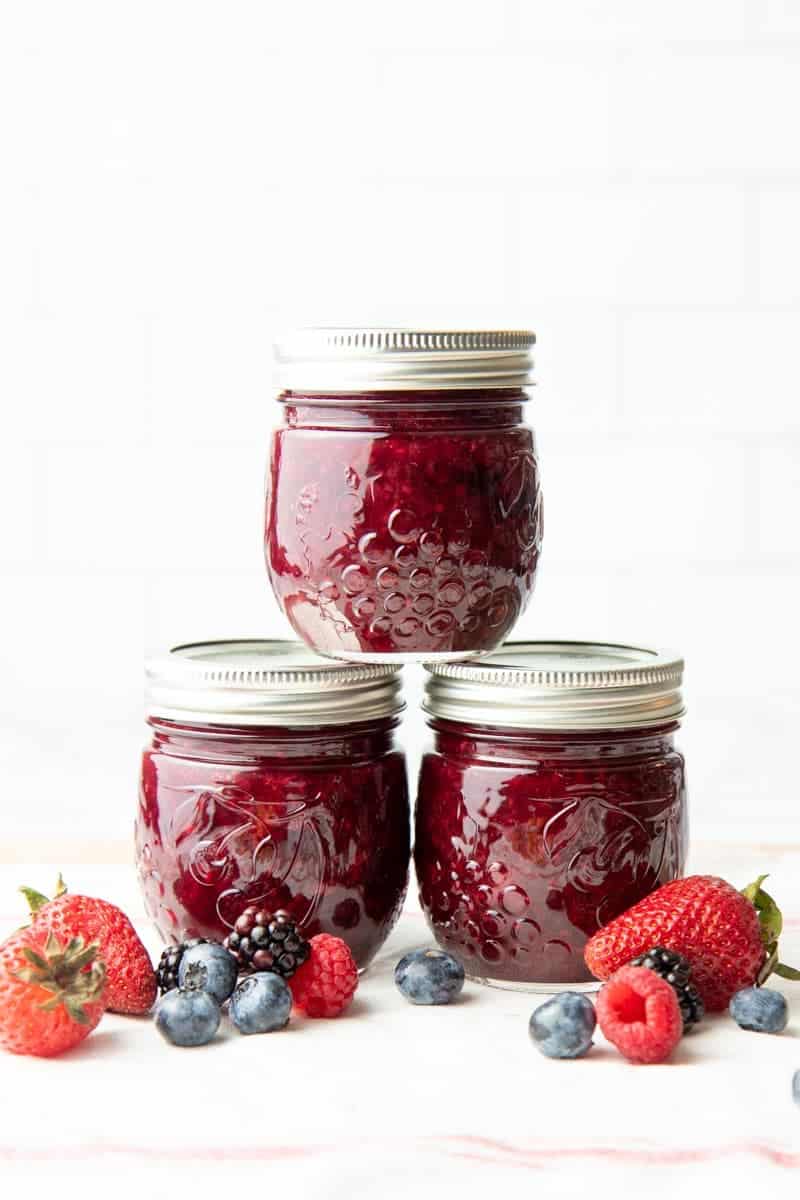
How to Can Mixed Berry Jam (Naturally Sweetened with Agave)
If you are new to canning, jam is absolutely one of the best places to start. Small batch jams come together quickly, have very few ingredients (this one only has four!), and result in an absolutely delicious end product that can be used in a ton of ways.
If you are nervous about canning, I promise you can do this! We're going to walk you through every step of the process, plus you can find even more extensive resources at Ball® Canning's website FreshPreserving.com. Together, let's get you canning!
What tools do I need to can mixed berry jam?
Canning does require a few (very affordable) specialty tools to make the process safer and easier. These tools work for this particular Mixed Berry Jam recipe, but they also can be used for most other waterbath and pressure canning recipes. Here's what you need:
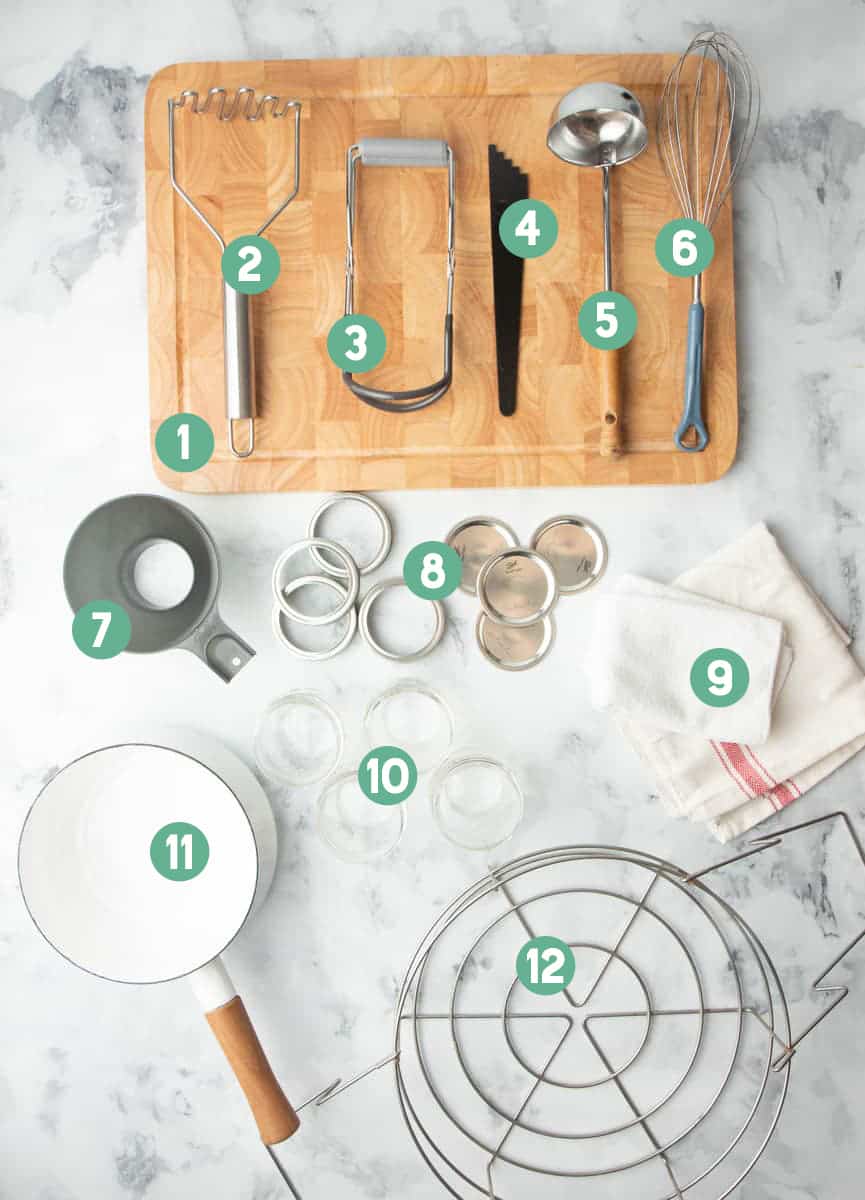
- Wooden cutting board or thick towel: This is used to insulate hot glass jars from a cold countertop, which prevents breakage.
- Masher: To mash up your delicious berries!
- Jar lifter: Hot, wet glass jars are slippery, which makes a jar lifter absolutely necessary for canning. Promise me you won't try to can without one.
- Headspace tool or plastic ruler: It's important to fill the jars to the right level for proper preservation, and a headspace tool makes this easy. You can also dedicate a plastic ruler to canning for the same purpose.
- Ladle: For, well, ladling.
- Whisk or spoon: You'll need to stir your jam frequently, and depending on the thickness of the pulp, you can either use a whisk or a spoon.
- Canning funnel: A special funnel with a wide end to help fill jars.
- Two-piece canning lids (lids and rings): All Ball® Canning Jars come with the two-piece lids and rings. You can also purchase them separately if you need new ones. You can reuse the rings, but you must use a fresh lid every time you preserve.
- Towels: Not only is canning guaranteed to get a little messy, but you'll also need to wipe the rim of your jars before fitting the lids for a proper seal.
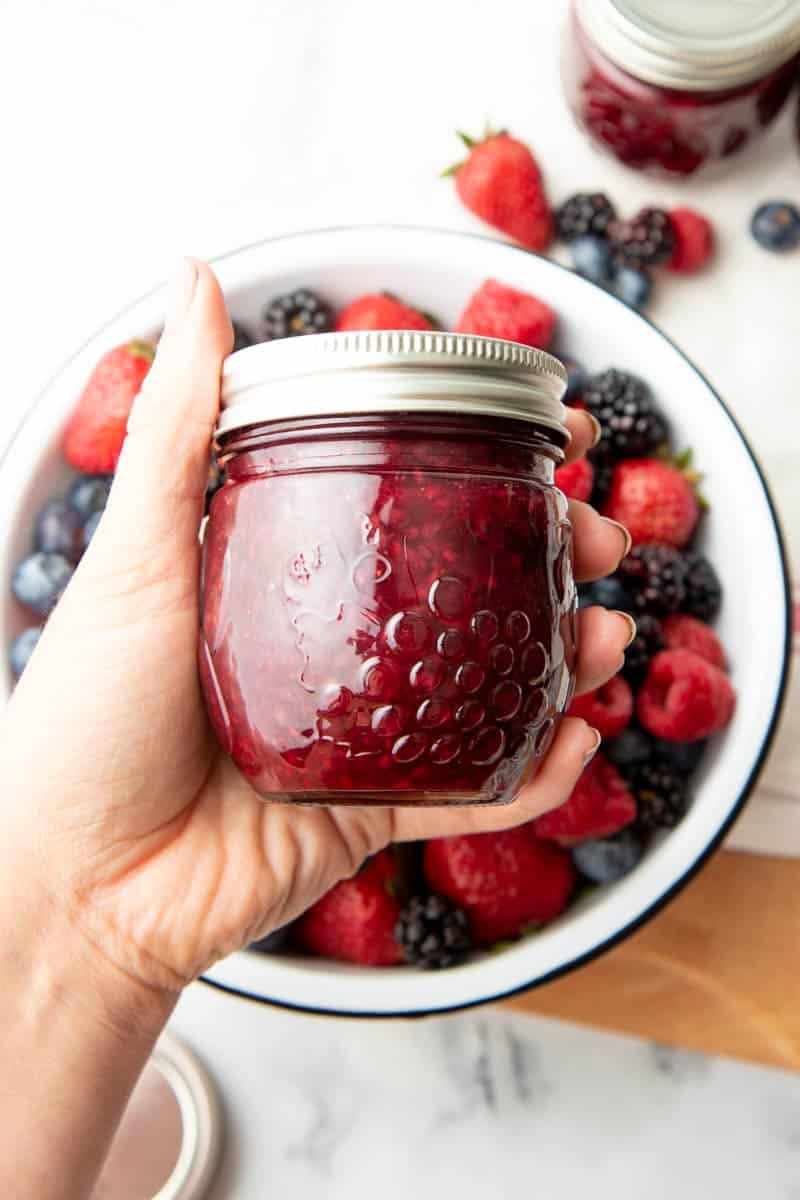
- Half-Pint Ball® Mason Jars: In these photos, we're using Ball® Half Pint Jam Jars, but any half-pint or SMALLER jars would work. Because of processing times, you can always process in a smaller jar than suggested in the recipe, but never in a larger jar.
- Pot for cooking jam: Any medium-to-large size saucepan will do the trick.
- Canning rack or trivet: This protects the bottom of the jars from bouncing against the bottom of the canner while processing. There are two main versions, a big metal rack or a small silicone trivet. I prefer the small silicone trivet for smaller jars and small batches, and the big metal rack for larger jars. Either will do the trick! But please, don't try to can without one.
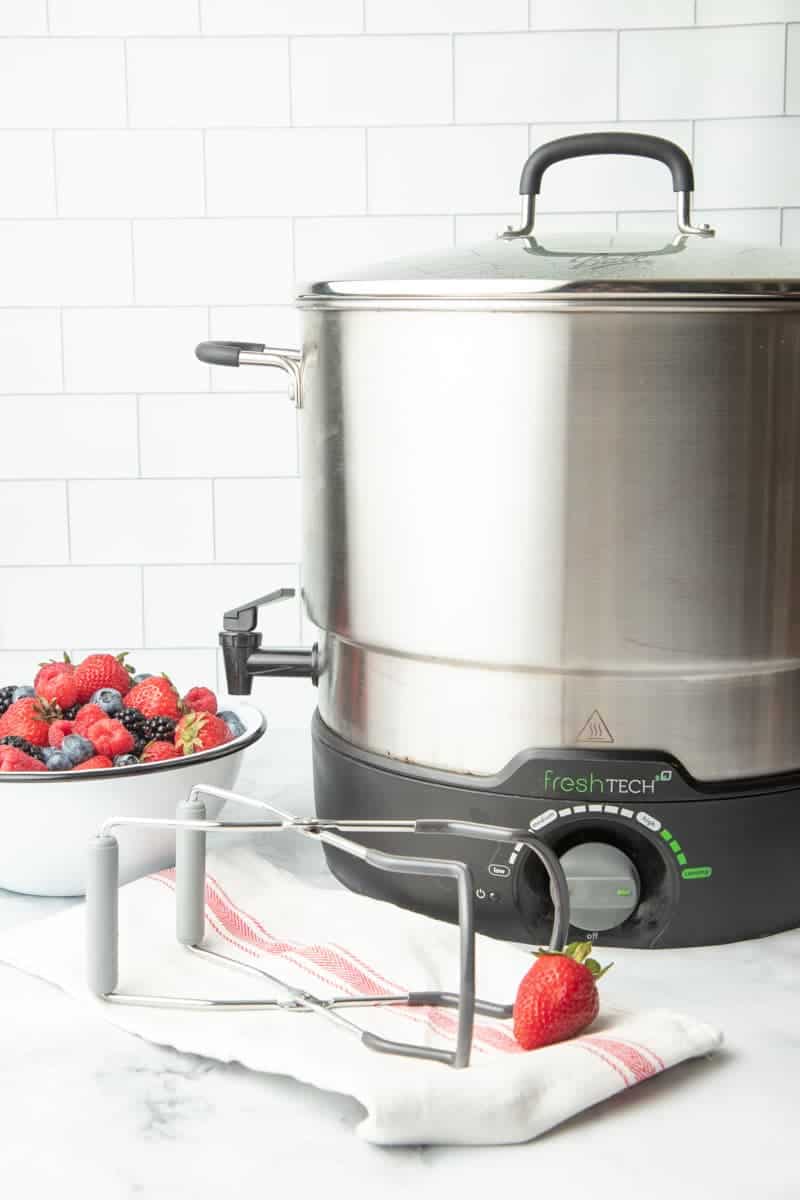
- Waterbath Canner (unpictured): A waterbath canner is literally just a very large pot (so large I couldn't fit it in the picture above). For smaller batches, including this jam recipe, you can easily use any large stockpot you have around your house, as long as your canning rack and jars can fit inside.
Wholefully Protip
If you get into canning and want to do larger batches, it's worth investing in a large canner pot or an electric canner-which is what I use. I've had a Ball® freshTECH Electric Water Bath Canner for years, and I love it because it leaves my stove open while I can.

What kind of jars do I need for canning jam?
Most jam recipes (including this one) will call for half-pint (8-ounce) Ball® Mason Jars. When it comes to canning, you can always can in a smaller jar than what is listed in the recipe, but never in a larger jar. Why? It's because the processing time listed won't allow the proper heat to reach all the way to the center of the preserves in a larger jar. There is just no way to guarantee a safe product if you use a larger jar.
Wholefully Protip
When working with glass jars, it's important to remember that extreme temperature changes can make glass shatter. Only fill hot jars with hot liquid. Room temperature jars should be submerged in room temperature water. And always insulate hot jars from cold countertops using a thick towel or wooden cutting board.
Beyond the size, you are free to experiment with the wide variety of Ball® Canning Jars available. They have different shapes, mouth widths, colors, and glass patterns available. I did a batch of this Mixed Berry Jam in both the Ball® Elite Collection Regular Mouth Half Pint Jam Jars and the Ball® Aqua Vintage Regular Mouth Half Pint Jars. I think they both look beautiful!
Can you reuse canning jar lids?
You can reuse the rings as long as they are not rusted, but the flat lids need to be replaced each time you preserve with them. In our house, we save lids that have been used for preserving for storage use (great for storing leftovers in the fridge!), and keep them separate from our preserving lids.
Do I need a special pot for canning?
Nope, any large stockpot you have will do the trick, with two caveats:
- It must be able to fit your canning rack or trivet in the bottom.
- The jars you are using must be able to fit in the pot and be covered by at least an inch of water.
For small jars like these half-pint jam jars, any run-of-the-mill stockpot will do the trick, but if you get into canning larger batches with larger jars, you'll probably want to upgrade to either a larger waterbath canner pot or an electric waterbath canner.
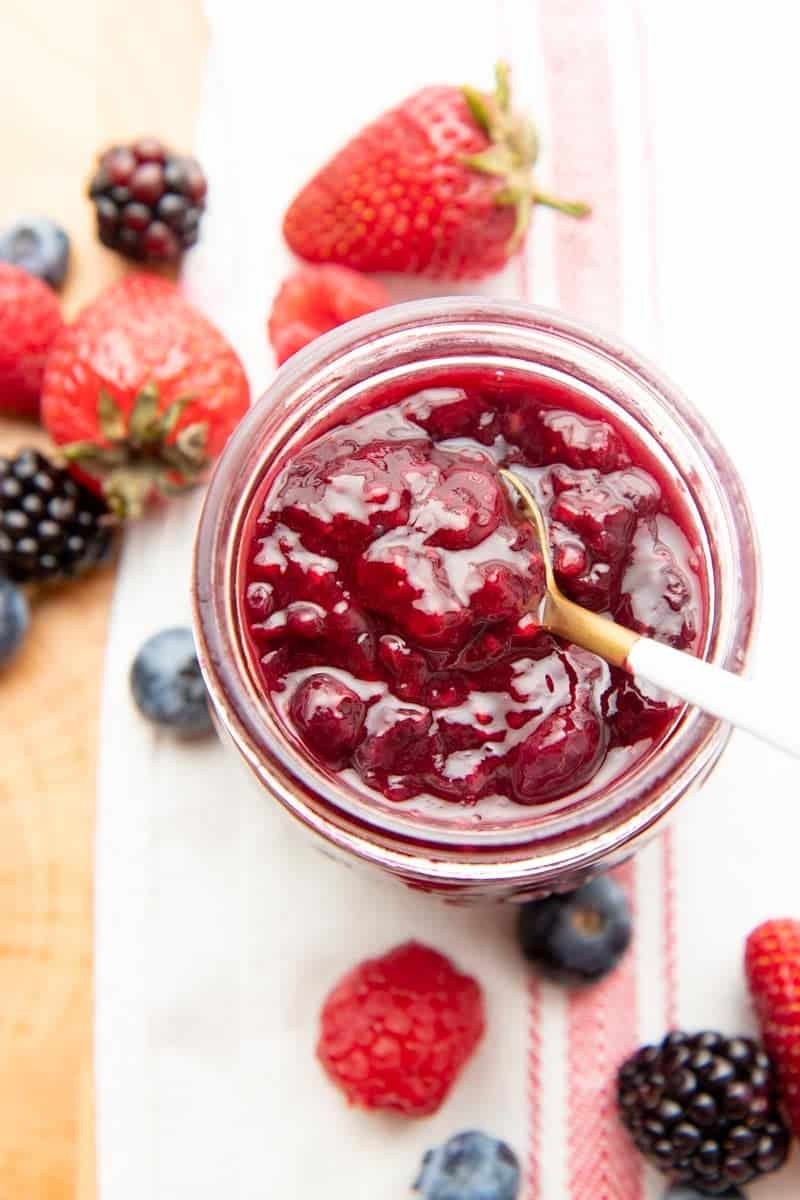
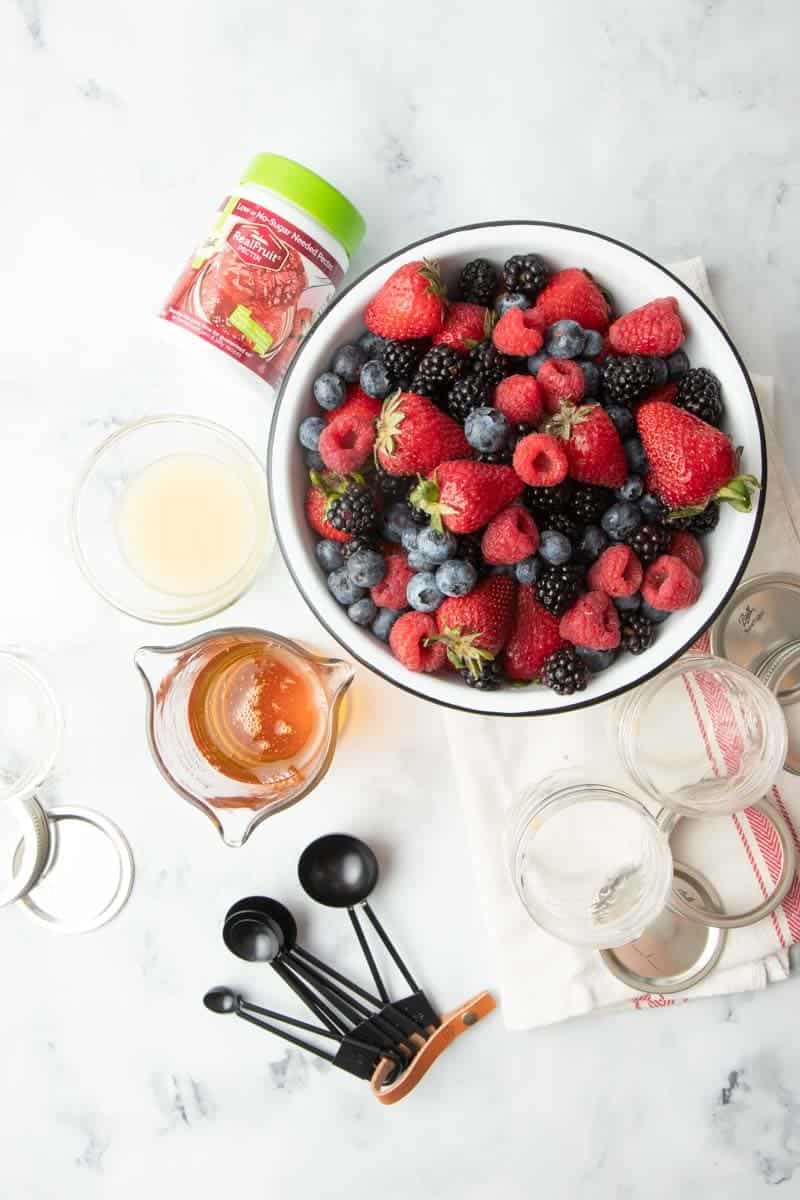
What ingredients do I need to make this Mixed Berry Jam?
This jam requires just four ingredients, and only one of them is special to canning. You'll need:
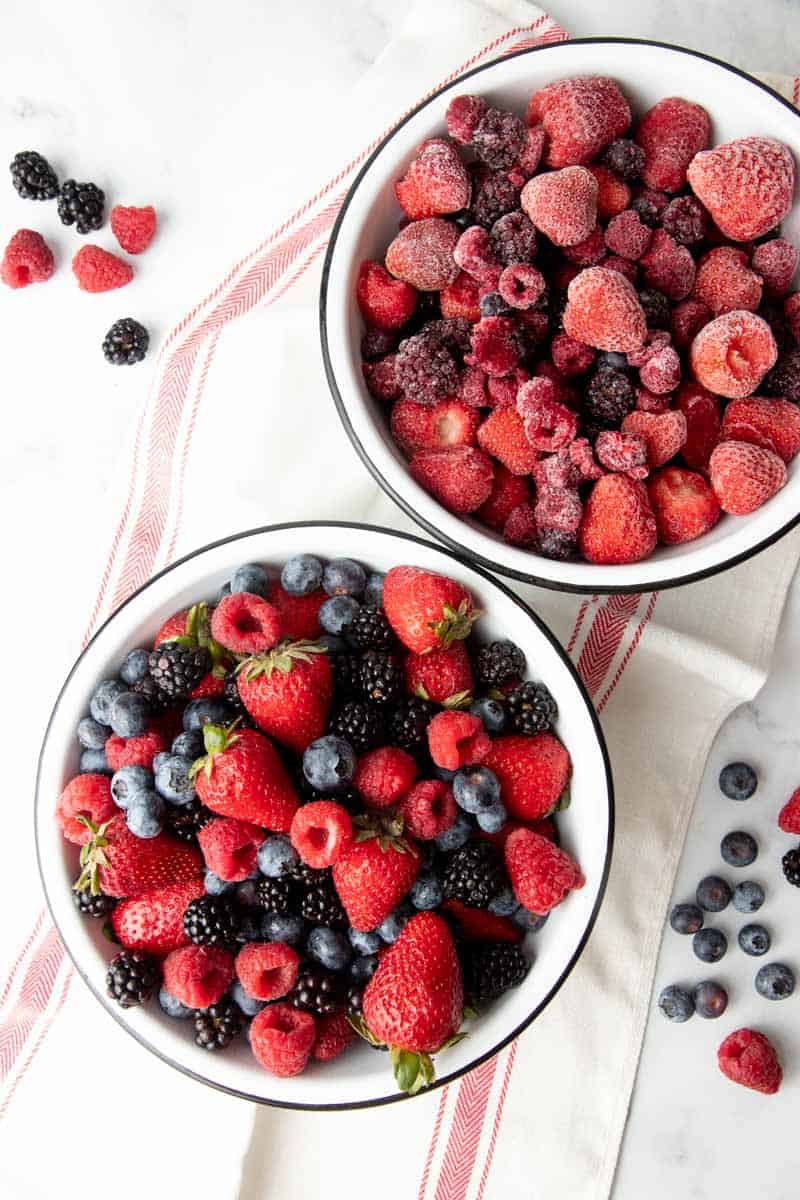
- Mixed berries: Any combination of berries works for this recipe. I used blackberries, strawberries, blueberries, and raspberries. Fresh or frozen (and thawed) berries both work.
- Bottled lemon juice: Do not sub in fresh lemon juice. The acidity of bottled lemon juice is controlled, and for safe canning, we need to be precise with our extra added acid.
- Agave nectar/syrup: This is a very lightly flavored sweetener.
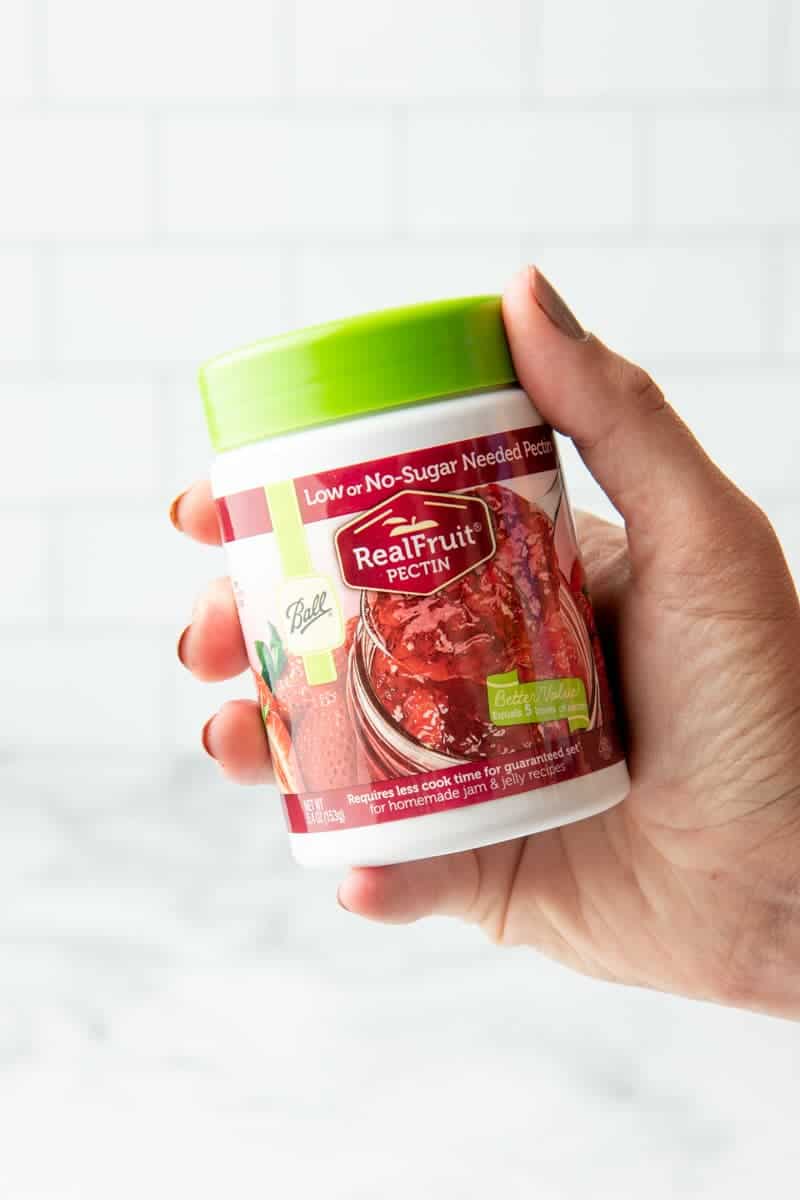
- Ball® Real Fruit, Low or No-Sugar-Needed Pectin: This is what makes the jam thicken up.
What are the best types of berries to use for mixed berry jam?
Whatever berries are the sweetest and have the best flavor will make the best jam! You can experiment with what combinations work best for you. You can use any combination of:
- Red Raspberries
- Black Raspberries
- Blackberries
- Pineberries
- Strawberries
- Blueberries
- Honeyberries
- Cherries (not a berry, we know, but still really good in this jam)
- Boysenberry
- Lingonberry
- Elderberry
- Serviceberries
I recommend choosing the berries that grow well in your area and focusing on those first-that'll give you the most robust berry flavor in your jam!
Wholefully Protip
Frozen berries work wonderfully for jam-in fact, I prefer them because they allow me to decide when I want to can jam. I tend to freeze fresh berries all summer long, and then do my jam canning when life is a bit calmer come wintertime.
What is pectin, and why do I need it?
Pectin is a naturally occurring starch found in many fruits and vegetables in varying amounts. When cooked, it can transform runny fruit puree into the silky, thick, luscious jam we all know and love. Some fruits like pears and apples have enough natural pectin that they don't need to have much (if any) added, but for most jams, it's best to add additional pectin to ensure a good jam set.
What type of pectin should I get?
There are two main types of pectin, one that you use with "regular" jam recipes that contain a lot of granulated sugar, and what we use here-low or no-sugar needed pectin. Regular pectin works along with the sugar to thicken the jam, but Ball® Real Fruit, Low or No-Sugar-Needed Pectin doesn't need added sugar to get that thick jam texture.
Okay, I'm ready to can jam! How do I make this Mixed Berry Jam recipe?
We're going to walk you through the entire canning process here to make sure you have it down pat. If you're an experienced canner, feel free to scroll right down to the bottom of the page to print the recipe and get to work.
Wholefully Protip
It's important for even experienced canners to frequently brush up on the latest in canning safety. The procedures change as new information comes to light. Ball® Canning's FreshPreserving.com site is a great resource for the latest in canning tips and tricks.
Step 1: Prepare your tools, jars, and waterbath canner.
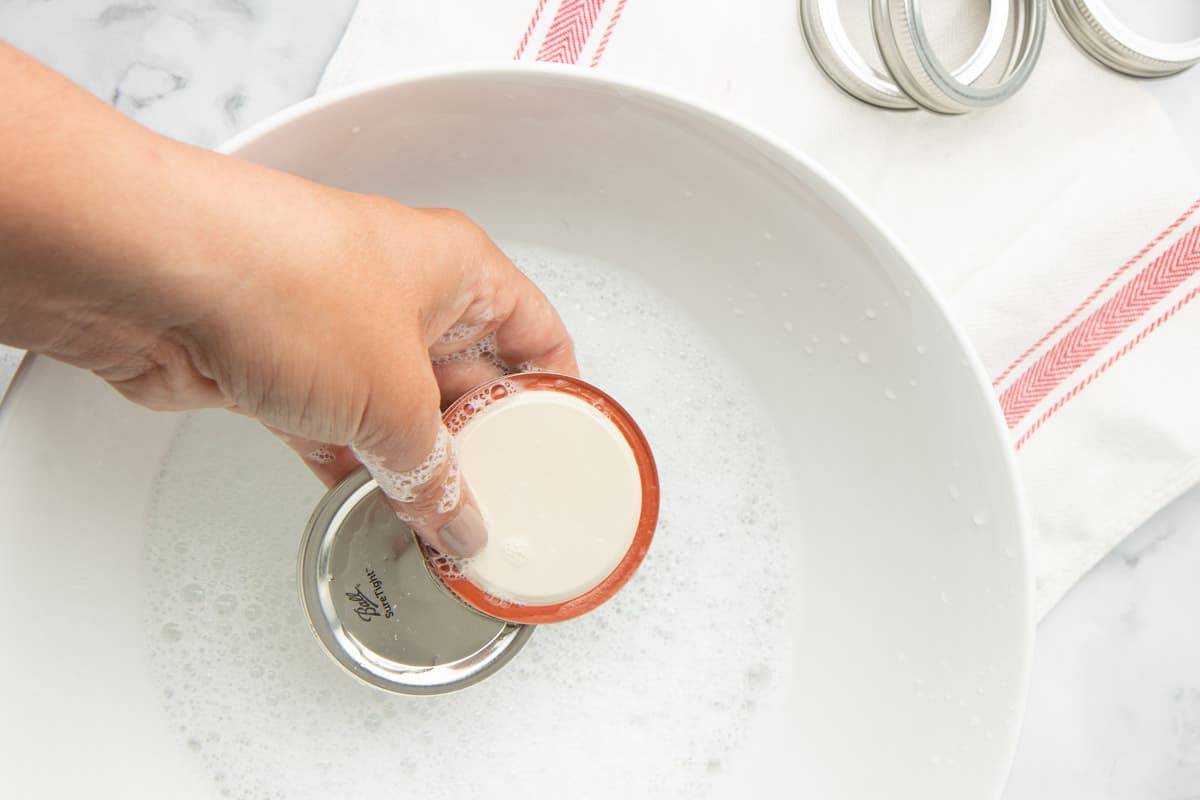
Begin by washing your tools, jars, lids, and rings in warm, soapy water. You can wash your tools and jars in the dishwasher, but the two-piece closures must be washed by hand. Set them aside.
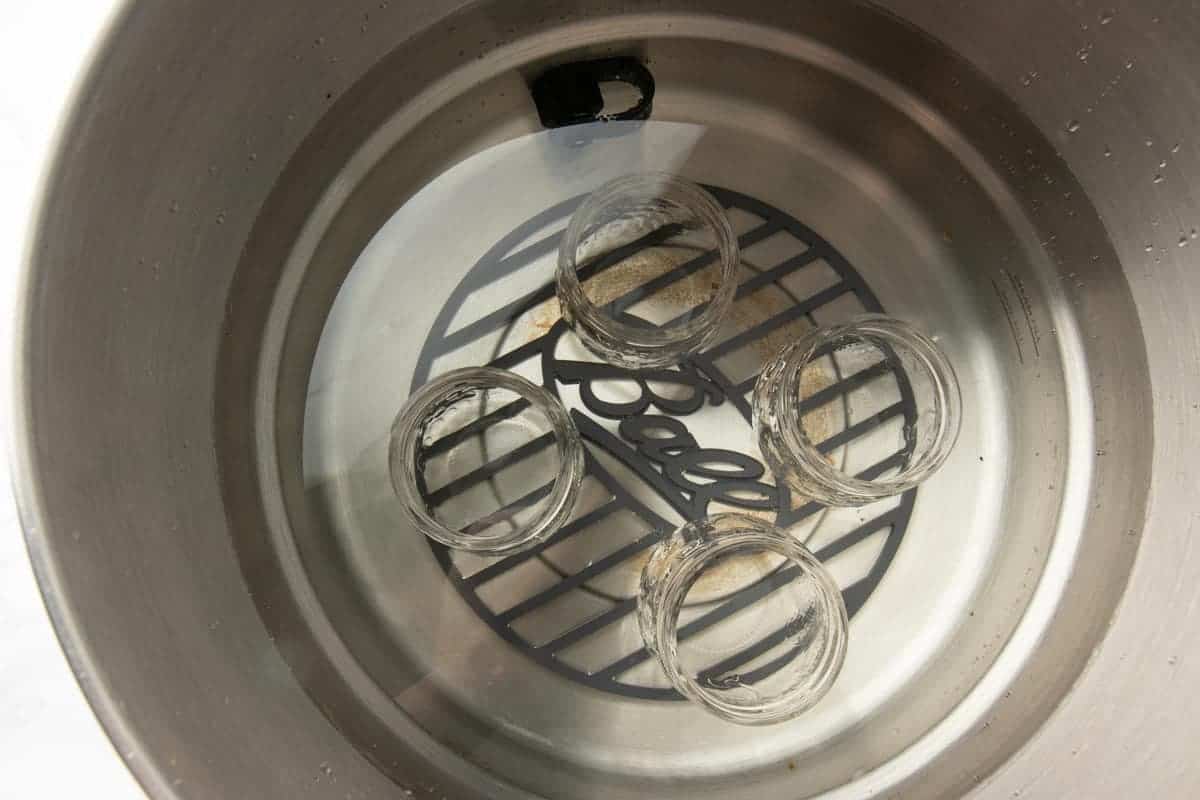
Fill your large stockpot or canner, and then fill with enough room temperature water to cover your jars by at least an inch. Fit your canning rack or trivet in the bottom of the pot.
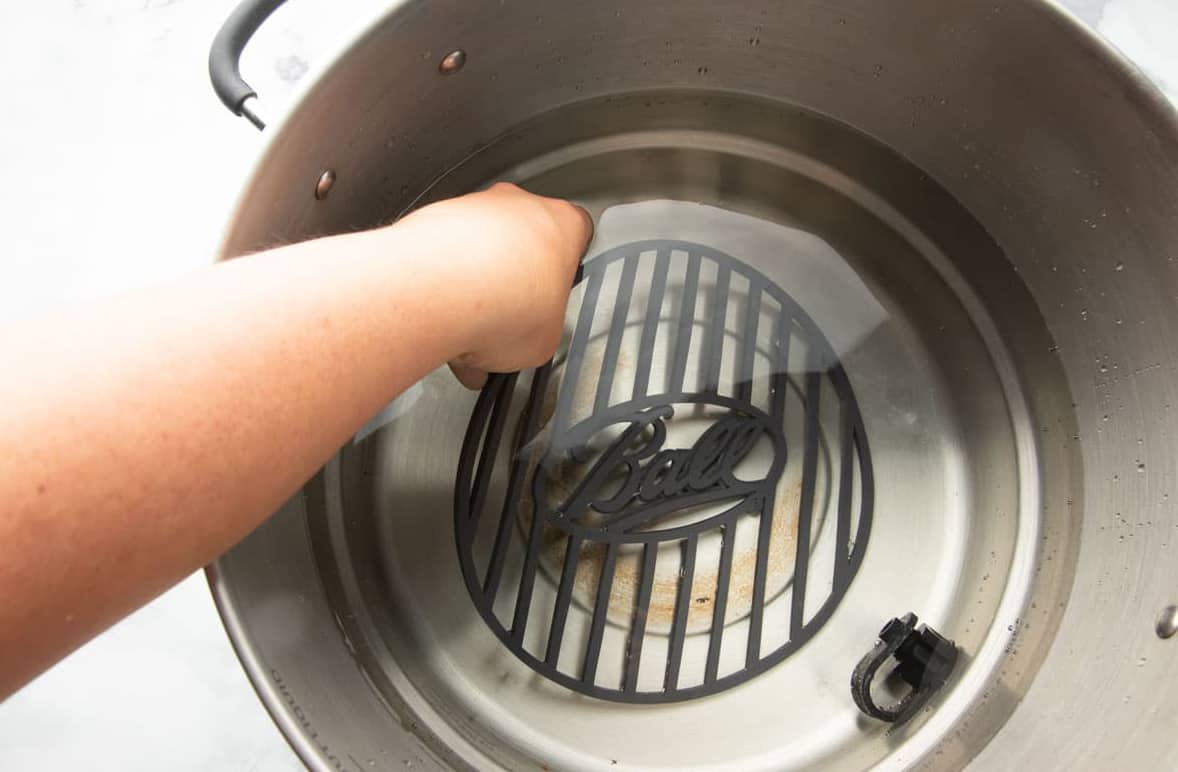
Place your clean jars under the water in the canner, and turn on the heat. Bring the jars to just barely a simmer to keep them warm while you prepare the jam. Do not boil the jars.
Wholefully Protip
Always prepare more jars than a recipe calls for. It's easy to put jars away if you don't need them, but it's hard to stop in the middle of canning to clean and heat up jars if you need extras.
Step 2: Make the Mixed Berry Agave Jam
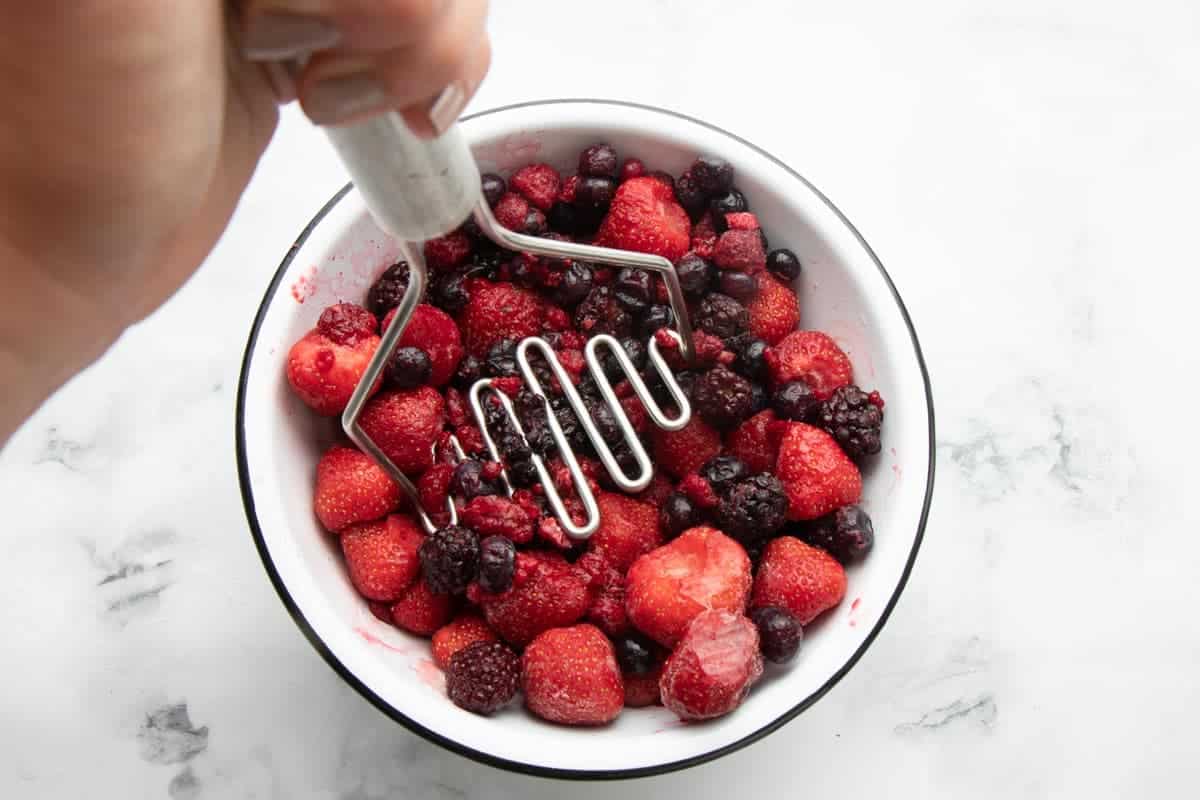
Begin by mashing either your fresh mixed berries or the thawed frozen berries in a large bowl or baking dish. Don't worry too much about it being perfectly smooth, as the berries will break down more as the jam cooks.
Wholefully Protip
Make your jam seedless by pressing the berry puree through a fine-mesh strainer. Discard the seeds, and measure out four cups of the smooth puree for your jam.
Measure out four cups of the mashed berry puree, and transfer it to a saucepan or Dutch oven. Add in the lemon juice.
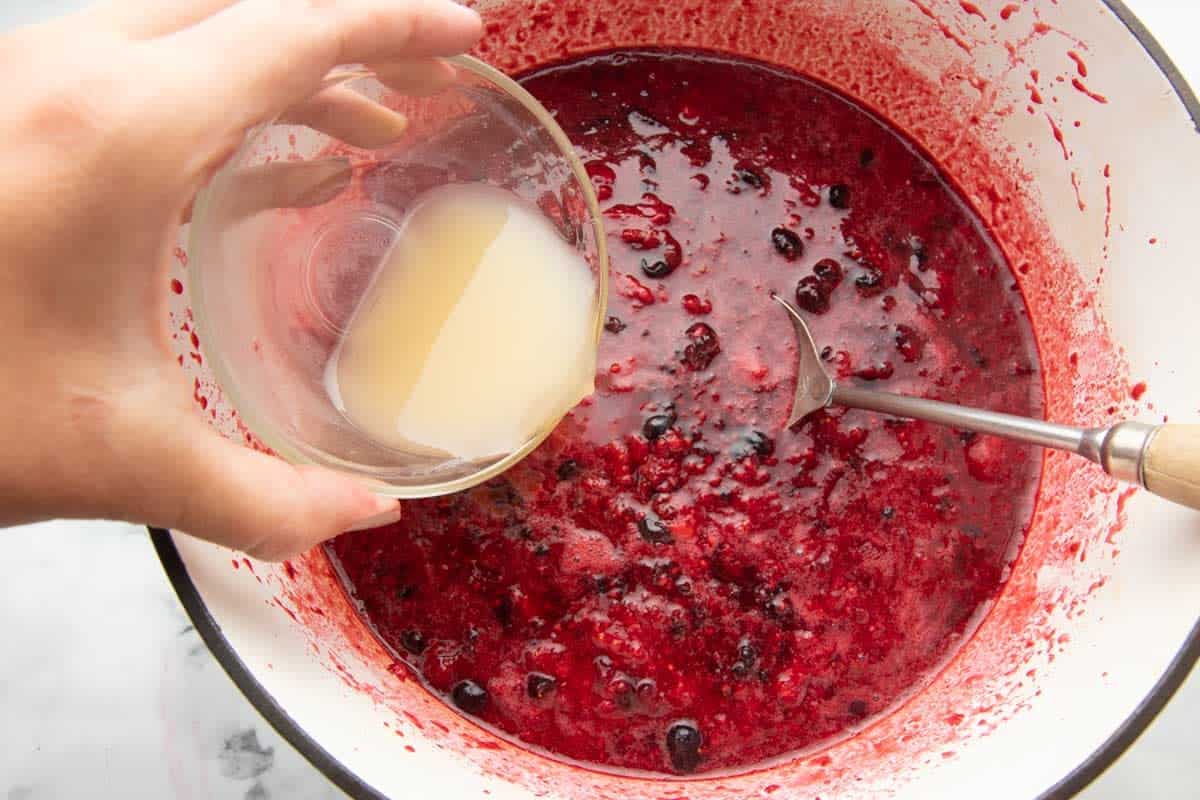
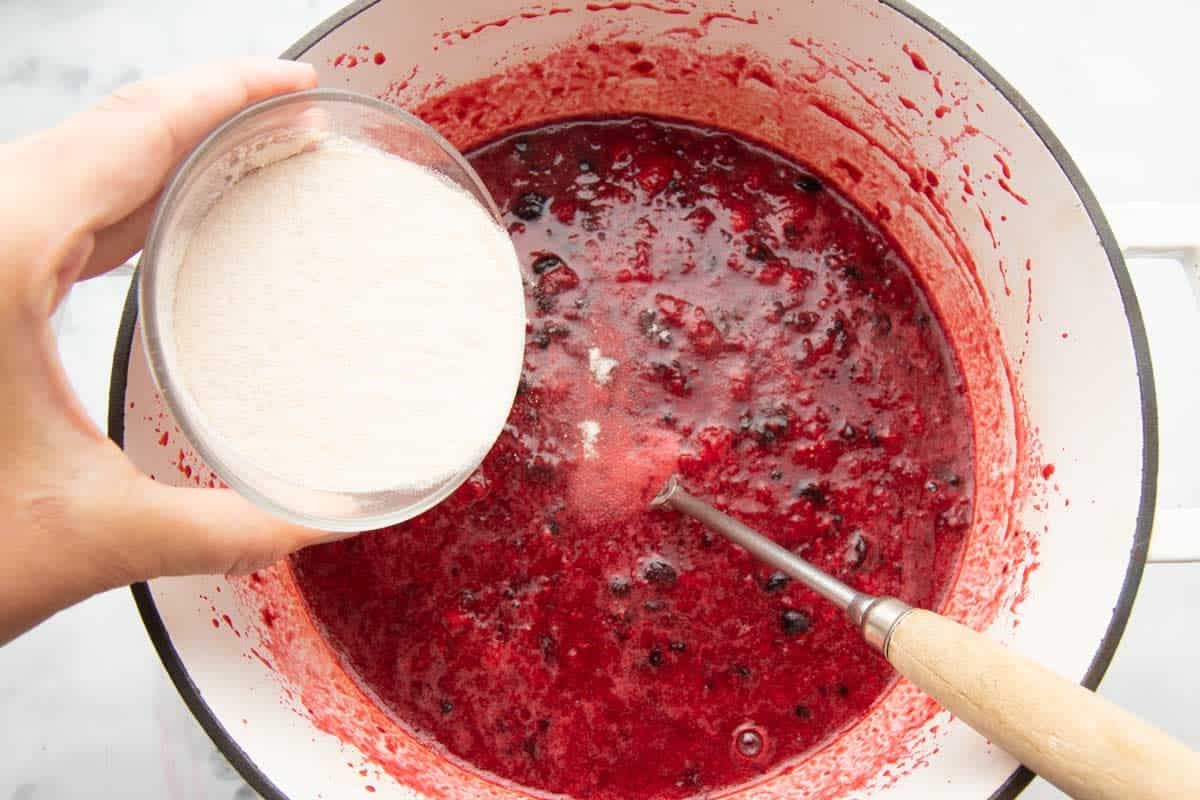
Lightly sprinkle three tablespoons of the Ball® Real Fruit, Low or No-Sugar-Needed Pectin over the top of the berry mixture.
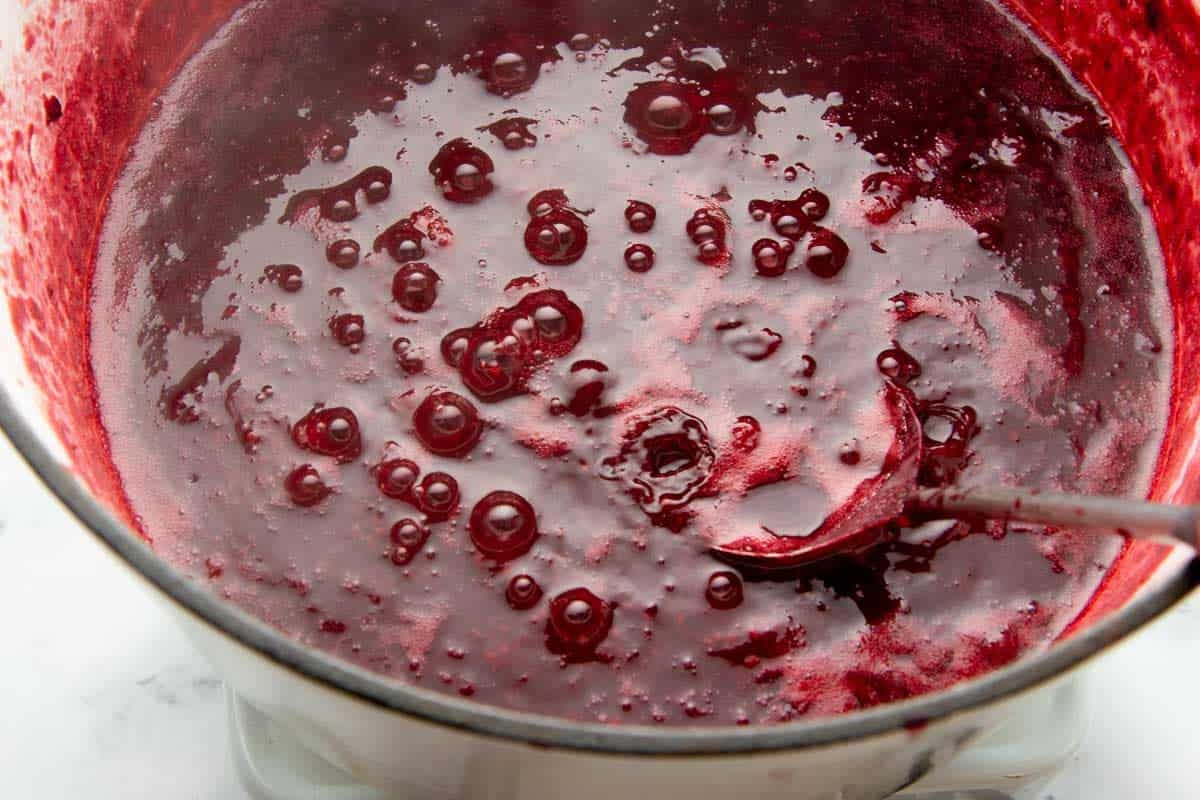
Turn the heat onto high, and bring the mixture to a full rolling boil, stirring frequently to prevent sticking. You're looking for a full boil that cannot be stirred down. Depending on your berries, this can take anywhere from 10 minutes to 45 minutes.
Wholefully Protip
If your jam starts to foam up, no worries! Just use a slotted spoon to remove the foam, and keep on cooking as listed.
When the jam reaches the full rolling boil point, add in the agave syrup.

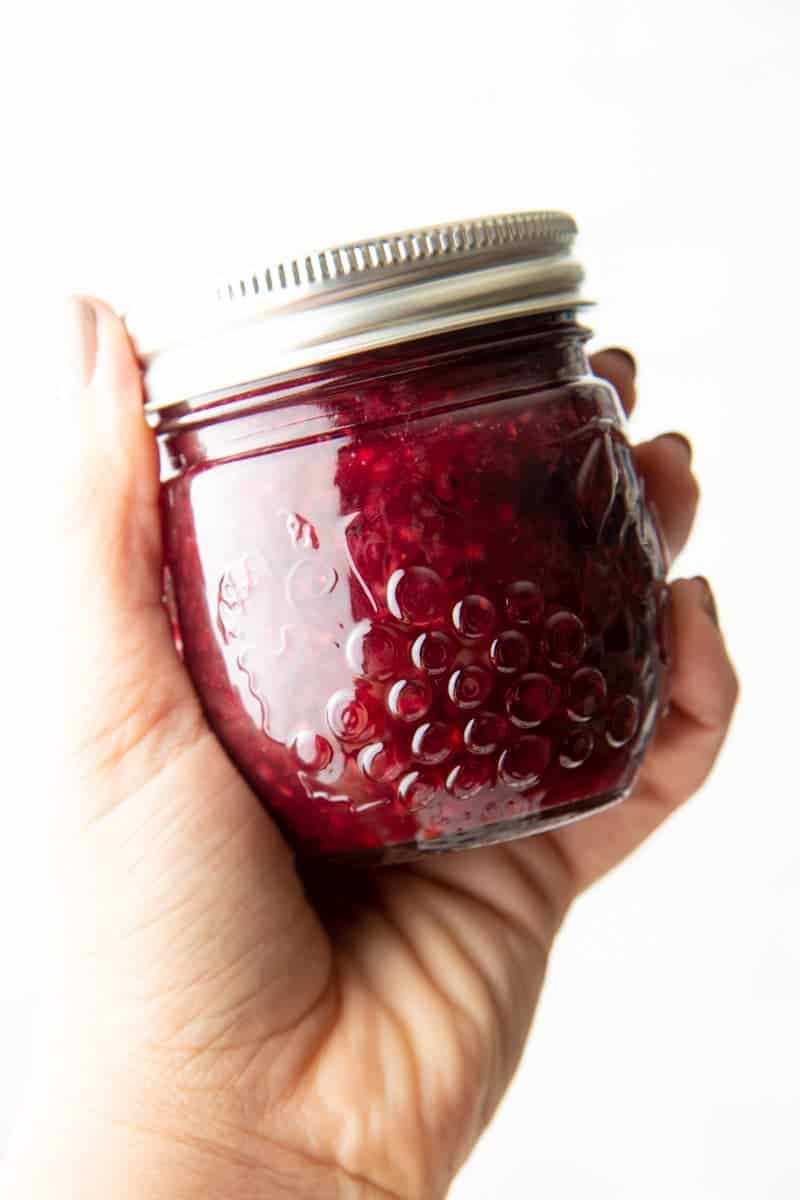
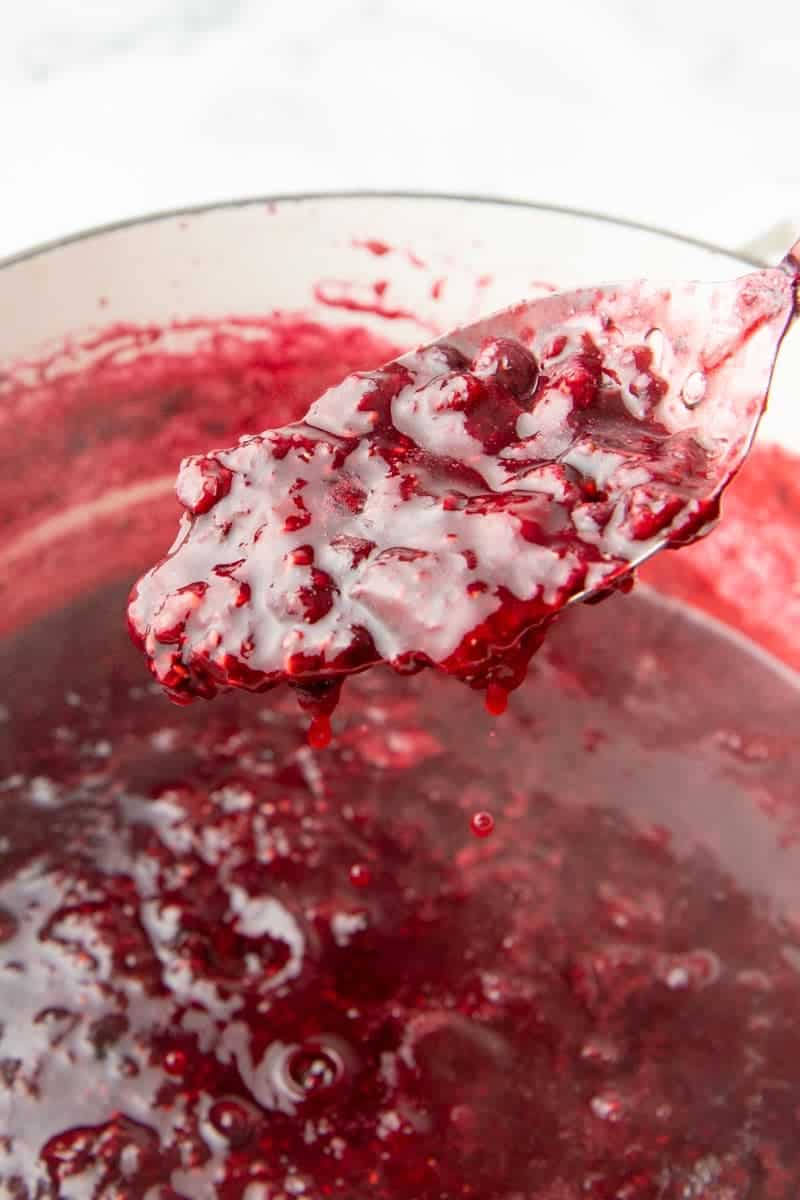
Now, bring the jam back up to a full rolling boil again, and boil hard for one minute. Then remove from the heat. Congratulations, you made jam!
Wholefully Protip
If you want to skip the preserving process, you can fill your jars with the jam and then just place them in the fridge. Make sure to use the jam within three weeks.
Step Three: Fill your jars and preserve.
Place a thick towel or a wooden cutting board on your workspace. Working one jar at a time, use your jar lifter to lift a hot jar out of the canner and drain the water back into the canner. Place the jar on your work surface, and then fit with the canning funnel. Ladle the jam into the jar.
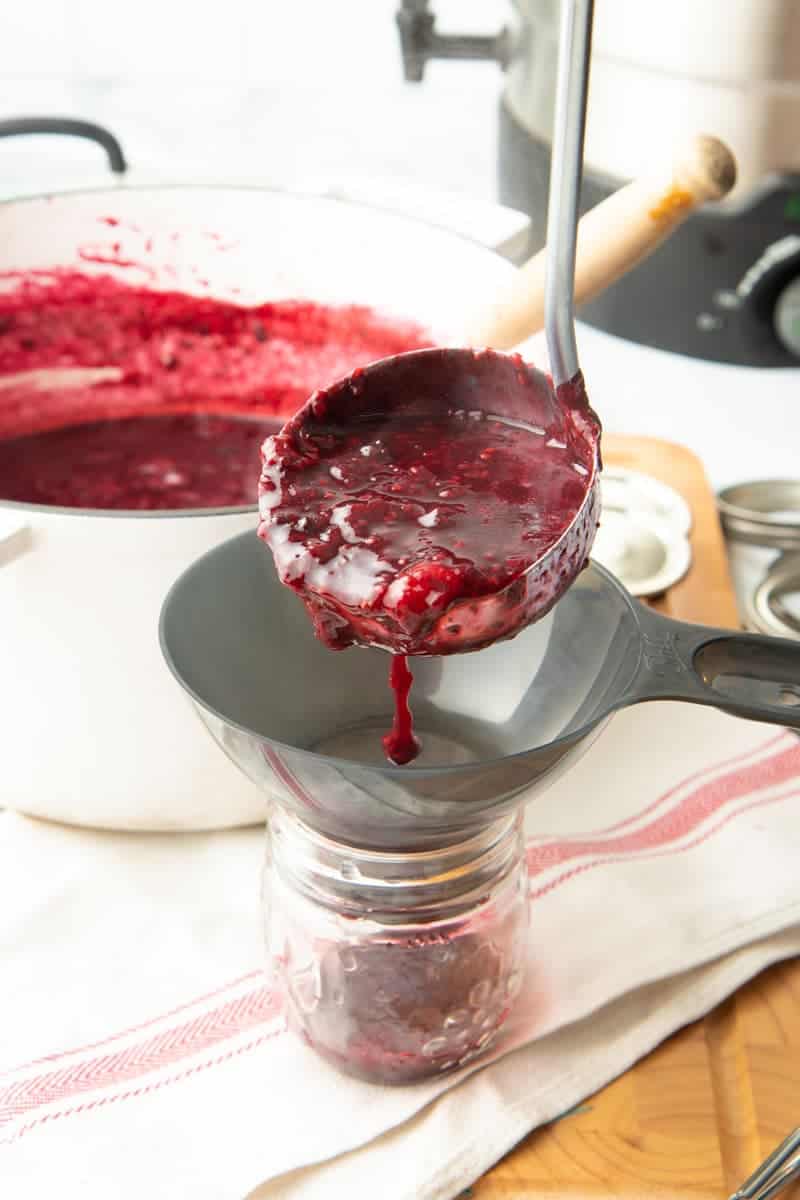
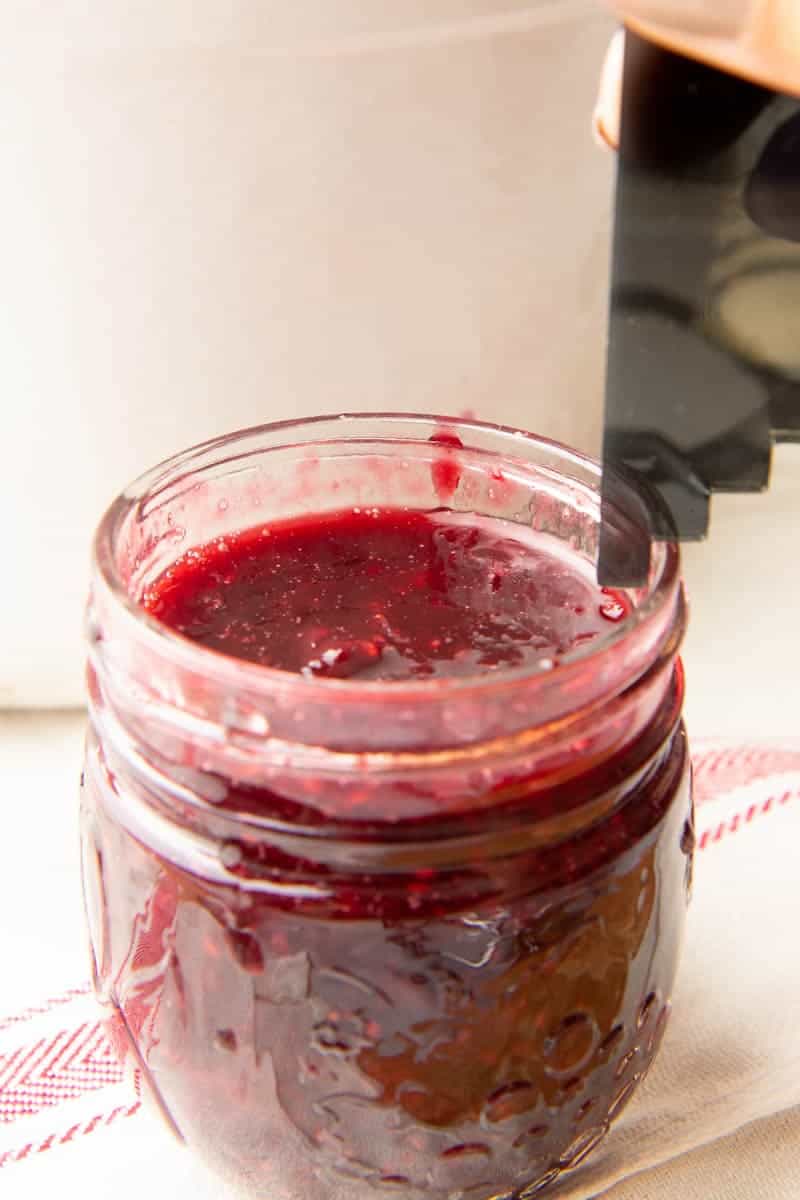
Remove the funnel from the jar, and check for headspace. With this jam recipe, you want a ¼" gap between the top of the jam and the top of the jar. You can measure this using a headspace tool or a plastic ruler reserved only for canning. Adjust the level of jam to reach the proper headspace. The jar in the picture below needs to have a little bit of jam added to it to reach the bottom of the headspace tool.
Wholefully Protip
Proper headspace (the empty space between the top of the food and the top of the jar) is important to ensure the jar seals properly. Too little headspace may cause the jars to overflow while processing and not seal. But have too much headspace, and you might not get the proper suction to seal the jars during cooling. The amount of headspace needed changes with the type of recipe, but in general, jam needs a headspace of ¼".
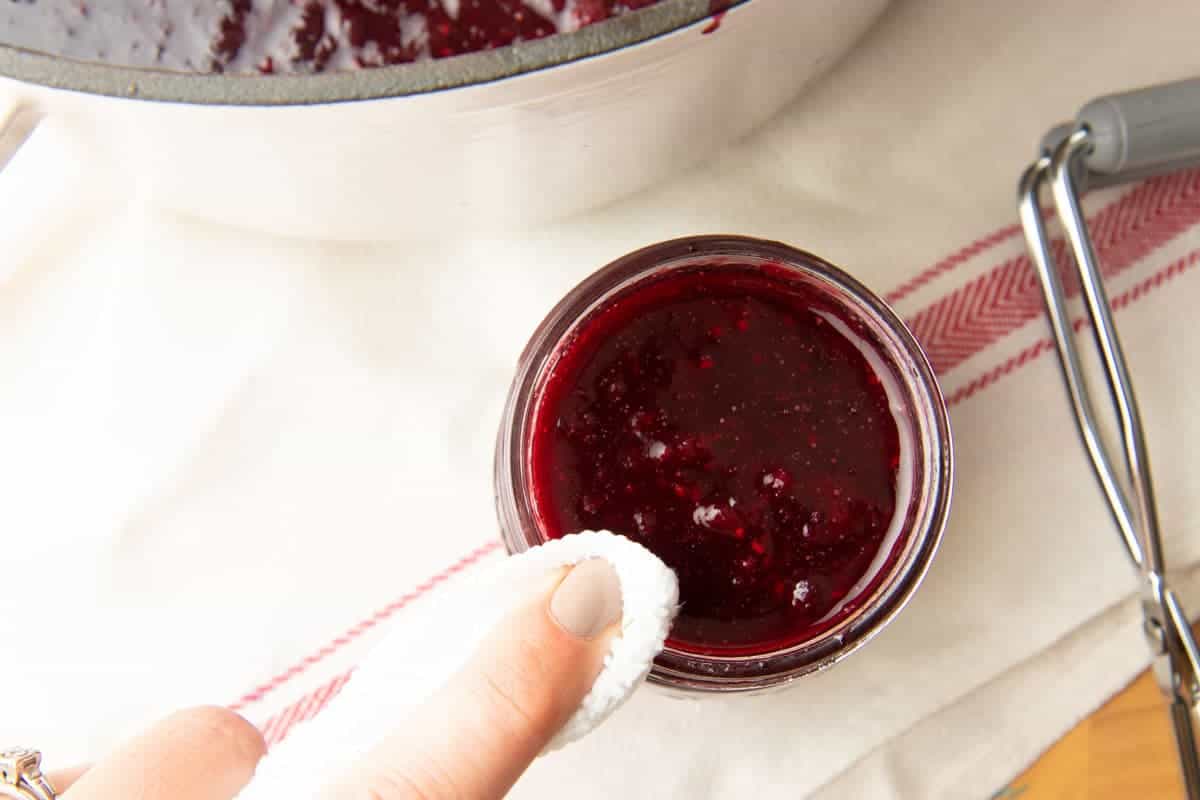
Once the headspace is correct, use a damp cloth to wipe the top of the jar clean to ensure a proper seal.
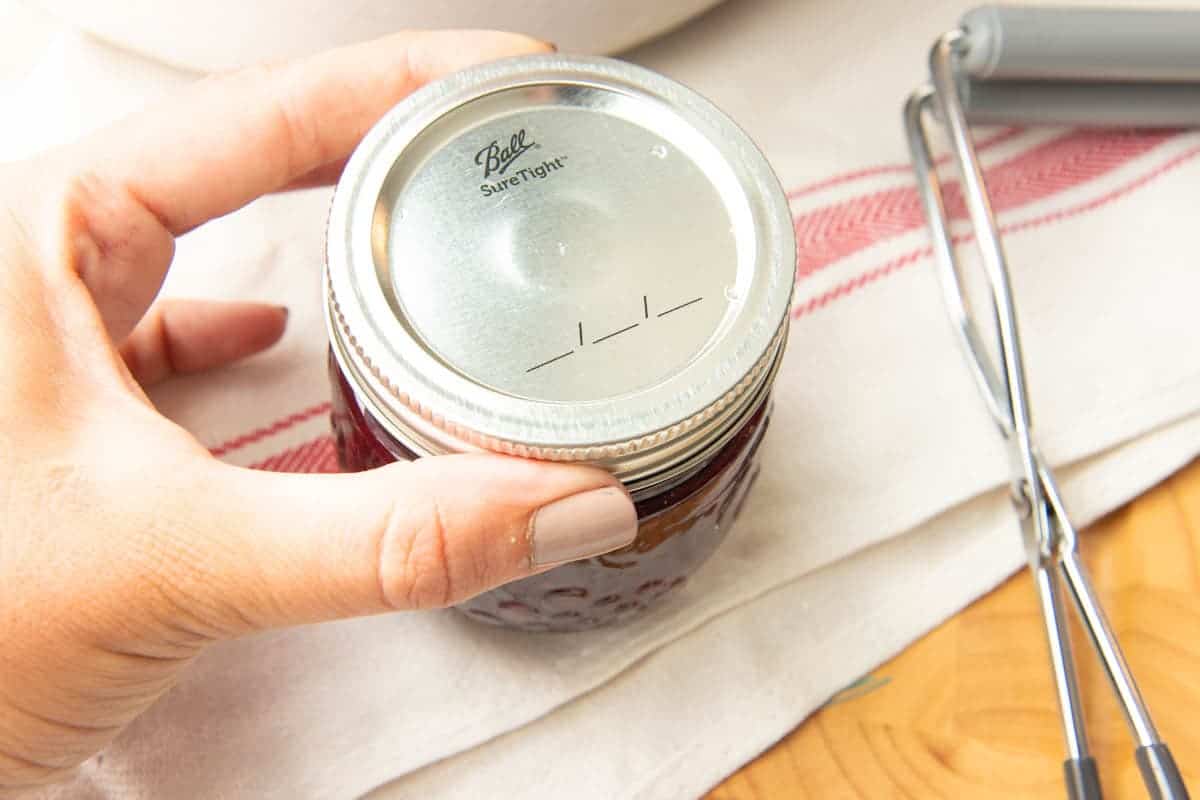
Center a flat lid on top of the jar.
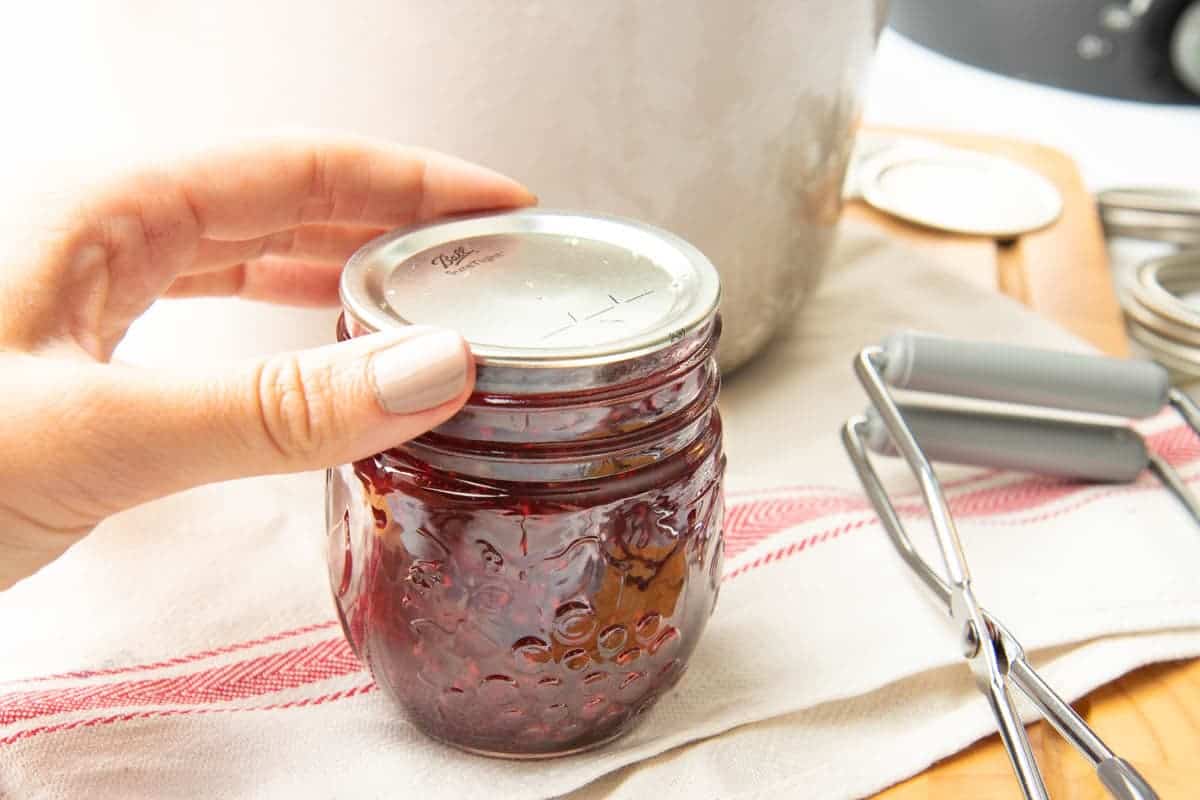
And then put on the ring and tighten until just fingertip tight
Wholefully Protip
Do not overtighten the rings on Ball® Canning Jars! They need to be tightened just to fingertip tight to process correctly.
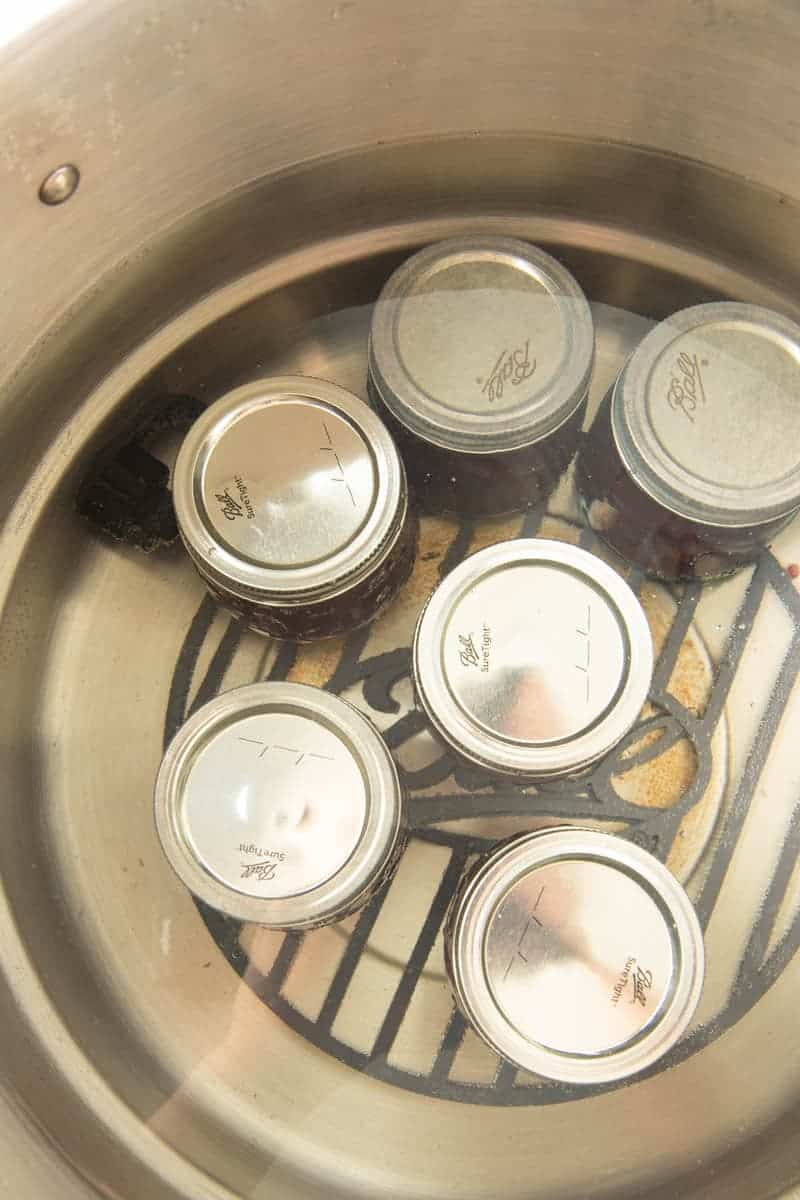
Using your jar lifter tool, place the hot jar back into the hot canner water, and repeat with the remaining jars.
Wholefully Protip
We work one jar at a time when filling to make sure to keep the jars hot. If you take all the jars out at one time, by the time you go to fill the last one, it could be cool enough to shatter when filled with the hot jam.
Once all of your jars are back in the canner, put on the lid and bring it up to a full boil over high heat. Once the canner is fully boiling, set a timer to process for 10 minutes for altitudes below 1,000 feet. If you are at a higher altitude, make sure to check Ball® Canning's High Altitude Canning Adjustments Guide.
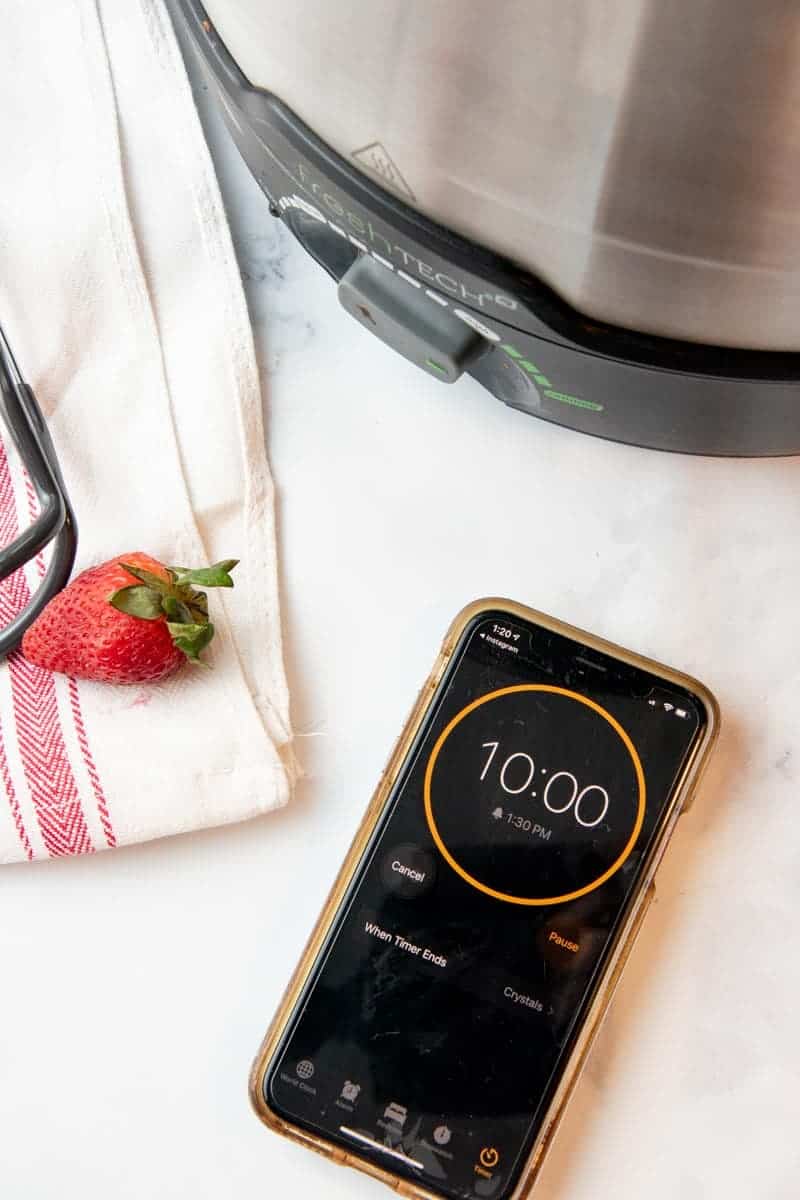
When the timer is up, turn off the heat and remove the lid from the canner. Allow the jars to rest in the canner for five minutes before moving them to a thick towel or wooden cutting board to cool and seal. Space the jars apart by an inch or two to promote cooling. After processing, the rings on the jars will have loosened, but do not retighten them.
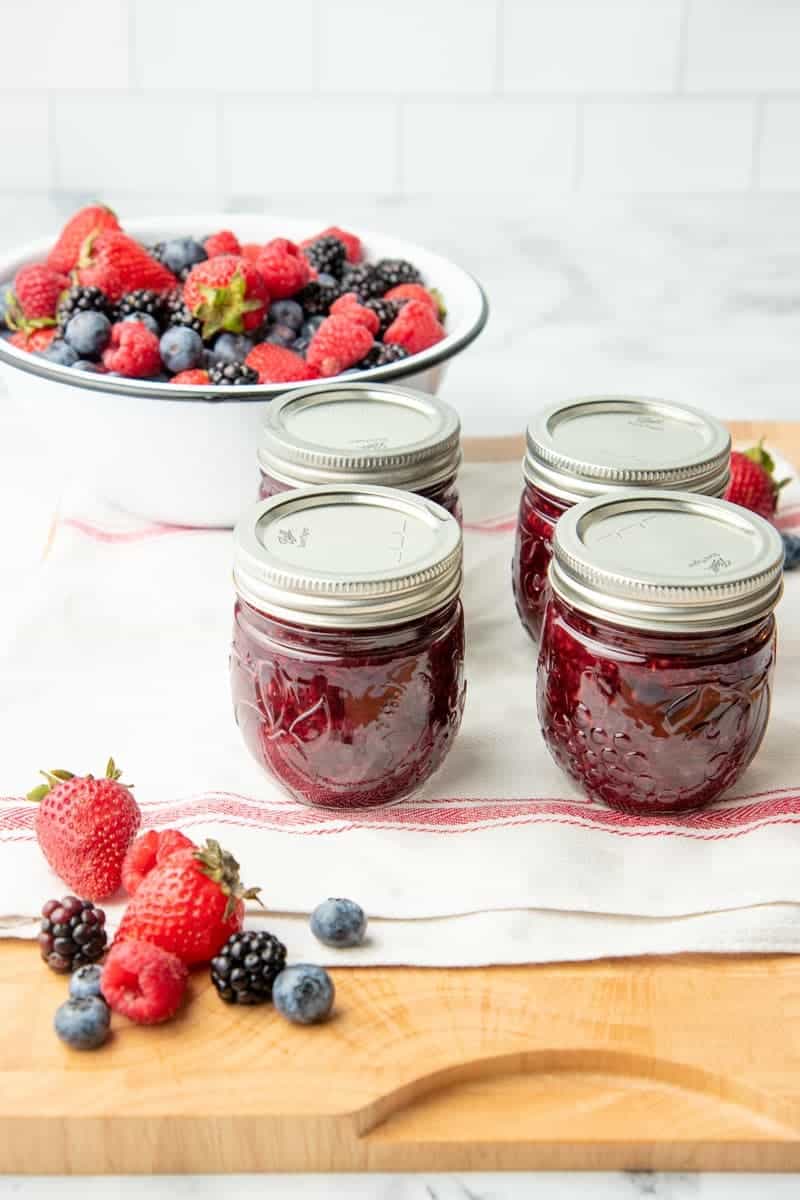
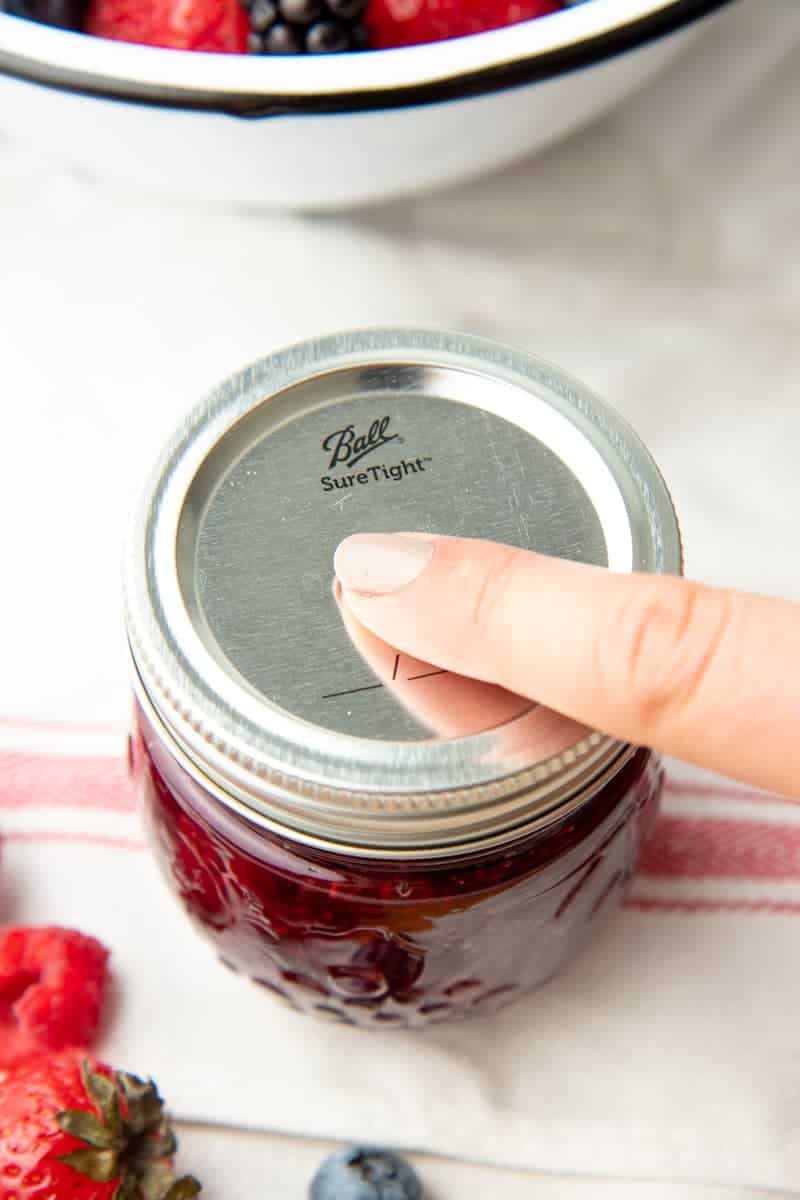
Step 4: Check the seals and enjoy!
As the jam cools, you'll hear a very satisfying "POP!" as each jar sucks in the lid and seals. After 12-24 hours, when the jam is fully cooled, check your jars for sealing by pressing a finger in the middle of the lid. If it doesn't move, it's sealed and shelf-stable. If the lid flexes, the jar didn't seal, and while it isn't shelf-stable, it's still safe to eat-just store it in the fridge.
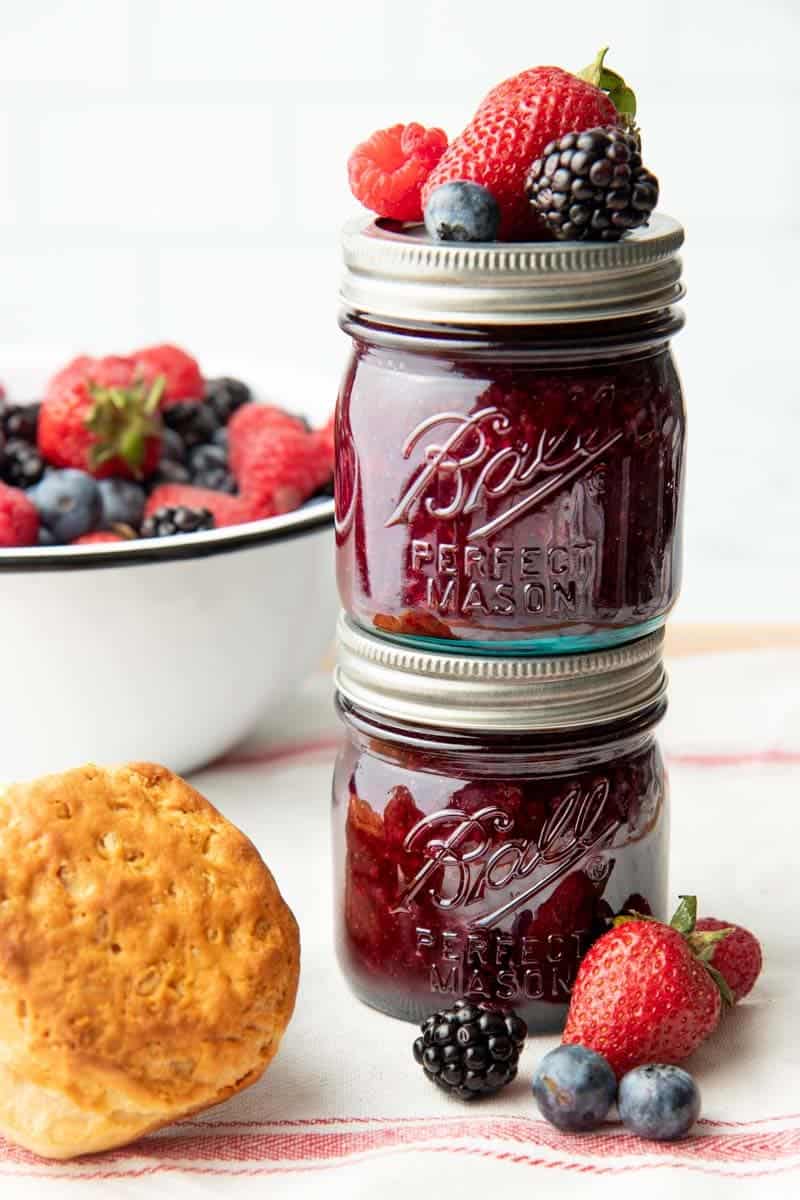
For long-term storage, remove the rings, wipe down the jars, label and date them, and store in a cool, dark location. You can get at least 18 months of storage time out of properly preserved jam.
Wholefully Protip
My favorite way to label canned goods is by writing with a permanent marker directly on the glass of the jar (you can see examples of this in our How to Can Diced Tomatoes post). It's easy to read and wipes off cleanly with a cotton ball dipped in rubbing alcohol.
Can you double this recipe?
Nope! When making jam recipes, it's important to cook it in the exact amounts listed, or you might end up with jam that doesn't set. If you want to cook multiple batches, cook each one separately-I've been known to have two or three pots of jam on the stove at once. You can process them in the canner together if you have space.
I have a glass-top or ceramic stove, is it okay to can on it?
If you have a glass-top or ceramic stove, you may have heard you can't can on it. No worries, we'll still get you canning! Some glass-top stoves are safe to can on, and you can find that out by contacting the manufacturer or checking in the manual for your stove.
If your stove is safe for canning, you need to make sure to use a canner or stockpot with a completely smooth and flat bottom to safely can. You can learn more about canning safely on a glass-top stove in this video from Ball® Canning.
If your stove isn't canning safe, you can always use the Ball® freshTECH Electric Water Bath Canner. Even though I have a gas stove at home, I use this canner because I love that it frees up space on my stove.
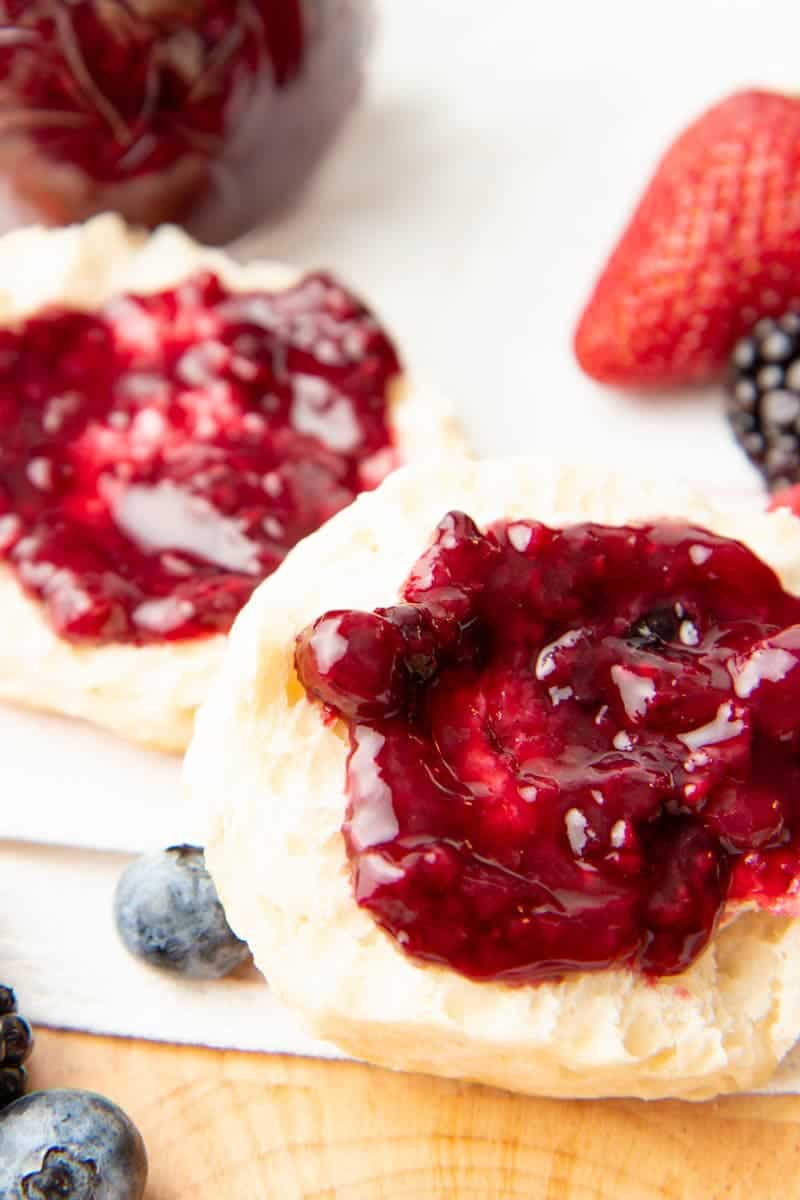
What are some ways you can use jam?
Now you have a shelf stocked with beautiful jars of Mixed Berry Jam...what do you do with it all? Here are just a few ideas for our favorite ways to use up jam:
- Spread on toast, biscuits, or English muffins
- Drizzled on pancakes or waffles
- Stuffed inside French toast or grilled cheese
- Served with a cheese board (especially with Brie)
- Swirled into yogurt or oatmeal
- Mixed into a cocktail
- Spooned into thumbprint cookies with jam
Canned jam also makes a wonderful gift! I can extra each year to stash away for quick hostess gifts, stocking stuffers, and housewarming presents. I think the Ball® Mason Jars are so beautiful, they don't need much dressing up beyond some ribbon and a tag! Enjoy.
Want more recipes like this one? Check out these favorites!
- How to Freeze Strawberries. My favorite hack for making jam is to freeze my berries while they are in season, and then using them to make jam in the fall or winter, when the garden is less active and the kitchen is a little slower. Check out our guides on how to freeze blueberries and how to freeze cherries, too!
- Strawberry Jam Without Pectin. This little jam recipe only calls for two ingredients, and will give you maximum strawberry flavor.
- How to Make Fruit Wine. Wine is shockingly easy to make, and our strawberry wine guide will walk you through the method, step-by-step. We have a blueberry wine option too!
- Dilly Beans. This pickle recipe is perfect for people brand-new to canning, because you don't have to worry about gelling like you do with jam. We love dilly beans!
- Bread and Butter Pickles. If you aren't big on dill pickle flavors, try these sweeter bread and butter pickles instead!
📖 Recipe
Mixed Berry Agave Jam for Canning
Ingredients
- 4 cups crushed mixed berries from fresh or thawed frozen
- 1 ½ tablespoons bottled lemon juice
- 3 tablespoons Ball RealFruit™ Low or No-Sugar Needed Pectin
- ¾ cup agave syrup
Instructions
- Prepare boiling water canner. Heat jars in simmering water until ready to use, but do not boil. Wash lids in warm soapy water and set aside with bands.
- Place crushed berries and lemon juice in a saucepan. Sprinkle pectin evenly over berries and bring mixture to a full rolling boil that cannot be stirred down, over high heat, stirring constantly.
- Whisk in agave syrup. Return mixture to a full rolling boil. Boil hard 1 minute, stirring constantly. Remove from heat. Skim foam if necessary.
- Ladle hot jam into a hot jar, leaving a ¼-inch headspace. Remove air bubbles. Wipe jar rim. Center lid on jar and apply band, adjusting to fingertip tight. Place jar in boiling water canner. Repeat until all jars are filled.
- Process jars 10 minutes, adjusting for altitude. Turn off heat, remove lid, and let jars stand 5 minutes. Remove jars and cool 12-24 hours. Check lids for seal-they should not flex when center is pressed.
Video

Hi, I was wondering if I can double this recipe and still be safe for canning.
It's going to be a lot harder to get the jam to set properly if you double the recipe. Instead, we recommend doing two regular-size batches if you want double the jam!
First time using agave recipe. It does not seem to be setting. Anything I can do to save the batch? My 4 year old grandson has c sis and cannot process sugar. I made it for him!
Hi Barbara! Thanks so much for your patience as our offices were closed for the end of the year. The best thing to do if it's not gelling is to continue cooking it! Sometimes it can take a while for it to come up to a hard boil. You want it to be at the point where it can't be stirred down. Then you continue boiling it hard until it sets up when you test it. You can start testing it after a minute, then check every minute or two after until it reaches the consistency you want! We like putting a plate in the freezer and testing our jams and jellies by spooning a bit onto the frozen plate. If it sets up, it's ready! If it's still too runny, we keep boiling! I hope this helps. Please let me know if you'd like to troubleshoot further. I'm happy to help =)
OMG! I am sooo happy to have stumbled onto your site/blog! I've never canned before but have wanted to & reading your helpful info has inspired me. I'm going to be gathering all the equipment I need & will be canning some of your recipes - this one & I can't wait to try the salted cantaloupe jam! Being from the Deep South originally, cantaloupe was something we ate a lot of - and peaches, too! My grandmother used to can all the time when I was young but never thought to ask her how or watch the procedure. She's gone now & so is her knowledge & recipes but, thankfully, I found you & your inspiration.
Thank you Cassie. I've wondered through your site & I really like what I've seen. I have you bookmarked for sure. And, I'm excited to start canning!
Thanks for sharing your story with us, Tricia! We're so excited to be an inspiration for your canning journey! We hope you love the recipes. Please let us know how they turn out for you. =)
Can I use another sweetener besides agave? Fresh lemon juice rather than bottled?
Sorry, but no! This recipe hasn't been tested with any other sweeteners, so we can't guarantee that it would be safe for canning. Fresh lemon juice doesn't have as consistent of an acidity, so bottled lemon juice is best.