
How to Make Fruit Wines + Strawberry Wine Recipe


My husband and father are beer home brewers. I've watched them devote entire Saturdays to the process of brewing beer. While I loved drinking the results, I was never interested in devoting all that time to brewing beer.
For years, I just assumed that making wine required the same amount of investment in time and equipment as beer brewing. But turns out-it doesn't! You can make a batch of strawberry wine with less than 15 minutes of hands-on time. And you can be sipping it on your front porch just a few weeks later. Making fruit wines (or country wines) is now one of my favorite hobbies, and I'm so excited to share it with you!
Today, I'm going to share with you a recipe for a classic Homemade Strawberry Wine, plus walk you through the entire process for making fruit wine. You can apply these same tools and processes to almost any fruit out there, so once you've nailed down Strawberry Wine (a great wine for beginners), you can let your imagination-and what's in season-inspire your next batch.
Read me: an important winemaking caveat!
Like most things in life, the craft of home winemaking falls on a wide spectrum. On one end, you have the folks who love to dive all in-they spend hundreds of dollars on special tools, they sanitize everything using synthetic chemicals, they take scientific records, they use very specific winemaking additives. On the other hand, there is what I like to call "heritage" winemakers. These people use barely nothing more than a clean canning jar, fruit, water, and some sugar-after all, that's the way folks have been making wine for generations. And then there are all of us who fall somewhere in between on the spectrum.
Wholefully Protip
If you get into winemaking, it's important to figure out how to make the process work for you! Experiment, and drink your mistakes!
The moral of this story is that there are a million and one combinations for how you can make a "good" bottle of wine. I'm going to write out how we do it in our home, but that absolutely isn't the only (or even the best) way to do it. Throughout this post, you'll see a theme of me giving you multiple ways to achieve the same result-think of it as an opportunity to try out what method works best for you.
What tools do you need to make fruit wine at home?
You can really go all out with tools when it comes to winemaking, but here is the bare minimum of what I suggest you have on hand to do your first batch of strawberry wine. You can easily get started making wine for under $60.
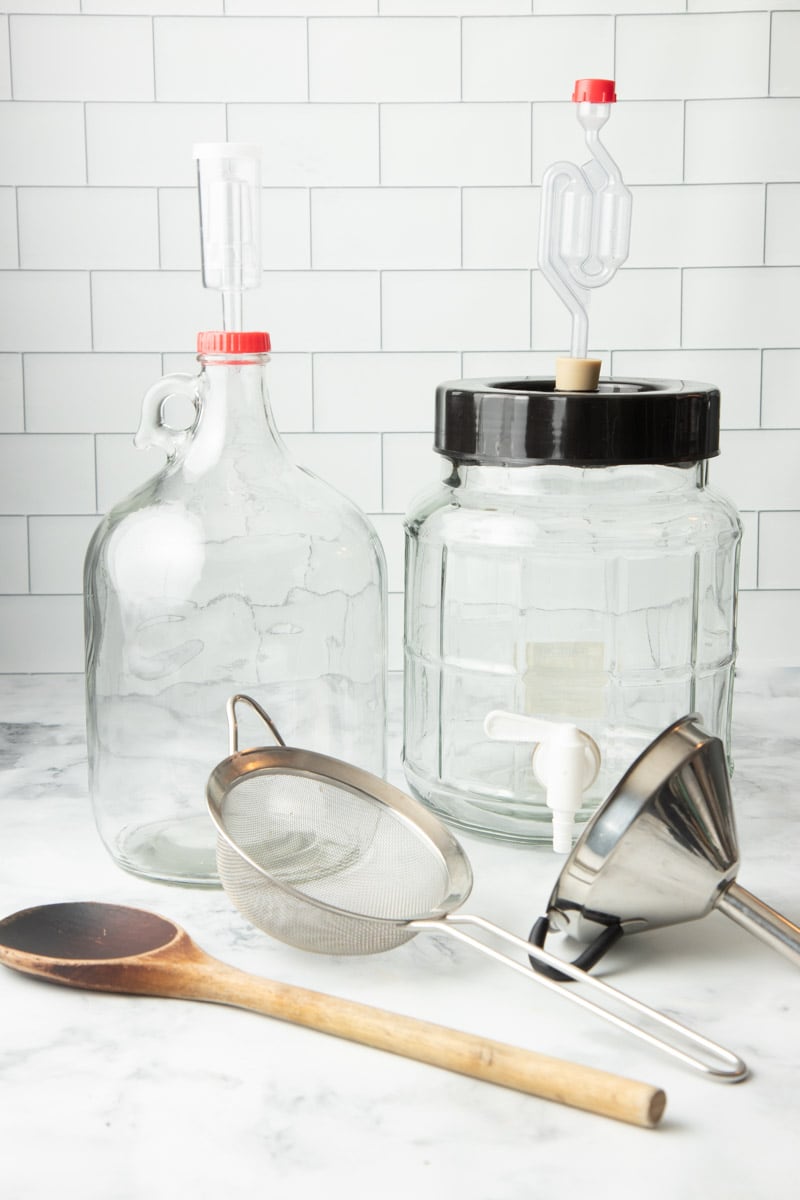
A primary fermentation container:
This should be a big bucket, a large jar, a crock, or specifically designed fermenter-which is what we use and will be showing in this post.
The size is important. I recommend it be at least 40% bigger in volume than what you'd like your final amount of wine to be. Why? Because your primary fermentation will have fresh fruit in it, which we'll later filter out. Also: during the initial fermentation, the yeast can get quite overzealous, and you'll need room for all the bubbles-plus, extra room gives the yeast extra oxygen to work with! The strawberry wine recipe below is for a one gallon batch, so your primary fermentation container needs to be at least 1.4 gallons in size.
A carboy for secondary fermentation:
This is simply a big ole glass jug! We brew almost exclusively in one gallon batches at our house, so we have an entire fleet of one gallon carboys. You can purchase them in a bundle with an airlock and cork. They also come in much larger sizes if you want to do big batches-five gallon is a common carboy size. The shape of the carboy is important-the narrow neck reduces the surface area of wine exposed to oxygen during secondary fermentation, which is good!
Wholefully Protip
Some folks use a carboy for both primary and secondary fermentation. We've found it much easier (and less messy) to have a large, wide-mouth container for primary fermentation when working with whole fruits-plus, the primary fermentation container can double as a bottling bucket.
An airlock:
Strictly speaking, you don't necessarily need an airlock to be successful at winemaking, but they make it a lot easier and they are incredibly affordable (less than $3 each). An airlock allows the brew to release the carbon dioxide it's producing during fermentation, without allowing oxygen, microbes, or bugs into your wine.
Bottling equipment:
How you bottle your wine is a personal decision! We prefer to use flip-top style glass bottles because it's easy and we have them on hand. You can purchase a corker and do new or recycled wine bottles (we use these half-size wine bottles for gifting, and they are adorable). You can even just stash your wine in mason jars!
When it's time to bottle or transfer your wine (called "racking"-more on that in a bit), a siphon/bottle filler is another item that isn't an absolute necessity, but will make your life way easier. This helps you transfer the wine from one container to another without disturbing the sediment, and helps you bottle much easier. You'll also need some sort of container to bottle from that has a spigot on it. Some folks buy a special bottling bucket, but we just use our primary fermenter.
Wholefully Protip
Everything else you'll need for winemaking (spoons, funnels, sieves, etc.) are standard kitchen wares that you probably already have kicking around.
What kind of airlock should I buy?
You'll see two different kinds of airlocks out there-the 3-piece airlock and the twin S-bubbler. Both work just fine for making wine. The only real advantage here is that it's slightly easier to see bubbles moving (which means you can keep an eye on how active your fermentation is) on the S-bubbler. I have and use both kinds.
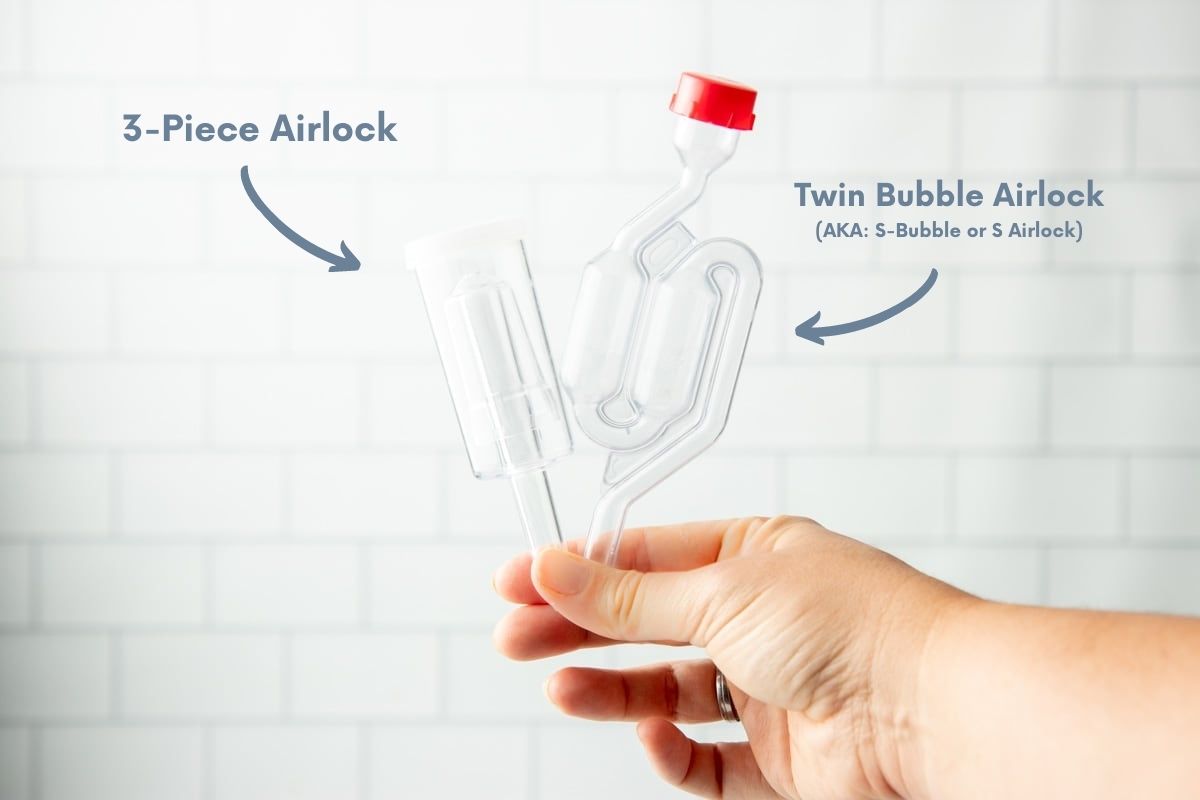
You will need a stopper or cap with a hole to affix the airlock to the top of your carboy or fermentation container, so make sure to grab that, too. They are often sold together in sets.
Wholefully Protip
Both kinds of airlock need to be filled to the line on the side with water to operate properly. Make sure your airlock always has water during fermentation.
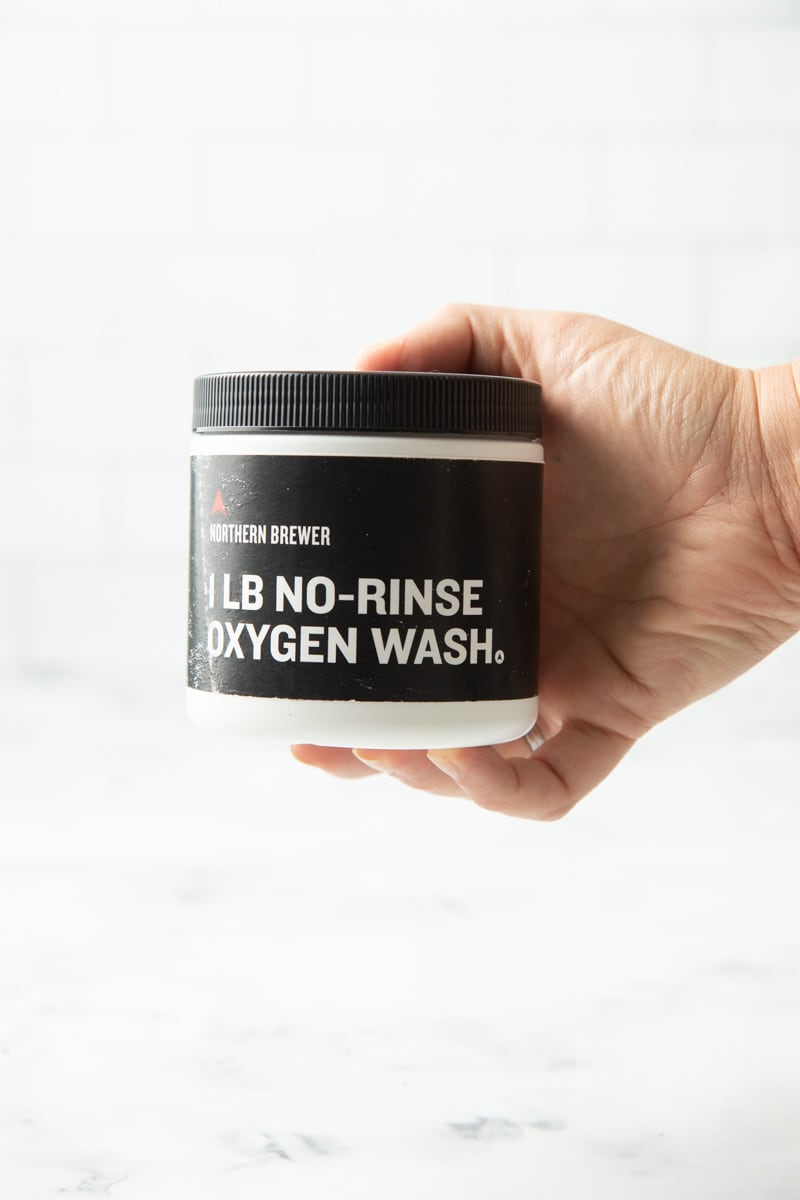
How do you sanitize all the tools?
Level of sanitization is one of those things that falls on a wide spectrum. Some folks prefer to absolutely blast their tools with synthetic chemical sanitizers (Star San is a common one that folks use) before making wine to kill any yeast or bacteria that might impact the flavor of their wine. On the other end of the spectrum, some people don't even wash the spoon they use to stir so it'll keep the same yeast on it from batch to batch!
Like most things in my life, I stick to the middle path. We make sure all of our tools are cleaned very well with soap and hot water. Plus we use an oxygen wash (which is just a form of hydrogen peroxide) as an extra layer of sanitization before making our wine.
What ingredients do you need to make fruit wine?
Alright, now onto the actual ingredients that make the magic happen. Here you can go as simple or as fancy as you like, but you'll at least need:
Fruit
I highly recommend using fresh, in-season fruit that is frozen first. Why freeze it first? The process of freezing helps to break down the cell structure of the fruit so it can release its juices easier. In other words, freezing makes fruit mushy (which is good in this case)!
Wholefully Protip
I prefer frozen fruit because it releases the juices easier, but fresh fruit will work, too.
Sugar
This is the time to whip out a big bag of organic cane sugar! You'll use a lot of sugar here, but don't freak out-your goal is to feed the yeast so they turn that sugar into alcohol. You can add two pounds of sugar to a batch of wine and still get an incredibly tart and dry wine because the yeast ate it all!
If you are tempted to swap out the sugar for another sweetener (say honey), that's fine, but just be aware that you are now making a different kind of alcoholic beverage (sugar=wine, honey=mead, maple syrup=acerglyn) and the process might be slightly different. We're sticking with sugar for this post.
Water
The type of water you use to make your wine is important. Chlorinated tap water (especially over chlorinated) can inhibit or even kill your yeast-so I always use filtered water. I use water straight from our Berkey water filter. Jugs of spring water from the store will also do the trick.
Wholefully Protip
Some folks report using their chlorinated tap water for winemaking with no issues, so feel free to experiment if you'd like.
Yeast
These little babies are the magic that turns the three ingredients above into wine! There are two ways to go about procuring yeast for your wine project:
- Wild yeast: The OG way to make wine-by embracing the yeast that's already on the fruit and in the air around you! This is a really fun way to make wine, and if you are interested in it, I highly recommend checking out The Wildcrafting Brewer for a deep dive on the method. We've done a few batches with wild yeast, and it's fun to see how different it turns out depending on what yeast inoculated your batch!
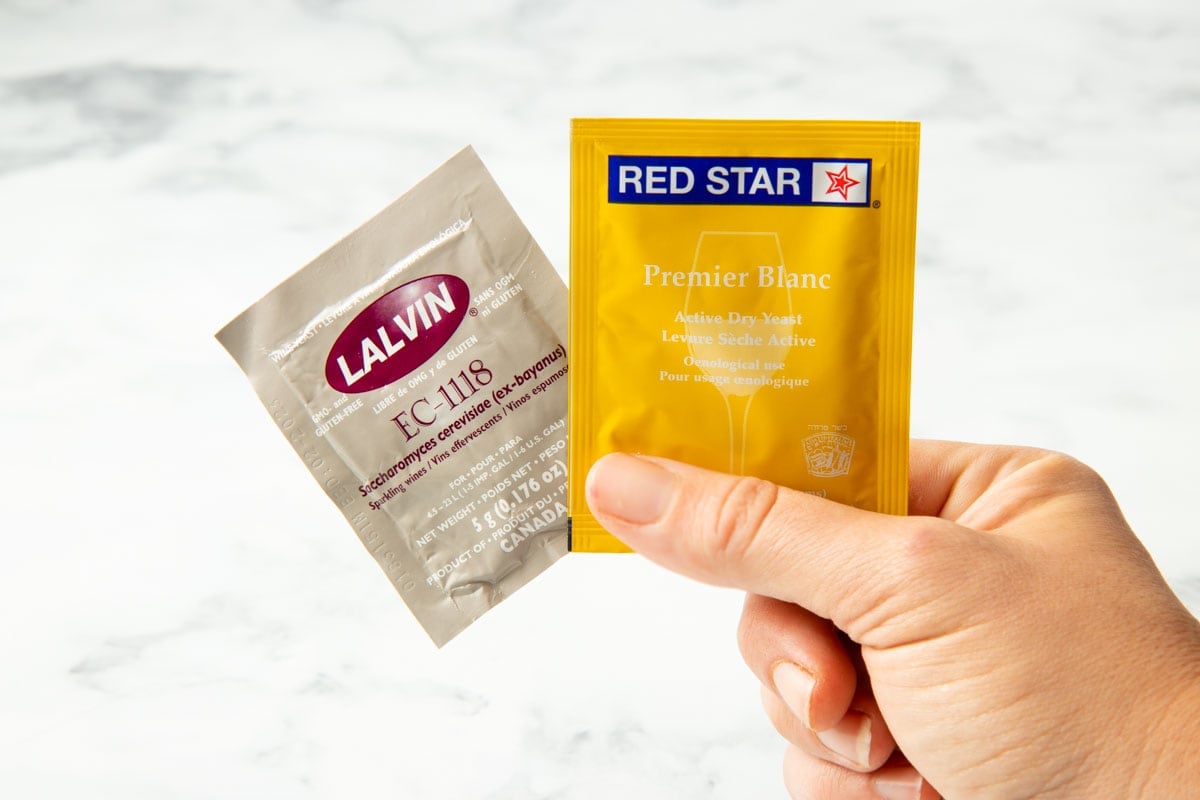
- Purchased winemaking yeast: For a consistent, standardized wine making experience, you'll want to use purchased winemaking yeast-it's where I recommend winemaking newbies start. Winemaking yeast comes in little packets just like bread yeast. There are a ton of different strains you can try that impart different flavors, alcohol levels, fermentation styles, and other qualities (and we recommend experimenting with them). These two are our favorites for fruit wine making because of their neutral flavor, high activity, ease of use, and high final alcohol levels-Lalvin EC-118 and Red Star Premier Blanc.
Wine Additives
Those four ingredients above are really all you absolutely need to make a batch of country wine (and are all that folks have used for generations to do so). But eventually, people realized that the flavor, appearance, and process of wine is improved with some additives-most of the additives mimic characteristics in traditional grape wines.
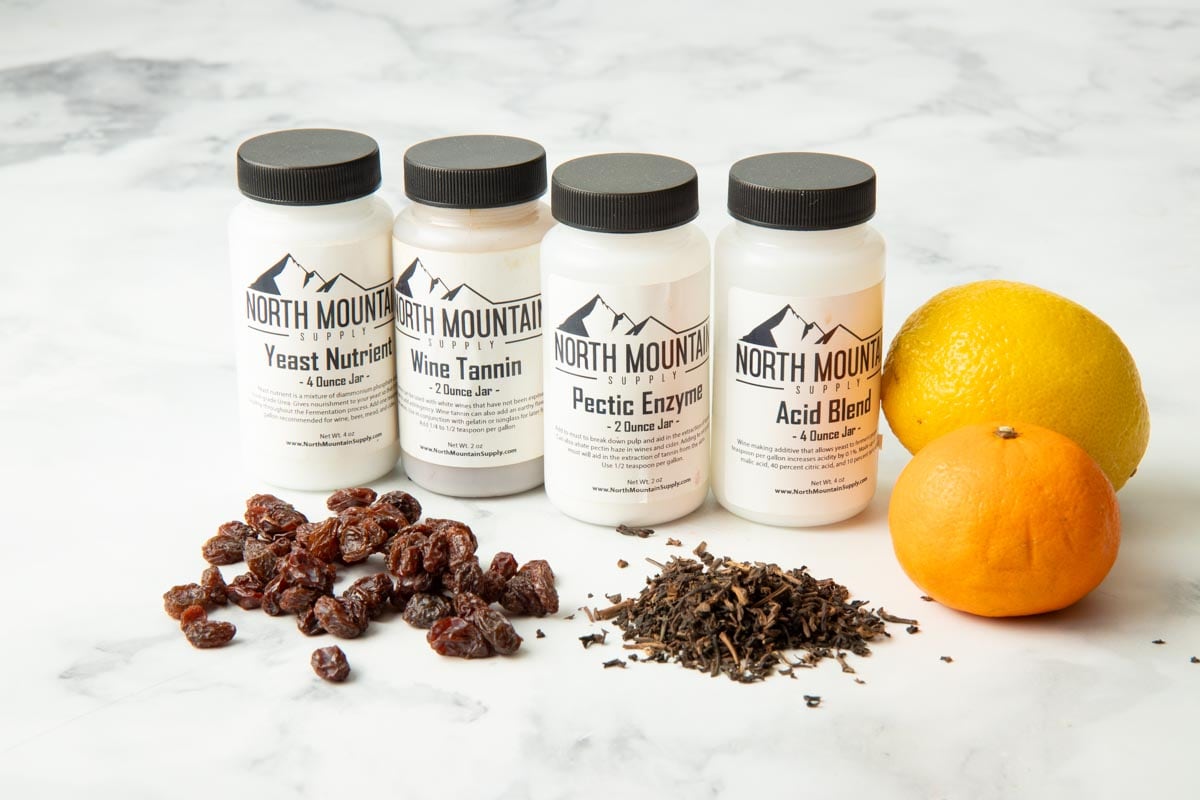
With almost all wine additives there are both natural and purchased/synthetic ways to achieve the same result. Here are the most common ones:
- Tannin: Have you ever brewed a cup of black tea too strongly and it has mouth-puckering astringency? That's tannin. You might not think you want that in your strawberry wine, but a little bit of tannin can help balance out fruity sweetness and add an interesting layer of earthy flavor. You can add tannin by using purchased Wine Tannin or by just adding a cup or two of strongly brewed black tea.
- Yeast nutrient: Yeast love to eat sugar, but they also need other nutrients (like folic acid, magnesium, and others) to help them thrive. Many fruits provide enough of the nutrients so you don't need to add yeast nutrient. But if your fermentation is sluggish (we had this happen when we made blueberry wine), you can add purchased Yeast Nutrient to reactivate the fermentation. Some people swear that organic raisins can replace yeast nutrient, but the jury is still out on that.
- Acid: A little bit of acid is a great way to add another layer of flavor to fruity wines. Fruit wines without acid tend to have a harsh flavor. You can add purchased Acid Blend or any type of citrus fruit juice and peel that works well with your flavor profile.
- Pectic Enzyme: This is a common additive that doesn't have a non-purchased alternative, but that works, because it's also not absolutely vital. Pectic Enzyme helps to break down the pectin in the fruit, which makes it easier for the fruit to break down. This makes it easier to extract the juice, the tannin, and the nutrients from the fruit, and it also means the final result of your wine is much clearer. We tend to use pectic enzymes for fruits that are harder to mash (like rhubarb) and when we are making batches for gifting (to get that beautiful clear appearance). We don't use it in every batch.
Wholefully Protip
The benefit of using purchased wine additives is that it's easier to get precise consistency from batch to batch of wine.
Another common wine additive are Campden tablets. They are sodium or potassium metabisulfite tablets that are used to sterilize wine at various stages during the winemaking process. I personally don't use them (see more on that in the FAQs below), but a lot of folks do!
What kind of fruit can you use to make wine?
Almost anything! Berries and stone fruits (peaches, plums, cherries, etc.) are common, but I've seen onion wines, tomato wines, banana wines-it really is only limited by your imagination. Herb and spice wines are something we love in our house, too-lemon balm, peppermint, even basil!
What's a general formula for making fruit wine from any kind of fruit?
Making wine is more of an art than a science, which means it takes some experimentation to nail down exactly what works for you and your tastebuds, but as a general rule of thumb, you can use this formula for a one gallon batch of fruit wine:
3 pounds of fresh or frozen fruit + 2-3 pounds of cane sugar + 1 gallon of water + Yeast and desired additives
How do you make a dry wine versus a sweet wine?
The final sweetness of your wine is determined mostly by two factors: how much sugar you add (of course) and how much sugar your yeast can eat. Different strains of yeast can consume different amounts of sugar before they peter out and die in the alcohol that they've made.
For an example, let's walk through two different kinds of yeast in a wine batch.
- Yeast A can survive to 12% alcohol content. This yeast will eat some of the sugar you add, die off once the wine reaches 12% alcohol, and then the rest of the sugar will be leftover for the wine to taste sweet.
- Yeast B can survive to 18% alcohol content. It eats all three pounds of that sugar before dying off (or running out of food), and you end up with a dry wine.
Wholefully Protip
Without sterilization and added preservatives, homemade wines need to be at least 14% alcohol content to be shelf-stable. To achieve this, you need to add at least 2 ½ pounds of sugar per gallon batch, plus use a yeast with an 14% or higher alcohol tolerance.
I recommend starting with one kind of middle-of-the-road alcohol-tolerant yeast and setting a baseline amount of sugar to add (2-3 pounds is a good amount for one gallon batch). Red Star Premier Blanc has an 14% alcohol tolerance and is a good place to start. Then you can adjust how much sugar to add based on your own taste preferences from there.
How do you make strawberry wine (or any fruit wine)?
Alright, now we're going to dive into the exact method we use for making fruit wines in our house. The photos here show us making a batch of homemade strawberry wine from strawberries we picked at a local farm and then froze.
Step 1: Start the Must
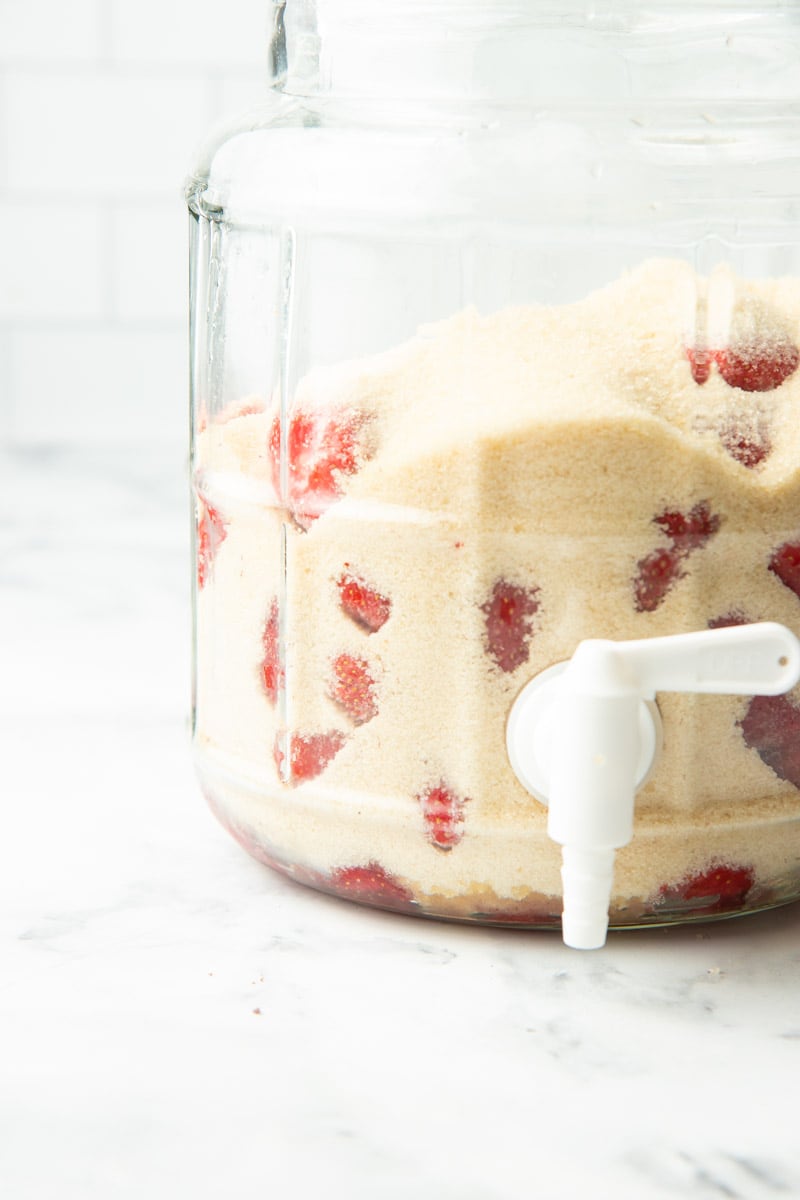
In winemaking circles, must is the term you use for the mashed up whole fruit and juice you use in winemaking. There are a lot of ways to make a must (stomping on grapes, anyone?) but my favorite method is to use frozen fruit-which helps break down the cell structure of the fruit-and macerate it by soaking the fruit in sugar for a few hours. This works pretty well for all berries and hard skinned fruits.
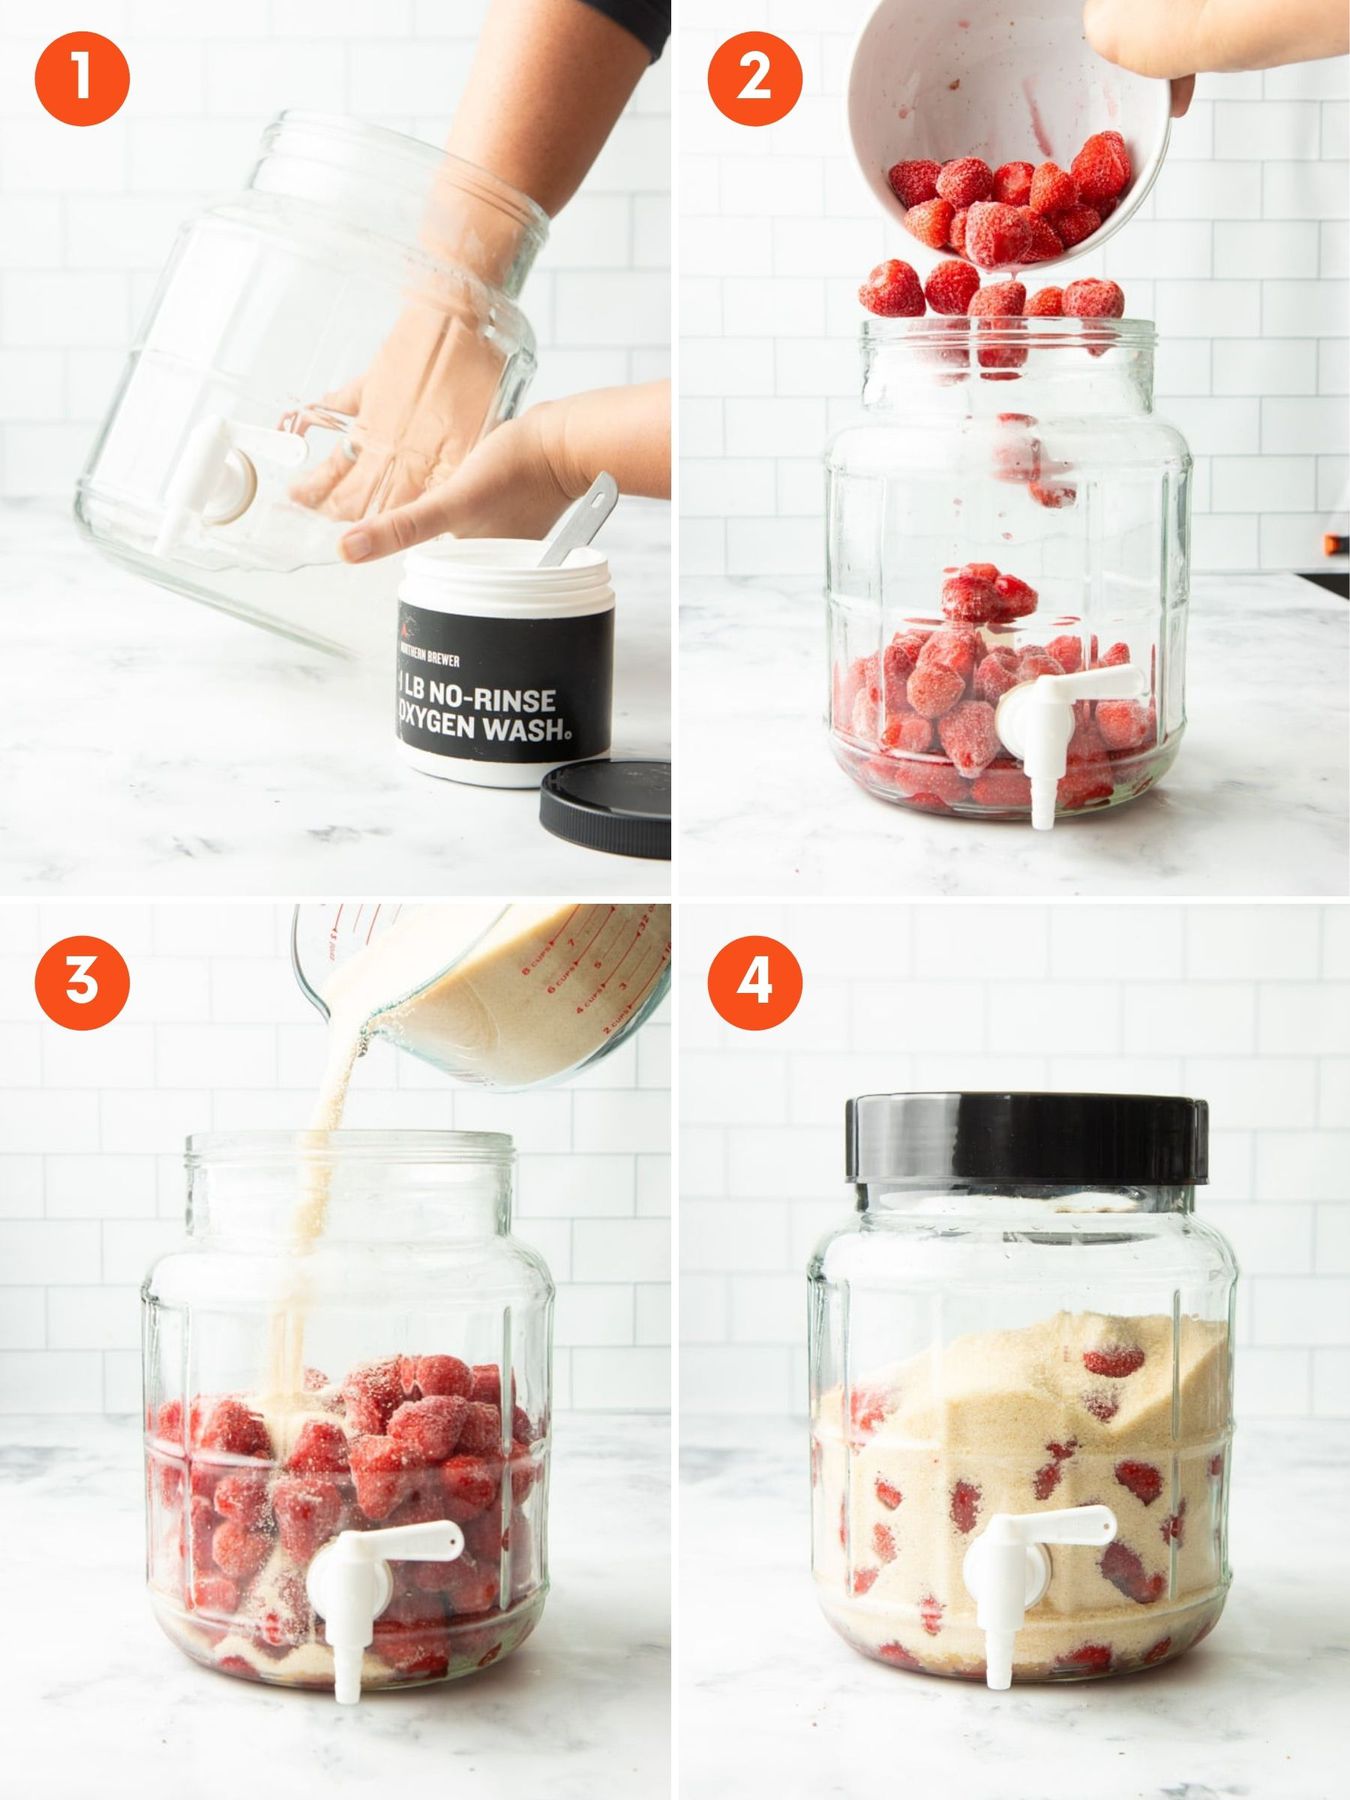
- Sanitize your equipment to your preferred levels of sanitization.
- Add your frozen fruit to the primary fermentation container.
- Cover the fruit with the sugar-it'll look like an obscene amount! This would also be the time to add your Pectic Enzyme if you are using it.
- Cover the fermentation container, and set aside for at least a few hours, up to 24 hours.
The fruit will begin to defrost and combine with the sugar, and the maceration process (which is destroying the structure of the fruit by making it sit in its own juices) will start to break everything down. Feel free to stir the whole mixture a few times with a clean spoon if you like-although it's not necessary. After 24 hours, the mixture will look quite different!
Step 2: Make the Wine
Next up is the actual winemaking process. It'll take you less than 10 minutes worth of active time!
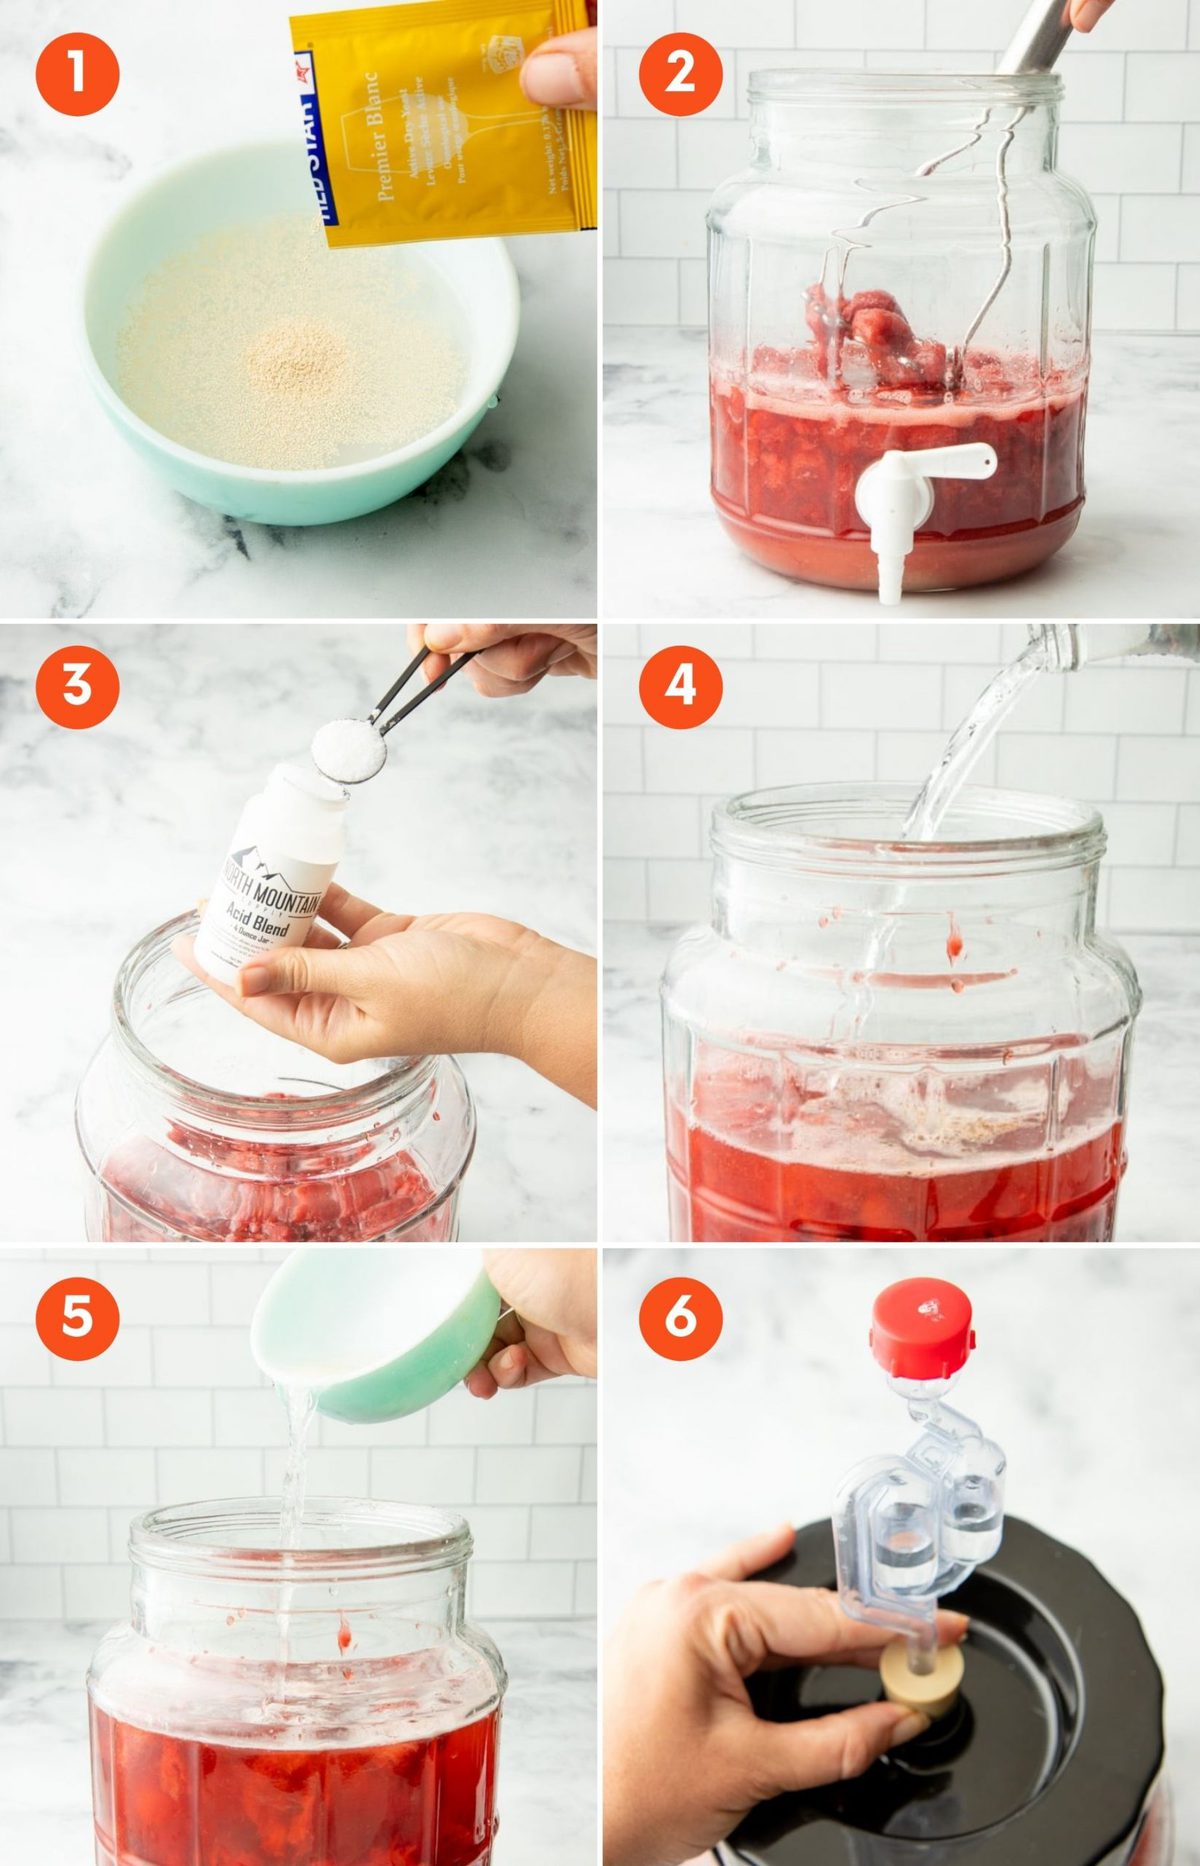
- Start by waking up your yeast. Mix the wine yeast with some non-chlorinated water in a small bowl. Set aside.
- Using a berry masher or clean hands, mash up all the fruit to finish making the must. It doesn't have to be perfectly smooth, just break it up pretty well.
- Add in your preferred additives. For this strawberry wine, I'm using purchased acid blend and wine tannin.
- Add in enough non-chlorinated water to bring your total volume (including the fruit in the must) to about 30% more than your final desired amount-so for a one gallon batch, that'd be 1.3 gallons. You don't have to be exact here. If you have too little later on, you can top it off with more water, and if you have too much, you can enjoy a preview sip!
- Pitch in the yeast and water mixture. Stir well. Don't worry if not all the sugar is dissolved.
- Close the fermenter and fit it with an airlock filled with water.
Place the fermenter in a spot out of direct sunlight, but don't put it too out of the way. During primary fermentation (the first 1-2 weeks), you'll want to check on it daily.
Wholefully Protip
Some people put the fruit must inside a brew bag inside of the fermenter for easy straining later. I like to let my fruit roam free inside the wine because I think you get a stronger flavor.
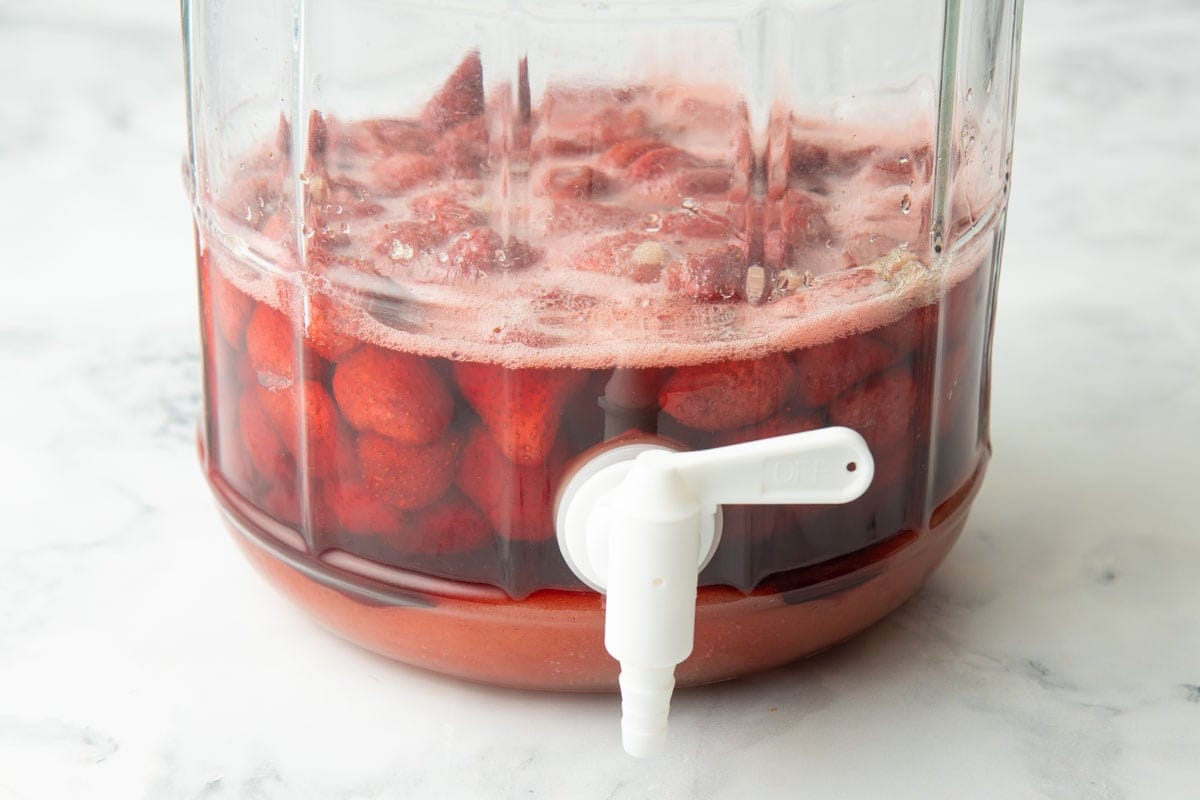
Step 3: Primary Fermentation
Then, you wait for action! Agitate the wine mixture at least once a day (twice is better) by either swirling the whole container or removing the lid and stirring it well. You'll know fermentation has started when you start to see fine bubbles moving up the side of the fermenter and the airlock starts bubbling.
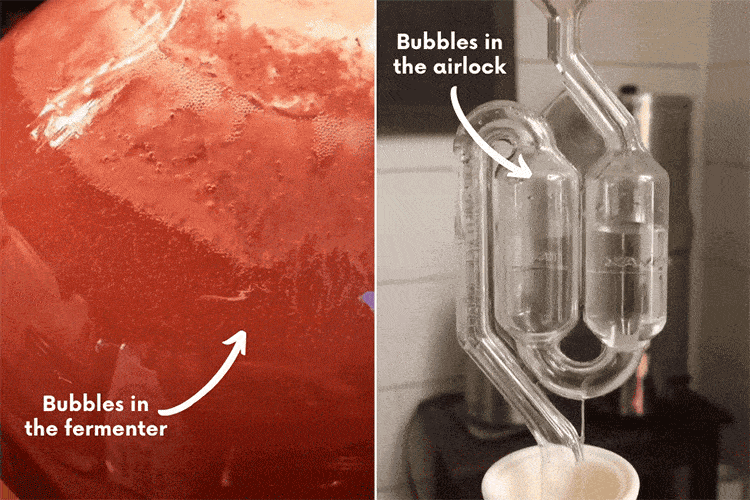
Depending on the temperature of where your fermenter is (warmer rooms = faster start), it can take as little as a few hours or as long as two to three days for fermentation to get started. But once it gets started-watch out! Primary fermentation can be quite active on fruit wines like this strawberry wine. You'll want to keep an eye on your container to make sure the bubbles aren't overflowing or taking over the airlock.
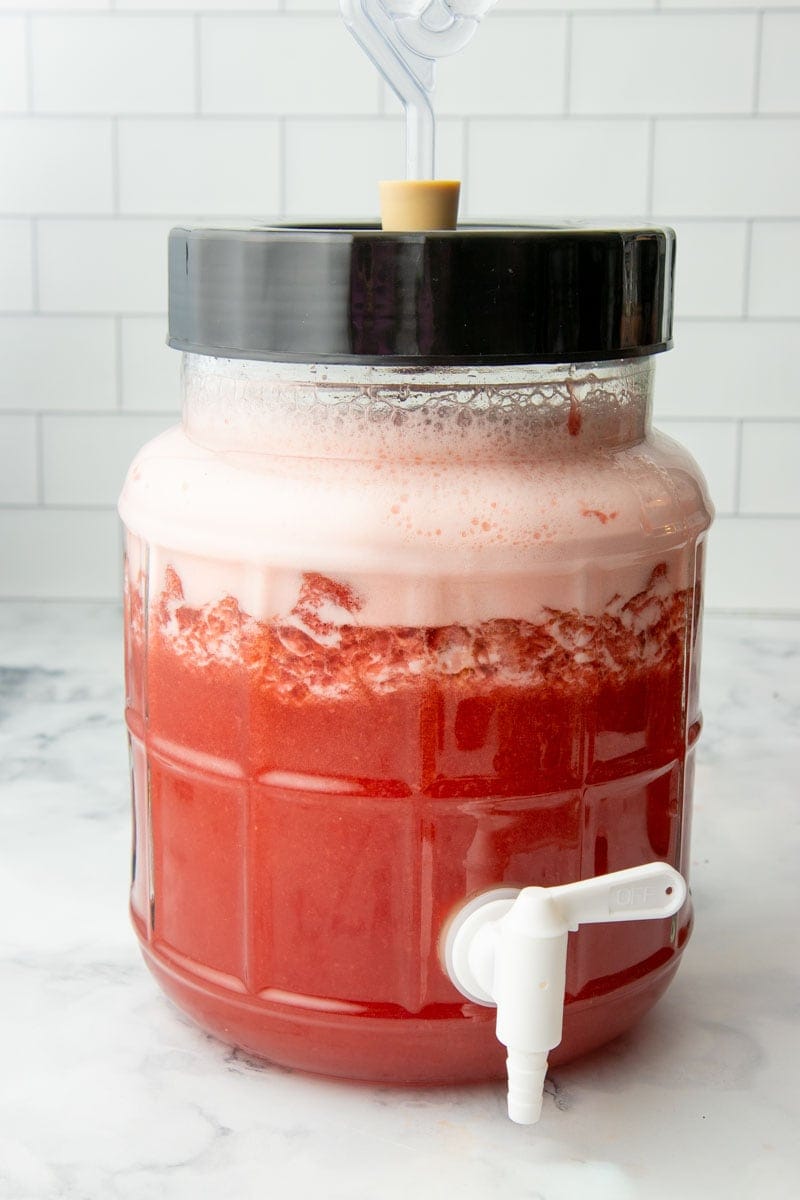
Keep agitating the mixture during the entire primary fermentation time-this is especially important when working with whole fruit, because it can form a mat at the top of the fermenter that traps the carbon dioxide.
Wholefully Protip
Stir the wine quite vigorously during primary fermentation! You want to incorporate air into the wine to help with fermentation. Use your muscles!
Primary fermentation is finished when the bubbling in the airlock slows down dramatically. That can happen in as quickly as three days or as slowly as three weeks-it'll just depend on your yeast, your home, and your fruit. Since I like to use whole fruit in my fruit wines, I like to keep the whole fruit in there for at least a week before moving on to secondary fermentation.
Step 4: Racking and Secondary Fermentation
Once the primary fermentation has slowed down, it's time to strain out the fruit and rack (what it's called when you move the wine from one container to another) the wine into a carboy.
- Fit a funnel with a mesh sieve into the neck of a sterilized carboy. You can also use a special brewing funnel with a strainer if you choose.
- Using a large ladle, scoop out the whole and mashed fruit and pour it through the sieve and funnel.
- Press the fruit into the sieve to get as much of the early wine out as possible.
- When the sieve fills up, dump the spent must into the compost, and replace. Keep repeating until the majority of the fruit is out of the wine.
- Pour the remainder of the wine through the sieve and funnel.
- You want the wine to come to the bottom of the neck of the carboy. If you have too much, you can pour yourself a glass of not-yet-finished-but-still-delicious wine. If you have too little, you can top it off with more non-chlorinated water.
- Fit the carboy with an airlock.
Wholefully Protip
For some fruits with thin/goopy pulp (American persimmons are a good example), you might want to strain your wine through cheesecloth or a nut milk bag before racking into the carboy to remove even more of the pulp. Our yogurt strainer works great for this!
All this agitation will restart any sluggish fermentation quite actively, so I recommend placing the carboy in a place where you can keep an eye on it easily (but still out of direct sunlight). Once you know it's not going to geyser wine everywhere, you can then move the carboy to a dark, out-of-the-way spot to do the longer secondary fermentation. A closet is great for this, as is a basement-although a basement is usually cooler and can make the fermentation process slower.
Country and fruit wines, including this strawberry wine, are traditionally still wines-meaning they have no carbonation and the yeast is inactive (or, ahem, dead). That's the point when secondary fermentation is over. Here's how you know when secondary is finished:
- The airlock stops bubbling. This is the first signal that fermentation is over. The airlock stops doing its regular "bloop!"
- If you used pectic enzyme, the wine clears. It happens magically. One day your wine looks hazy, and then the next, you can see straight through it to the other side (especially if you used pectic enzyme). This is a sign that the yeast has finished its work.
- There are no bubbles along the side of the carboy. Even when the airlock stops bubbling, sometimes there are tiny bubbles running up the side of the carboy. These can often be the last sign that the yeast is still working.
This process can take anywhere from just a couple of weeks to months, depending on a number of factors. Just make sure your airlock has water in it (it will eventually evaporate) as your yeast does its work.
Wholefully Protip
Some people rack their wine multiple times (transferring it from one carboy to another) during secondary fermentation to both restart the fermentation and clear up the wine. A good rule of thumb is to rack it every 1-2 months, if you like.
Optional Step 4: Back Sweetening
When your secondary fermentation is over, it's time to taste that wine! In general, fruit wines need time to age before they are really delicious, so don't be too concerned about the flavor profile yet. What you are concerned about right now is sweetness. If you taste the wine and are happy with the sweetness, you can move onto Step #5!
If you taste the wine and it's too dry, no worries, we can now rack the wine and back sweeten it. There are multiple ways to do this:
- Use a non-caloric sweetener. Non-caloric sweeteners like stevia, monk fruit, and erythritol can be added to to sweeten the wine without reactivating the wine. The drawback is that these natural sugar alternatives often have funky aftertastes that turn some folks off.
- Sterilize and back-sweeten. You can use Campden tablets to kill off the yeast in your wine, and then add simple syrup to the wine to sweeten to taste.
- Back-sweeten with sugar and referment until the yeast hits its alcohol max. This is what I do!
How to back-sweeten without sterilizing your wine:
Here's my exact method for that third method of back-sweetening:
- Make a simple syrup by combining equal parts sugar and water in a small saucepan over medium heat. Heat until the sugar is completely dissolved. Let cool to room temperature.
- Using a siphon, transfer the wine (leaving behind the sediment) to a different, sterilized carboy.
- Add in the simple syrup, a little at a time, shaking or stirring well after each addition. Keep sweetening until you get to your desired sweetness level. You can taste using a sterilized stainless straw or a wine thief.
- Fit the carboy with an airlock.
Wholefully Protip
If you don't have a second carboy for back sweetening, you can always transfer the wine to your primary fermenter, sweeten to taste there, and then transfer back into the original carboy after cleaning out the sediment.
Depending on your yeast and the amount of sugar you used to begin with, back sweetening might reactivate your wine again (hence the airlock). You'll see bubbles along the side of the carboy and in the airlock. This is totally fine-it just means the yeast wasn't done with its work yet. When the fermentation is finished again (using the signals outlined in Step 3) you can taste and proceed with Step 4 again-do this as many times as you need to give it the sweetness you like.
If your wine doesn't restart fermentation within a week, that means your yeast has topped out on the alcohol level in the wine and can no longer "eat" any more sugar-this is good, because it means the back sweetening will stay at the current sweetness level. Now you can move on to bottling and aging!
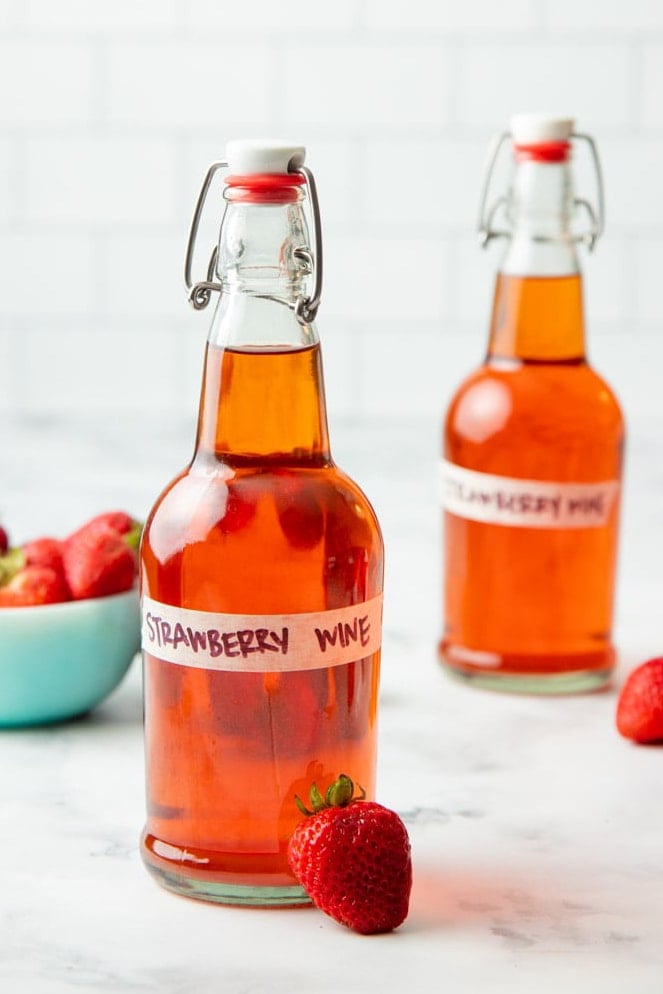
Step 5: Bottling
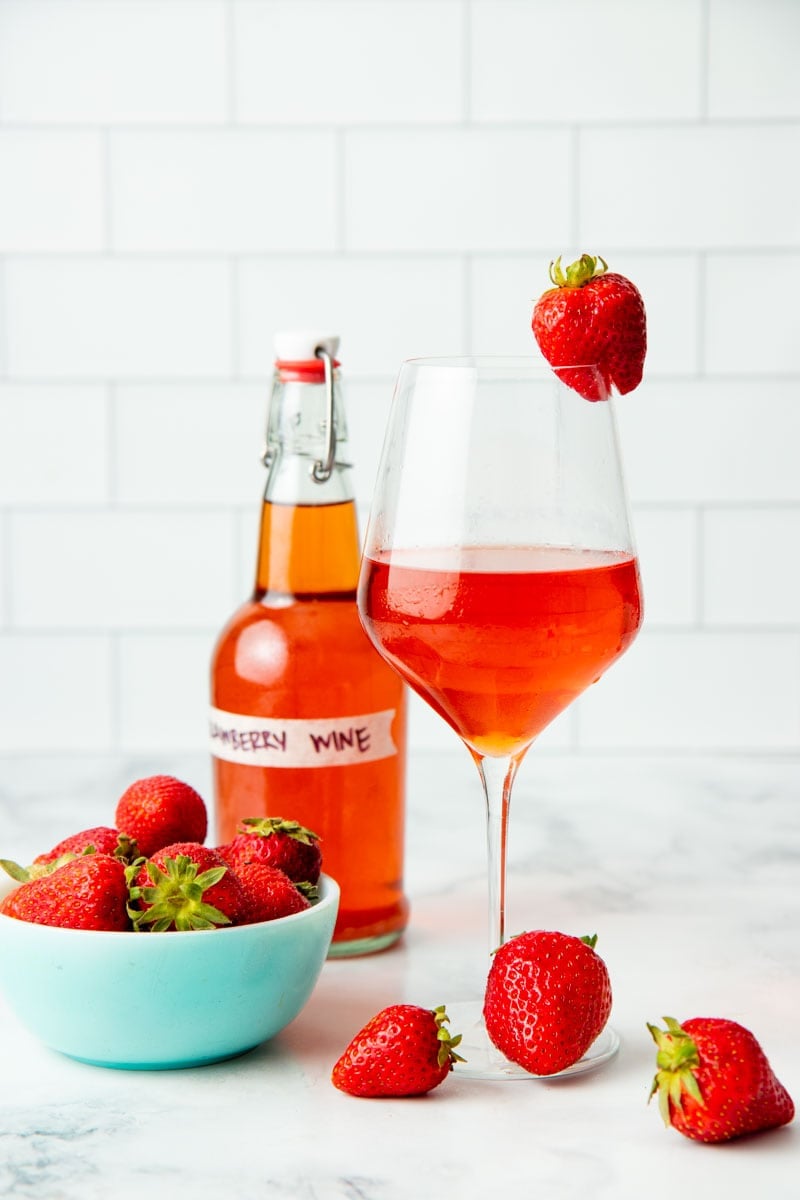
The bottling process can be as fancy or as simple as you like. Strawberry wine will taste the same out of a mason jar as it will coming out of a waxed and corked bottle-the choice is yours!
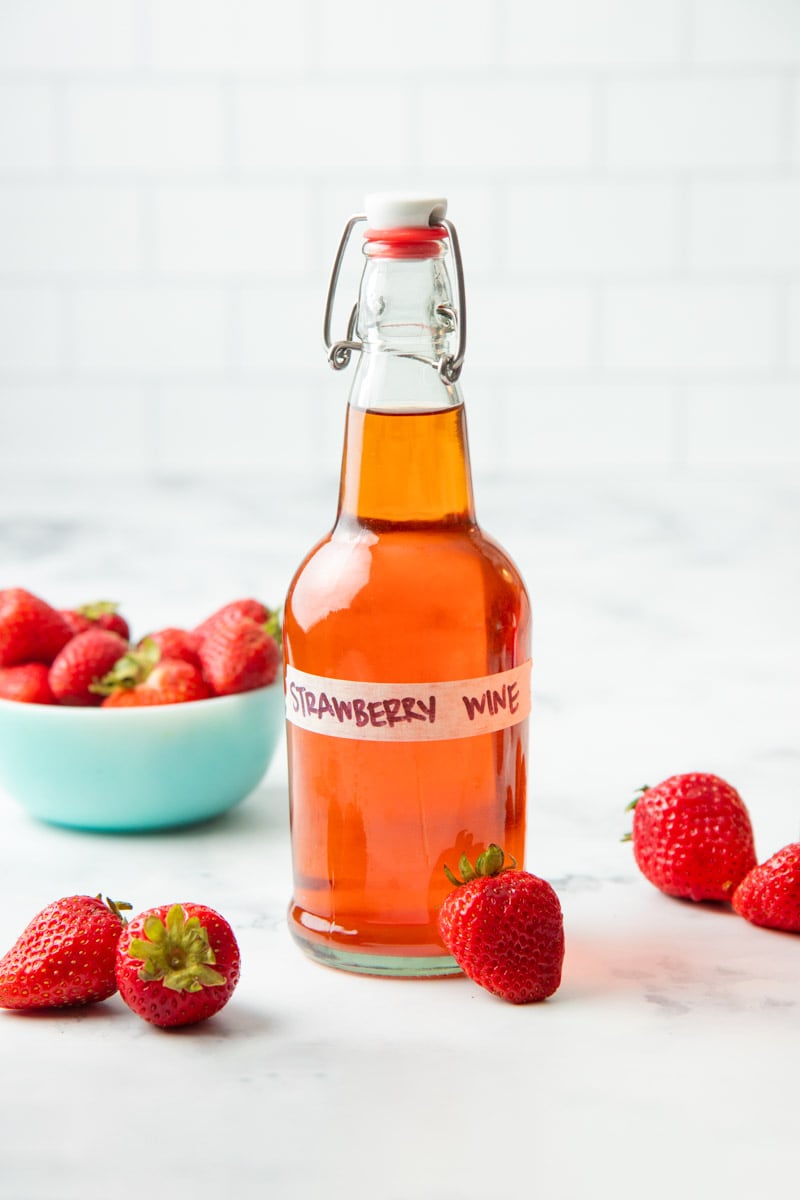
We personally bottle our wine in two different kinds of bottles that work well for us:
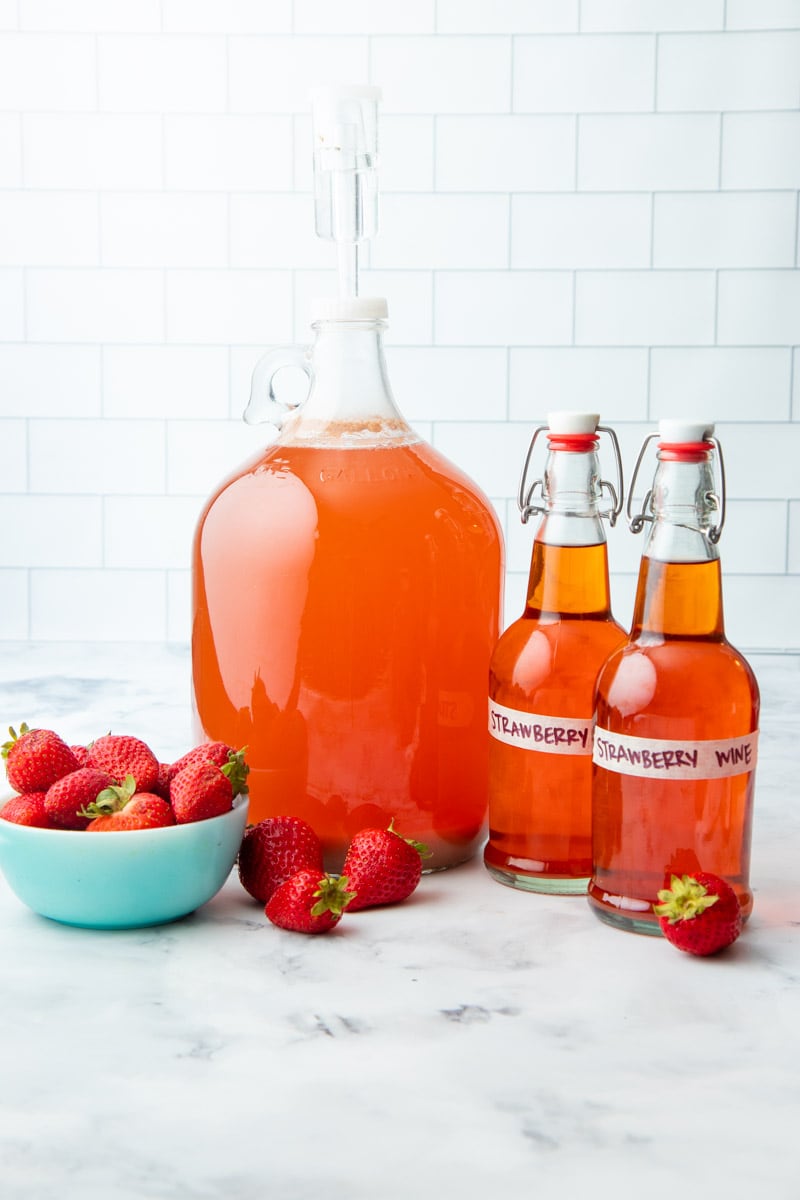
- 16 Ounce Flip-Top (Grolsch-Style) Bottles: These are the bottles we use for our "everyday" drinking. They are easy to use, and they hold carbonation well if you happen to bottle before the fermentation is quite finished. They are easy to reseal. You can get about 5-6 of these bottles out of a one gallon batch of wine.
- Half-Size (375ml) Stretch Hock Wine Bottles: These mini wine bottles are what we use for gift giving. We've been known to package three bottles of different fruit wines in one basket for a wonderful hostess or birthday gift. You can get between 8-10 of these bottles out of a one gallon batch of wine.
There are a million other ways you can bottle your wine: use recycled wine bottles, use beer bottles, put it in a jar with a tight fitting lid. No matter which vessel you choose, the process is roughly the same.
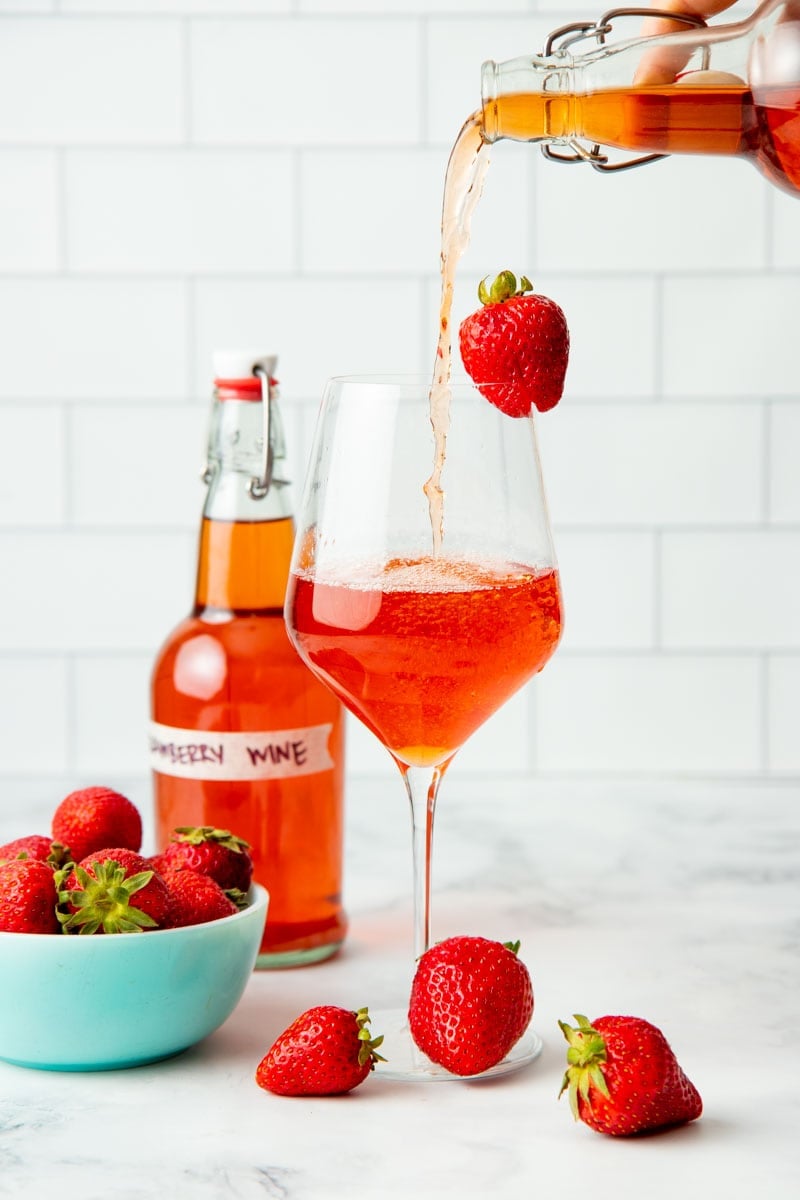
- Using a siphon, transfer the finished wine-leaving behind the sediment-from the carboy to the bottling bucket (or the primary fermenter if it has a spigot).
- Fit the bottling container spigot with a bottle filler, if using.
- Fill clean, sanitized bottles using the bottle filler or just the spigot.
- Cap, cork, or close the tops of the bottles.
- Label the bottles. We use masking tape and a Sharpie for wine we plan on drinking, and we make fancy labels for gift wine.
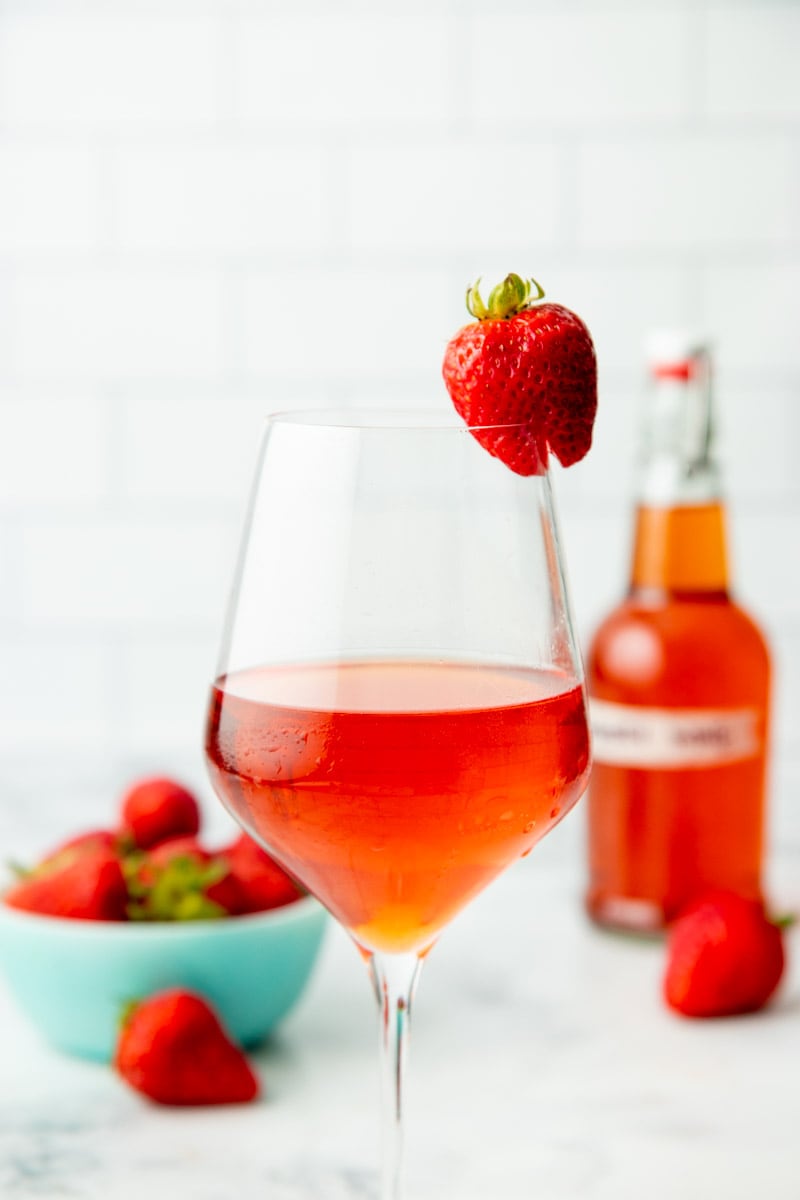
Step 6: Aging (the hardest part!)
As we mentioned earlier, most fruit wines really are at their most delicious after aging. That's the hardest part of this whole process-waiting! The general recommendation is to age it at least one month before trying, but fruit wines get really amazing after 6-12 months of aging. You can either age your wine in a cool, dark place before bottling (in a carboy) or after bottling. Many folks (myself included) prefer to do it after bottling to clear up the carboy for their next batch of wine! But some folks swear by bulk aging-and have shelves full of full carboys to prove it. Proponents of bulk aging say that the flavor is better and the fermentation is more complete.
Corked wine bottles need to be aged laying on their side-this keeps the corks wet, which keeps the corks wedged in nice and tightly. All other types of bottles can be aged sitting up straight, just as long as they are in a cool, dark spot.
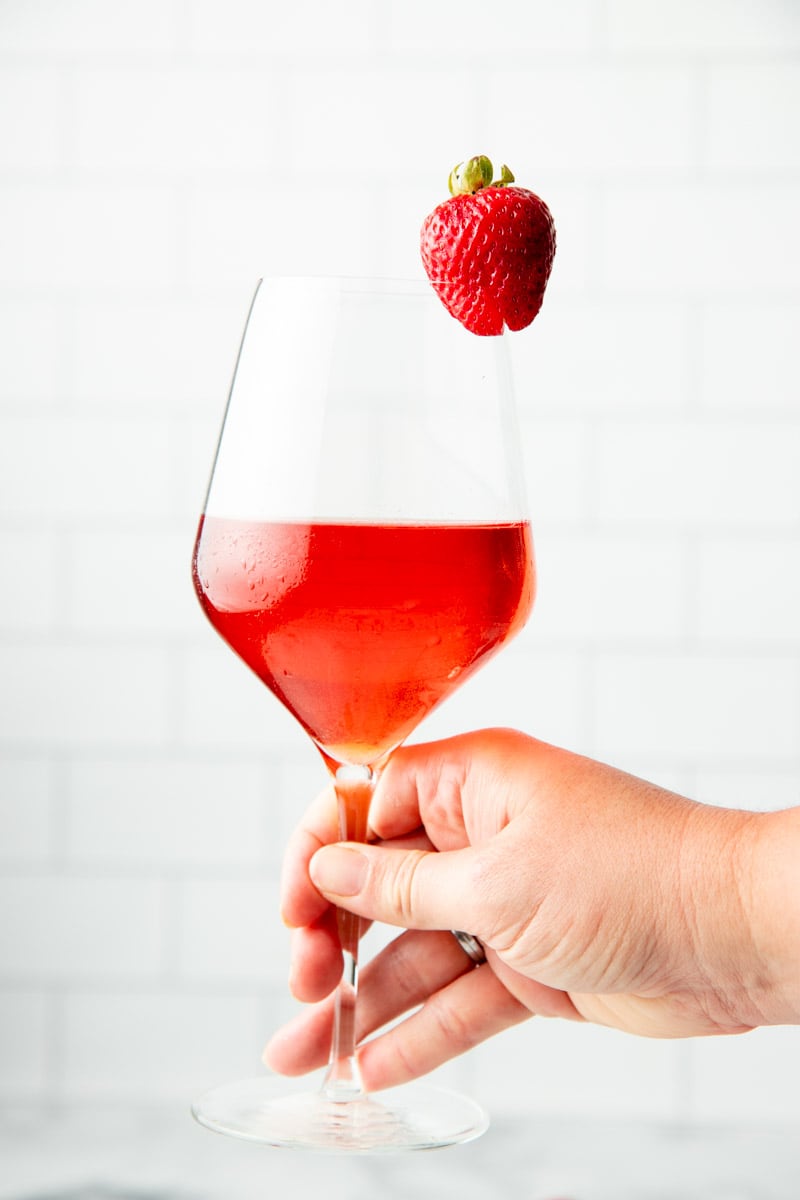
Aging makes good wine even better, and it can even make undrinkable wine enjoyable! I've heard tales of winemakers almost throwing out a batch because it was so bad, only to age it for a year or more and have some of the best wine they've ever tasted!
Frequently asked questions about making strawberry wine (or any fruit wine):
How do you know the alcohol content of the wine?
This is an arena of winemaking where I lean more toward the heritage winemakers-I do not take alcohol readings on my wines. I never set a goal for how much alcohol I want my wine to have-I just like to let the wine develop into what it wants to develop into. I honestly have no idea how boozy my wines are other than to be able to take a sip and say, "Yup, that's a strong one!"
Many (I could even say most) people who make wine at home take specific gravity readings using a hydrometer throughout the winemaking process to determine the fermentation levels and alcohol content. I've done it in the past with batches, and it's definitely interesting information to have, especially when you are starting out! However, my goal with learning how to make strawberry wine was to keep the process fun, simple, and light, and doing specific gravity calculations is not my brain's idea of carefree.
For some data-minded folks, it can be an incredibly helpful data set to use throughout the process. If using data to track your wine's fermentation and alcohol growth sounds fun to you, grab yourself a hydrometer and go on with your bad self!
What happens if you bottle your wine before it's done fermenting?
You might make little wine bombs! If the wine is still fermenting when you bottle, it'll keep producing carbon dioxide, which will eventually build up to a point in the bottle where it needs to escape. When it gets there, the bottle might pop its cork, pop off its flip-top-or in the worst case scenario, break the glass of the bottle. You can prevent this by making sure the wine is still and finished fermenting before bottling or by sterilizing the wine with Campden tablets before bottling. I personally like to live on the edge, so I never sterilize my wine (more on that in a sec), and occasionally, I open up a nice carbonated bottle!
How do I make sparkling wines (like champagne)?
Country wines and fruit wines are traditionally still wines (meaning they have no carbonation). Making a sparkling wine is a bit of an advanced technique that requires a good knowledge of how yeast works, the fermentation process, and advanced bottling techniques. We recommend tackling it only after you've mastered a still wine like this strawberry wine. When you're ready to move onto sparkling wine, Wild Wine Making has some great information about that process.
Can you use fruit juice to make wine instead of the whole fruit?
Sure can, and in fact, a lot of people save some time and skip some steps by doing so. I personally enjoy the flavor of using whole fruit, though, and I recommend it for first-timers looking to create a really delicious first batch of strawberry wine.
Why don't you use Campden tablets?
If you have dabbled in winemaking, you may have heard of a frequently used additive called Campden tablets. They are sodium or potassium metabisulfite tablets that are used to sterilize wine at various stages during the winemaking process. They kill off all the yeast and bacteria.
Why would you want to do this? Well, for some people, they want to have a completely sterile process to start off with (they add the tablets to the fruit must to kill off any naturally-occurring yeasts or bacteria). Some people also use them to stop fermentation before it's complete if they want to achieve a certain level of sweetness. And some people also add them to the wine just before bottling to make certain fermentation is over to avoid making bottle bombs.
I personally do not use Campden tablets. Mostly because I just don't find that I need them in my winemaking process, but also because I enjoy including wild yeasts and bacteria in my creations. There are tons of resources on the internet about using Campden tablets if stertilization is of interest to you.
Can I use bread yeast for making strawberry wine?
Some folks out there use regular baker's bread yeast for making wine, but I wouldn't recommend it. The strains of yeast in winemakers yeast will create a much tastier final result. If you don't believe me, try making a batch with bread yeast and see what happens!
Where can you get more information on making strawberry wine?
As if my 5000+ words on making strawberry wine wasn't enough! If you are looking for more resources on making fruit wines, here are some of my favorite brewing books to check out:
- Wild Wine Making <--- this is my absolute favorite resource if you are going to pick just one!
- Artisanal Small Batch Brewing
- The Wildcrafting Brewer
- Make Mead Like a Viking
- Sacred and Healing Herbal Beers
And check out our other DIY alcohol recipes:
📖 Recipe
Homemade Strawberry Wine Recipe
Ingredients
- 3 pounds frozen hulled whole strawberries
- 2 ½ pounds cane sugar this will make a semi-dry wine
- ½ teaspoon pectic enzyme optional
- Non-chlorinated water
- ¼ packet Red Star Premier Blanc yeast
- ⅛ teaspoon wine tannin OR 1 cup of strongly brewed black tea 2 teaspoons of loose leaf tea to 8 ounces of water
- 1 teaspoon acid blend OR 2 tablespoons lemon juice
Instructions
Before You Start
- Wash all your tools and sterilize to your desired level of cleanliness. Maintain this level of cleanliness throughout the process.
Making the Wine
- In a big bucket, a large jar, or specifically designed fermenter, add the frozen fruit, cane sugar, and pectic enzyme (if using). Cover and let sit out until the berries are defrosted and the entire mixture is quite juicy-at least four hours, up to 24 hours.
- Using a potato masher or clean hands, mash the berries to crush them. No need for it to be a smooth puree.
- In a small bowl, combine about a cup of water with the yeast, set aside to wake up for 10 minutes.
- Add the wine tannin or black tea and acid blend or lemon juice to the strawberry mixture. Add in enough water to bring the total volume of the mixture to about 1 ⅓ gallons-no need to be perfectly accurate.
- Pitch the yeast water into the mixture, and stir well to agitate. Close the lid on the fermenter and fit with an airlock.
Primary Fermentation
- Place the fermenter in a spot out of direct light, but where you can keep an eye on it. Agitate the mixture well at least once per day by stirring or swirling.
- The fermentation should start within 1-3 days. Continue to stir or swirl thoroughly throughout the entire primary fermentation stage.
- When the bubbles slow down considerably in the airlock (usually around the 10 day mark for us with this wine, but it'll vary based on the heat of your house), your primary fermentation is done.
Secondary Fermentation
- Fit a funnel with a mesh sieve into the neck of a sterilized carboy. You can also use a special brewing funnel with a strainer if you choose.
- Using a large ladle, scoop out the whole and mashed strawberries and pour them through the sieve and funnel.
- Press the berry puree into the sieve to get as much of the early wine out as possible.
- When the sieve fills up, dump the spent must into the compost, and replace. Keep repeating until the majority of the fruit is out of the wine.
- Pour the remainder of the wine through the sieve and funnel.
- You want the wine to come to the bottom of the neck of the carboy. If you have too much, you can pour yourself a glass of not-yet-finished-but-still-delicious wine. If you have too little, you can top it off with more non-chlorinated water.
- Fit the carboy with an airlock. All this agitation will restart any sluggish fermentation quite actively, so I recommend placing the carboy in a place where you can keep an eye on it easily (but still out of direct sunlight).
- Once you know it's not going to geyser wine everywhere, you can then move the carboy to a dark, out-of-the-way spot to do the longer secondary fermentation.
- Secondary fermentation is complete when the wine is "still," meaning there is no carbonation in the wine, no bubbling in the airlock, and the wine has cleared. This can take anywhere from a couple of weeks to months, depending on a number of factors. Do not bottle until the wine is still.
Bottling and Aging
- Using a siphon, transfer the finished strawberry wine-leaving behind the sediment-from the carboy to the bottling bucket (or the primary fermenter if it has a spigot).
- Fit the bottling container spigot with a bottle filler, if using.
- Fill clean, sanitized bottles using the bottle filler or just the spigot.
- Cap, cork, or close the top of the bottles. Label the bottles.
- Store in a cool dark spot (if using corks, turn the bottles on their sides to keep the corks wet) and age for at least 30 days, but preferably 6-12 months for the best flavor.
Video

Notes
- If your strawberry wine tastes too dry after secondary fermentation, you'll want to back sweeten it using the process outlined in the post.
- Make sure to taste your wine throughout the process! Not only is it fun to sample, it also helps you better understand the fermentation process at work.
Hi! I have begun the primary fermentation process for my strawberry wine and it is going well. Two Q’s for you - when I stir and agitate the wine it gets so carbonated it overflows and goes up into the airlock. What could I do about that? Secondly, I plan on letting it bulk ferment so that means I can leave it in the car boy for months right? Or should I still bottle it
Big congrats on a super active fermentation! For the airlock issue, you can leave the airlock off and just cover the carboy with a clean cloth and rubber band for a few hours until the carbonation dies down and then replace the airlock. That kind of bubbling should only happen in the first little while of primary fermentation until most of the sugar is used up. And yup, you leave it in the car boy while it does secondary fermentation.
This is incredible! How can I make it so that it is a sweet wine and not a dry wine? Is that possible?
Hi Michelle! It's definitely possible! Check out the section in the post titled "How do you make a dry wine versus a sweet wine?" for some info about that. Here's how it starts: "The final sweetness of your wine is determined mostly by two factors: how much sugar you add (of course) and how much sugar your yeast can eat. Different strains of yeast can consume different amounts of sugar before they peter out and die in the alcohol that they’ve made." It then goes on to give examples of what that looks like with two different kinds of yeast. Ultimately, it'll take a bit of experimenting to get a wine that's sweet enough for your tastes, but that just means you get to make more wine! So it's a win-win!
Hi Danielle! Thank you so much for replying! I was also wondering if ising granulated sugar instead of cane sugar will make it sweeter from the start? Or would it be safer to just back sweeten? Thank you so much!
The recipe calls for 2 1/2 pound sugar for a semi dry wine. How much sugar would you add for a sweet wine?
Hi Jodi! We recommend you checkout the section of the post titled "How do you make a dry wine versus a sweet wine?" It really comes down to the type of yeast your using and personal preference. Starting with this recipe, it will likely take a little bit of experimenting to find the level of sweetness you prefer. But to us, that's part of the fun of making your own wine!
Great info, helpful and well explained. I rarely comment, but I often find brewing communities fancy themselves elite and I leave before I get anything helpful. I love how you wrap your arms around the simple science and leave the rest to personal preference. Awesome job.
Thanks so much, Carmen! We appreciate you taking the time to comment, and we're so glad you found what you needed here. Happy winemaking!
Good morning Cassie, thank you for this exceptional tutorial on making strawberry wine. My husband and I were stationed in Italy back in the early 2000s. We were introduced to fragolino, being told it translated to strawberry wine. Ha! Huge misconception, but that’s not the point. The point is, I embarked on planting over 200 strawberry plants last summer, with the intent to grow more. Additionally, we have a myriad of fruits (berries and stones) on our property that one day, I would like to learn how to make wine with them. I am excited to try your recipe come June. Thank you for the additional book recommendations as well - as if your 5000+ words weren’t enough. Love it! I’ll keep you posted.
That sounds wonderful, Becca! Best of luck, and please let us know how it turns out for you!
Hi, does anyone have any advice please. I followed the recipe but didn't add pectic enzyme at the beginning. Now I'm 2 weeks into secondary fermentation and in the of carboy is what looks like a floating gelatinous mass? Otherwise the wine is still bubbling and looking very clear. Can the wine be saved or is it ruined?
Hi Beth! The strawberries in the wine do tend to make a sort of gooey gelatinous mess. Does that sound like what you're referring to? Based on your description, it doesn't sound ruined to us. But use your best judgement!
Cassie - have you made homemade grape wine with garden grapes? I’ve used your strawberry and peach wine recipes and done some twists of strawberry rhubarb and even a cherry raspberry with great success but am wondering if the process for grape wine would be different…
Thank you!
Tawnya
Hi Tawnya! We have tried it, but weren't thrilled with the results, unfortunately!
I've been making wine from this recipe (never made wine before), and I'm hoping I can ask a question here. My wine has been in secondary fermentation 5 1/2 weeks -- and for most or all of that time there's been like a white grainy-bubbly-looking mass covering the whole bottom half of the bottle. It had a globular looking top, before I nudged the bottle and the whole thing settled flat-ish. The rest of the wine looks relatively clear. I can see my hand as a fuzzy light blob through the carboy. No pectic enzyme added. There are still tiny bubbles rising occasionally, but no real bubbling in the S-lock. Is this yeast at the bottom? Or, is this some kind of... I don't know, moldy weirdness? I'm trying to decide if I need to rack again, or add yeast nutrient, or if this is just a normal thing that happens during this stage.
Hi Kat! That sounds just like the normal sediment settling to us! It never hurts to rack again and add some yeast nutrient if you are concerned, but it sounds all normal to us.
My wine has cleared and no bubble is visible on the surface, can I bottle it immediately? I'm a little confused since I broke my hydrometer
Hi Dina! We recommend giving it a taste. If it's still super sweet, that could mean the yeast didn't do it's work. That could either be from a bad batch of yeast, or it might mean your yeast need to be restarted. Try swirling or stirring it and seeing if fermentation starts back up. If it tastes like wine, though, you should good to go and bottle it! Clearing up and lack of bubbles are both great signs—the taste test will just help confirm!