Cut Out Cookie Recipe


I know there are a lot of sugar cookie recipes out there, but I'm telling you, this is the best ever cut-out cookie recipe. They are soft, tender, never spread in the oven, and thousands of readers have told me how much they love these cookies!

🔍 Recipe At-A-Glance: Cut-Out Cookie Recipe
- 🕰️ Prep Time: 20 minutes, plus chill time
- ⏰ Cook Time: 8 minutes
- 💚 Flavor Profile: Not to toot my own horn, but these may be the best sugar cookies you ever have. They are buttery, tender, and perfectly fluffy.
- 🎄 Good For: Spreading some Christmas cheer, brightening up any special occasion.
- 🧡 Difficulty: Decidedly non-fussy.

"Best sugar cookies I've ever made! Not only do they look good, but they taste wonderful, too. Not too sweet or sugary, just the perfect blend of goodness! Thank you for sharing this recipe."
- KEILEE -
Summarize and Save this Recipe Using:
🧡 Why You'll Love This Recipe

Hi friend: Throw out all your other sugar cookie recipes, because this is the only one you'll ever need for cut outs.
The first time I made a batch of these cookies, I had no fewer than a dozen people stop by my office and tell me these were the best sugar cookies they've ever had! The next year, I entered them into a Christmas cookie contest, and they took Best in Show! They are THAT good. You can stop looking...you have found your forever sugar cookie recipe.
Here's why you'll love this recipe:
- These cookies are perfect for cut out cookies. The dough is easy to work with and there is no spreading in the oven, so your Christmas trees still look like Christmas trees even after they are baked!
- The best lightly sweet, buttery flavor. My perfect sugar cookie is not too sweet (our best ever sugar cookie icing balances that out) and packed with buttery richness.
- This recipe is beloved by tons of folks who bake from it every holiday season. Just read the reviews! This recipe is a keeper.
💚 The Ingredients You Need
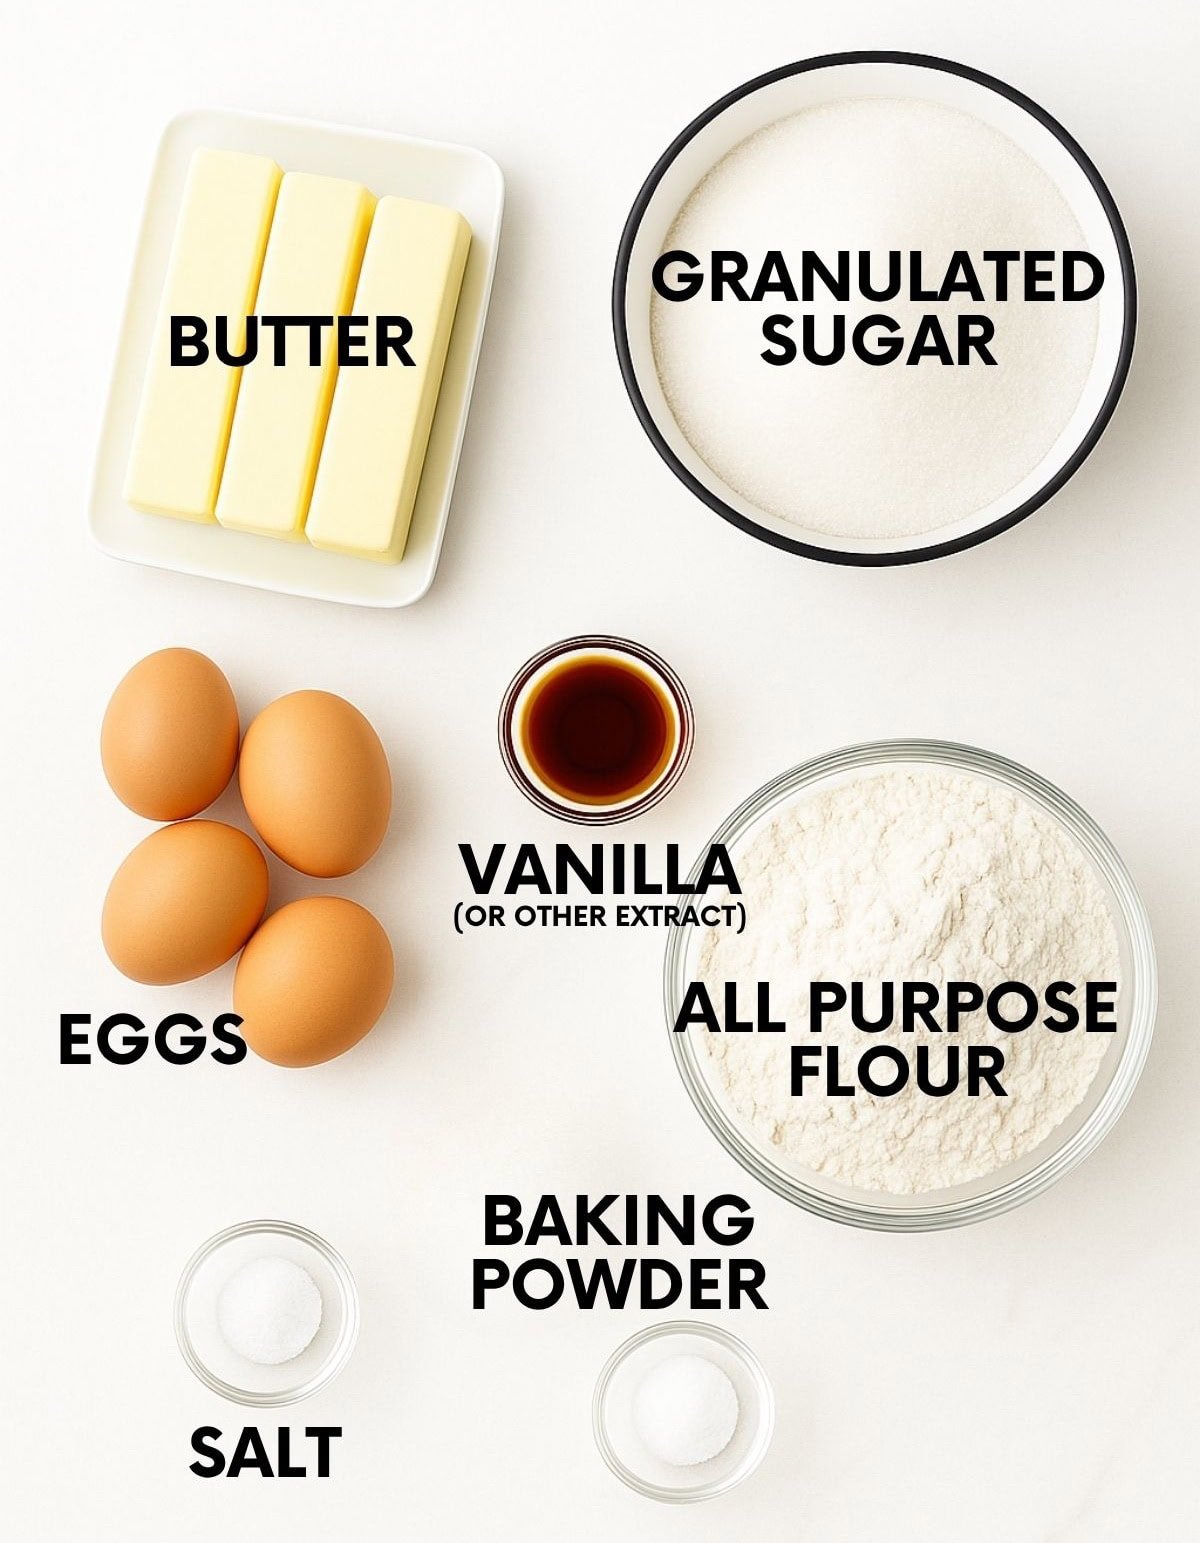
- All-purpose flour: You'll need five cups (this recipe makes a lot of cookies), plus more for rolling...unless you want to try my secret trick for the softest sugar cookies. If that's the case, you'll need a little powdered sugar for rolling out the cookies instead!
- Vanilla extract: I like to use my homemade vanilla extract for the best flavor, but store-bought will work as well. Look for pure vanilla, not imitation.
Make sure to check the recipe card below for the full ingredients list, along with quantities and my expert tips and tricks.
🔁 Variations & Substitutions
- Change the flavor: My go-to is to flavor these cookies with vanilla extract, but I've also made these cookies with almond extract, coconut extract, and peppermint extract, and they all taste amazing.
- Decorate for the holidays: This recipe makes an absolute ton of cookies! It's perfect for a cookie decorating party, but if you want less, you can easily halve the recipe. Or do as I do, and freeze the extra dough discs for other holidays (this recipe makes is the perfect Halloween cookies recipe, Easter sugars cookies, and Valentine's Day sugar cookies)!
- Skip the shapes: Don't feel like rolling out and cutting your cookies? Try my fan-favorite Lofthouse sugar cookie recipe instead!
🥣 Cut-Out Cookie Recipe How-To
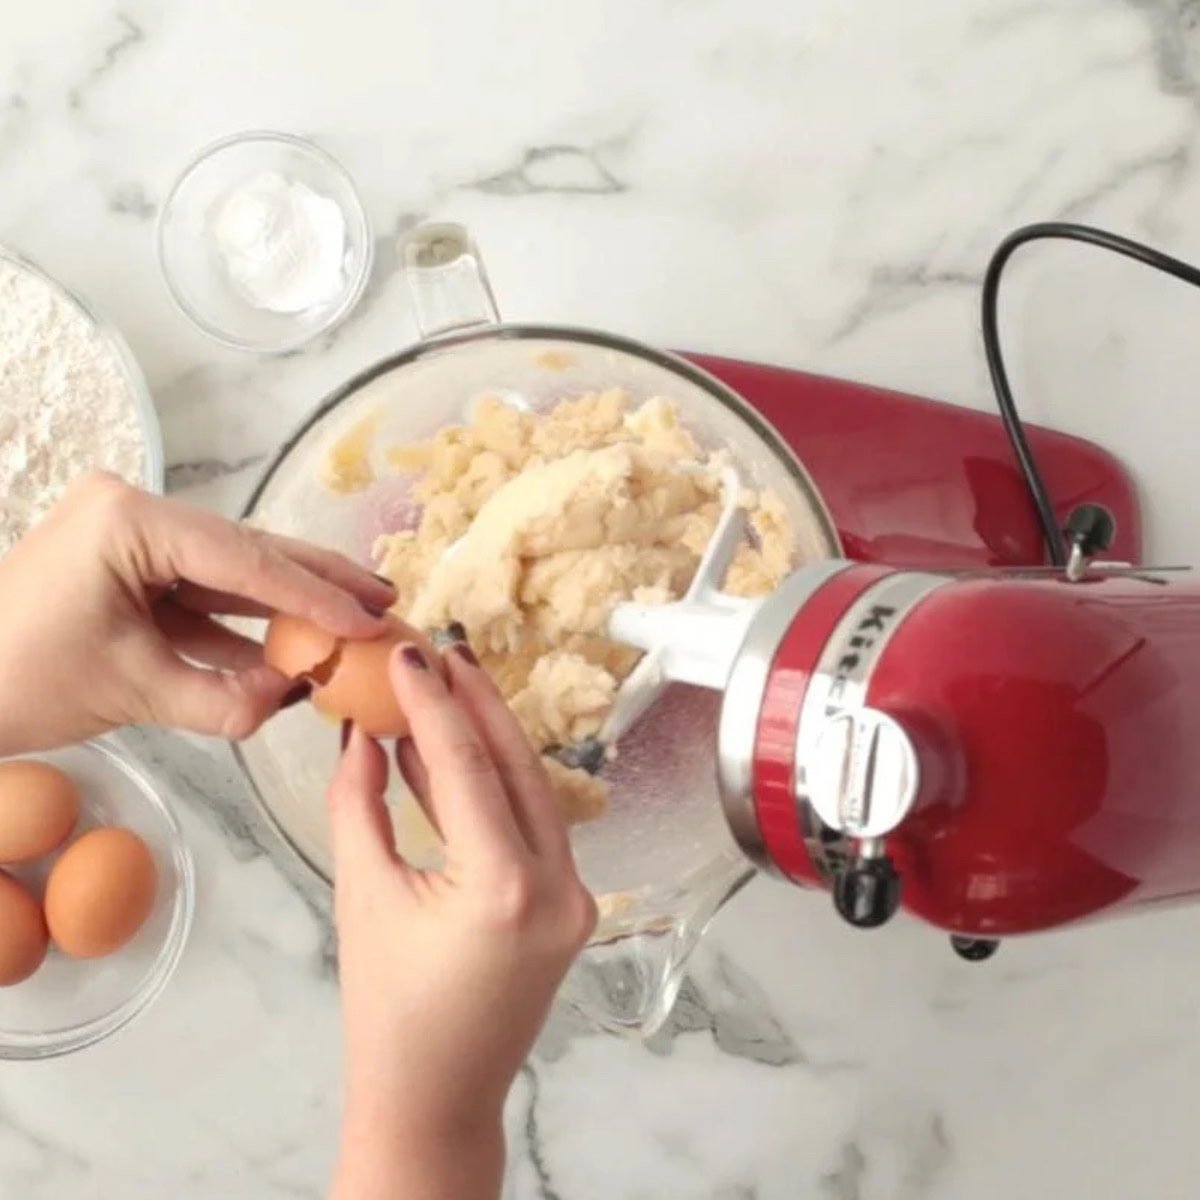
Step 1: Start by mixing the wet ingredients. Cream together the softened butter and sugar, then add in the eggs and the extract of your choice. You can do this using a stand mixer, hand mixer, or in a bowl with a spoon.
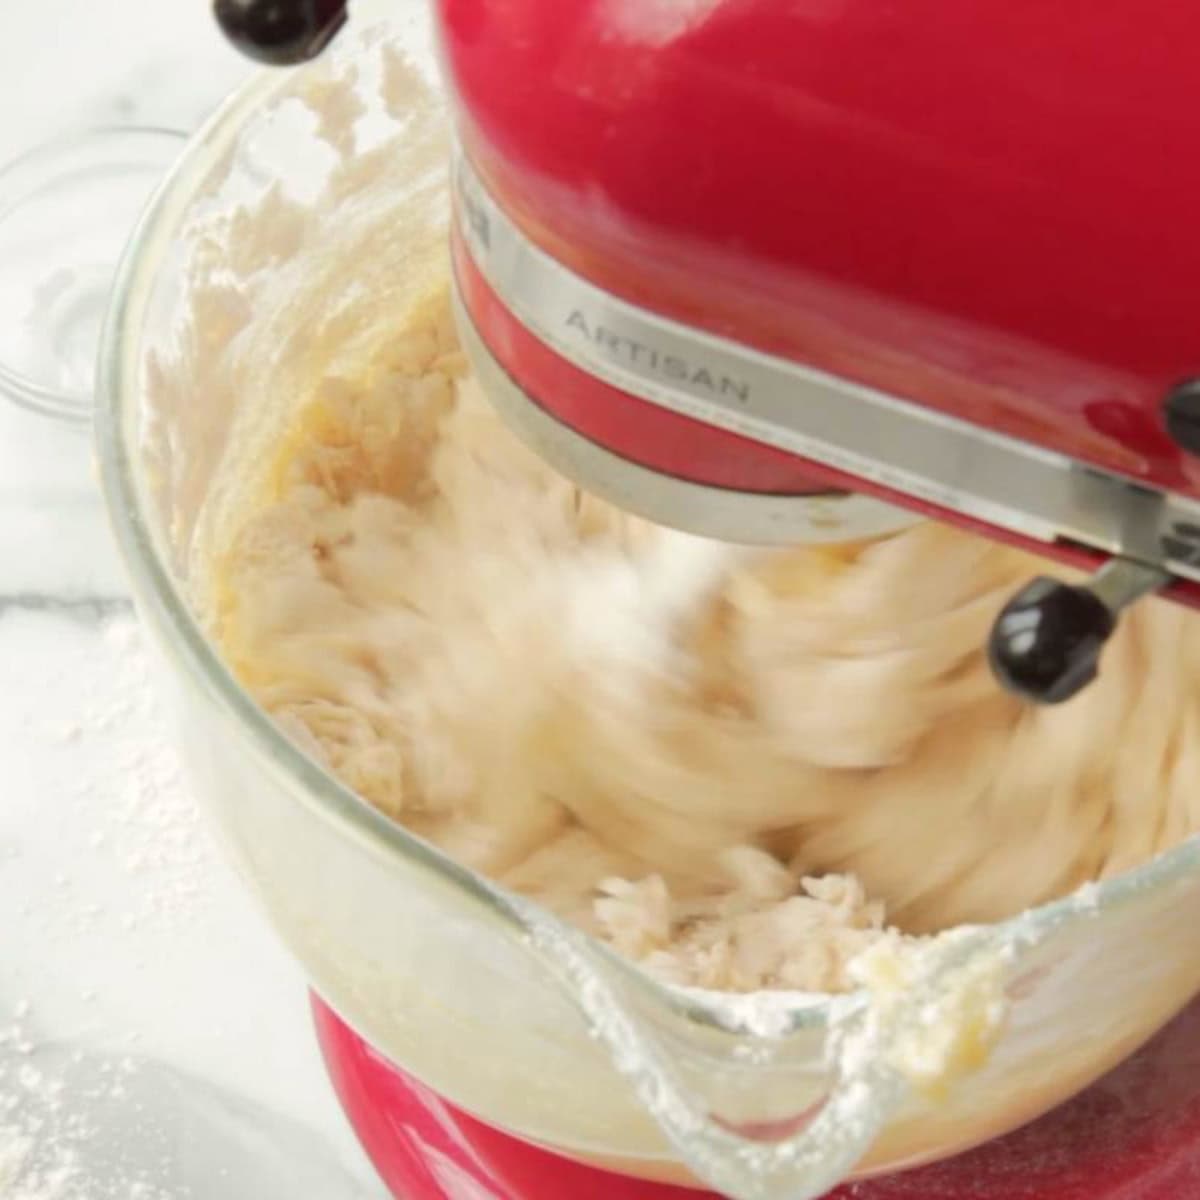
Step 2: Add in the dry ingredients, and mix until well-combined. I like to do this in 3-4 parts, mixing after each addition, to make sure all the flour gets incorporated well.

Step 3: Chill time! Divide the dough into quarters, then form into discs and wrap in plastic wrap. Chill in the fridge for at least two hours, or 20 minutes in the freezer.
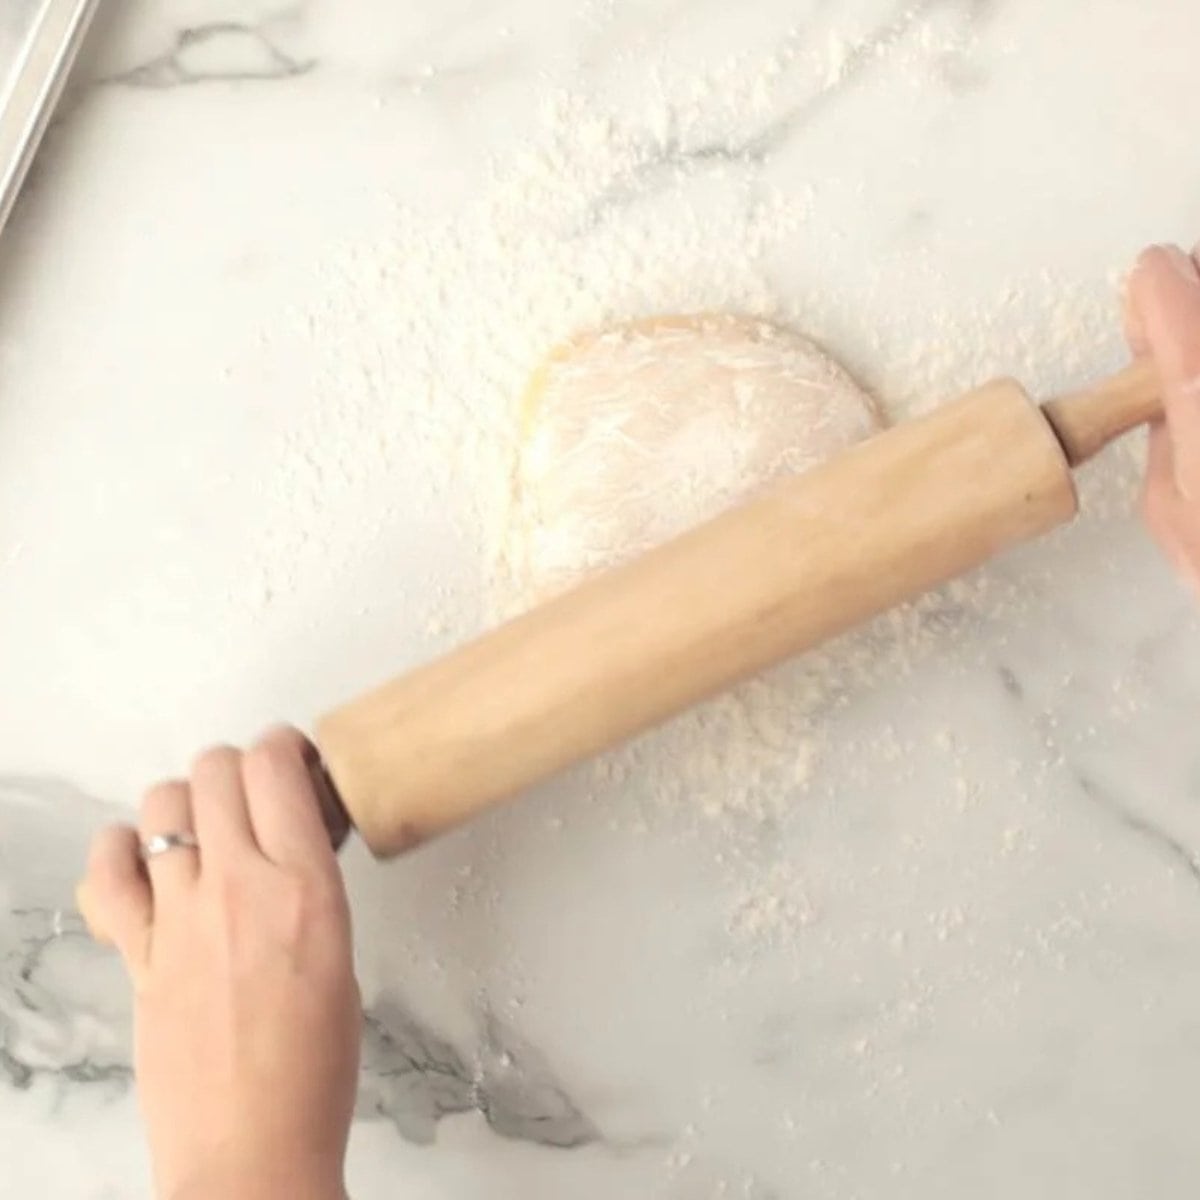
Step 4: Roll out the dough. Take one disc out of the fridge or the freezer and roll it out on a lightly floured surface until the dough is between ⅛" and ¼" thick.
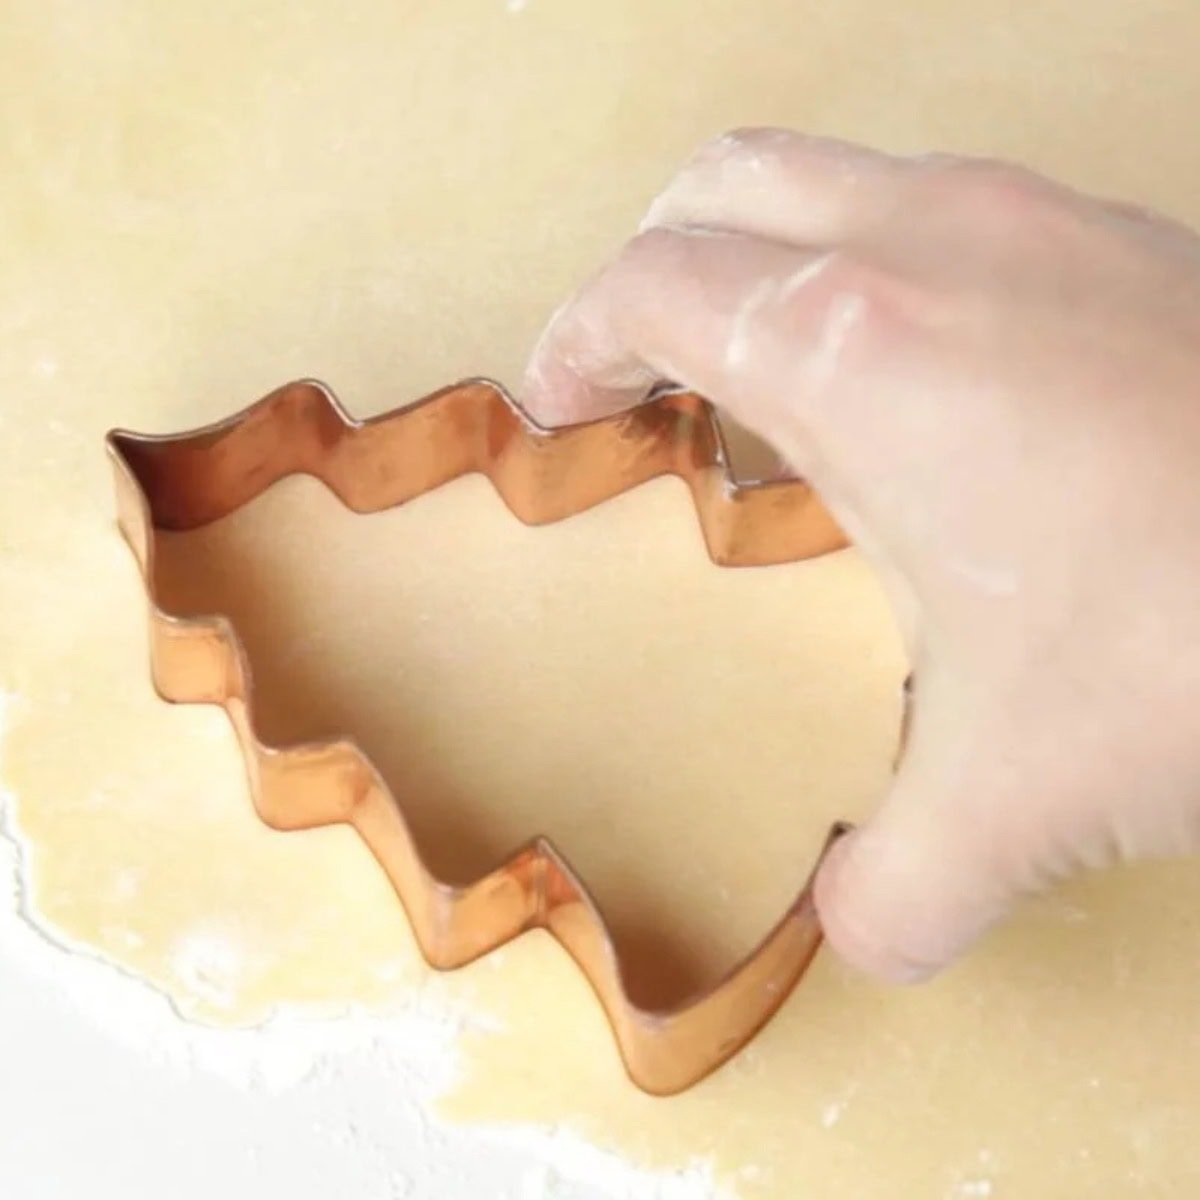
Step 5: Cut out the cookies. Grab your favorite cookie cutters and go to town!
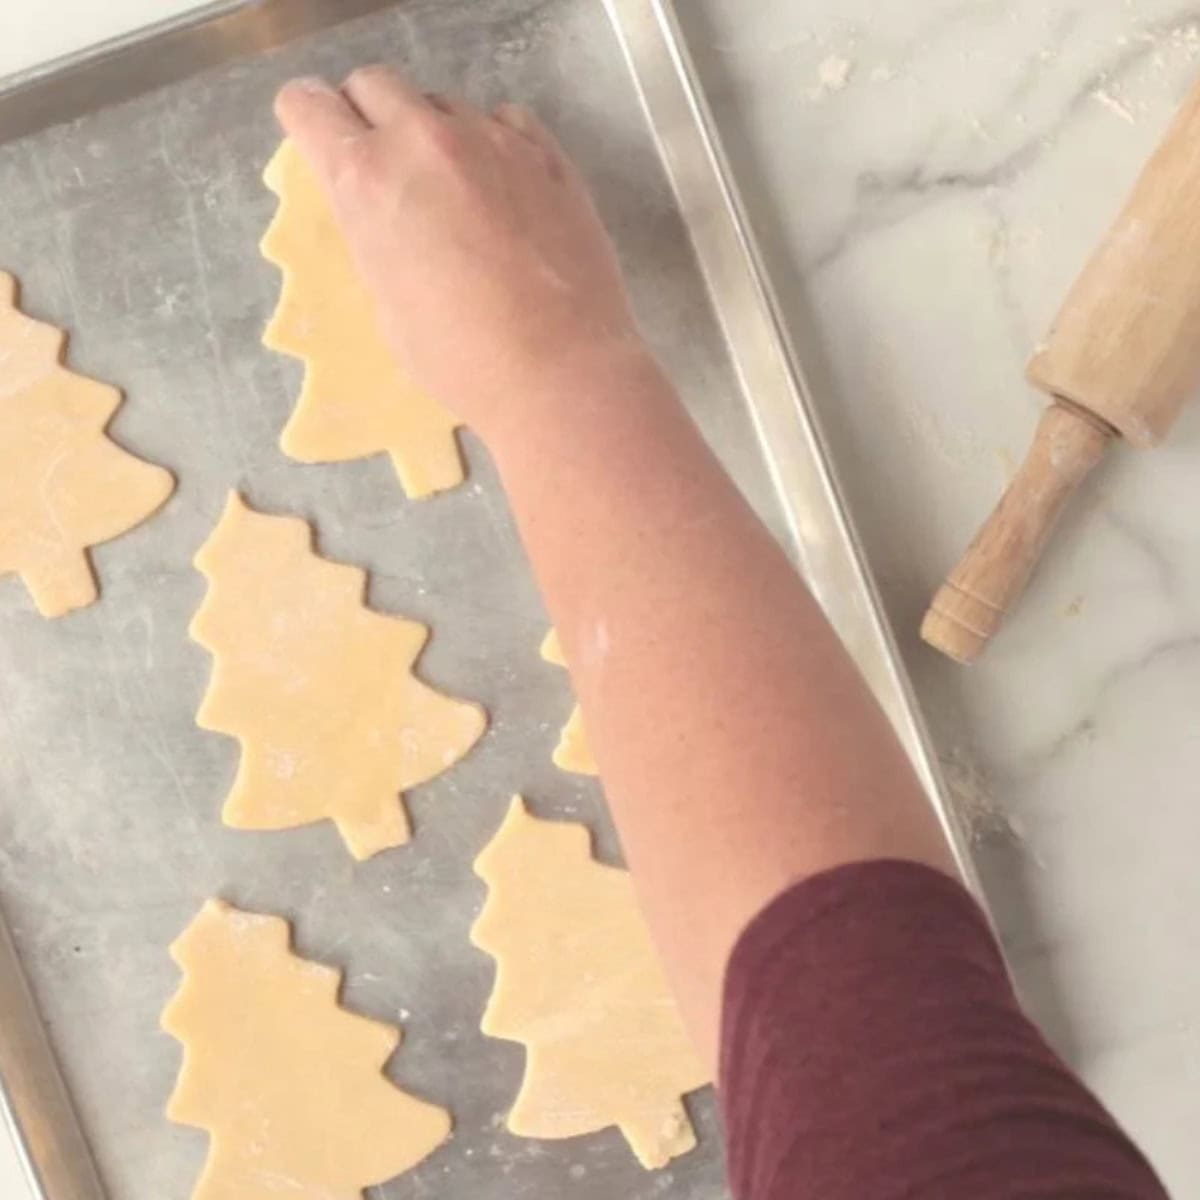
Step 6: Bake the cookies on an ungreased cookie sheet for 6-8 minutes in a 400° oven. Watch the cookies very closely! The cookies are done with the bottoms are just barely brown.

Step 7: Immediately transfer the cookies to a wire baking rack to cool. Allow cookies to cool completely before decorating.

Step 8: Now the super fun part! After the cookies have completely cooled, decorate them with my best ever sugar cooking icing and your favorite sprinkles.
🙋🏻♀️ Cut-Out Cookie Recipe FAQs
Chilling the dough is a non-negotiable, friends. Chilling the dough makes it so the cookies won't spread in the oven and will keep your beautifully cut out shapes.
I like between ⅛" and ¼" thick-you want a cookie that is thick enough to have some chew to it, but thin enough to bake evenly and quickly. Don't stress too much about it. Just as long as every cookie on the baking sheet is roughly the same thickness, you'll be good!
To freeze the dough: Form into discs, and then wrap tightly in plastic wrap. Place the wrapped disc in a freezer-safe glass food storage container or zip-top freezer bag. Freeze for up to a year.
To freeze the uniced baked cookies: Lay cooled cookies flat on a baking sheet, and freeze until solid-about 3 hours. Then transfer to a freezer-safe glass food storage container or zip-top freezer bag for up to three months.
I don't recommend freezing sugar cookies frosted with our sugar cookie icing recipe because while the taste is fine, this particular icing recipe tends to crack and lose its luster in the freezer. No worries. That icing recipe is so easy, it will take you no time to frost them once they are out of the freezer!
👩🏻🍳 My Expert Tips & Tricks
- Don't stress if the wet ingredients look curdled when mixing. I promise the final dough will turn out perfect!
- Keep the dough cool: Re-chill your dough if it starts to get too soft, or your cookies will start to spread a bunch. If the rolling pin feels more like it's smooshing softened butter than rolling out cookie dough, you know it's time to put your dough back in the refrigerator.
- Pick your favorite flavor! You can never go wrong with vanilla extract, but almond, coconut, or peppermint extracts are all fun options to experiment with.
- Don't overbake. In fact, until you know how your oven operates with this recipe, I recommend watching them at the oven window. They could be done in as little as five minutes! You're looking for very slight color along the edges. Err on the side of underbaked!
- Let the cookies cool completely before decorating. If not, the icing will run everywhere.
- Sweeter rolling. While most recipes call for rolling out sugar cookies with flour, I like to use powdered sugar. It keeps the cookies beautifully tender (using too much flour when rolling = tough cookies!), and leaves no residue behind!

🍪 More Great Cookie Recipes:


If you tried this cut-out cookie recipe or any other recipe on my blog, please leave a 🌟 star rating and let me know how it went in the comments!
📖 Recipe

The Best Cut Out Sugar Cookie Recipe
Ingredients
- 1 ½ cups unsalted butter 3 sticks, softened
- 2 cups granulated sugar
- 4 eggs
- 1 ½ teaspoons vanilla, almond, peppermint, or coconut extract
- 5 cups all-purpose flour plus more for rolling (see notes)
- 2 teaspoons baking powder
- 1 teaspoon salt
Instructions
- In the bowl of a mixer fitted with the paddle attachment, using a hand mixer, or mixing with a wooden spoon, cream together butter and sugar. Mix in eggs and extract until well-combined.
- In a separate bowl, whisk together the remainder of cookie ingredients. Add the dry ingredients to wet in batches, until combined.
- Divide dough into quarters, form into discs, and wrap in plastic wrap and chill for at least 2 hours in the fridge, or 20 minutes in the freezer.
- Preheat oven to 400°F.
- Remove one disc from the fridge and roll out on floured surface until dough is ⅛"-¼" thick.
- Cut with cookie cutters and bake on an ungreased cookie sheet for 6-8 minutes, watching closely. Cookies are done when bottoms are just barely golden. Remove immediately from cookie sheet, then let cool completely on wire racks before frosting. Make sure cookie sheets are cool to touch before placing more cookie dough on them.
- Decorate with sugar cookie icing and sprinkles, as desired.
Video
Notes
- If the wet ingredients look a little curdled, don't worry. Keep on going, and I promise it will all smooth out.
- The standard way to roll out sugar cookies is to use additional flour, but you can also use powdered sugar. The powdered sugar absorbs into the cookie while it bakes and doesn't leave any flour residue.
- Here's my sugar cookie icing recipe for when it is decorating time!
- Make sure the cookies are cooled completely before decorating.
- These cookies cook fast, so keep an eye on them until you know how long they take in your oven. You want there to be just a touch of gold along the edges.


This has been my go-to sugar cookie recipe for years now. I think I found it the first year it was published. My daughter uses this as the recipe for sugar cookie orders. We love the almond extract in the cookies and icing. This recipe never fails me
Yes!! I'm so glad you love it as much as I do. And the almond extract takes them to the next level!
I make this exact recipe every Christmas Eve, and they come out perfectly every single time!
Can the dough be made a day or 2 ahead?
Hi Kelley! This dough is great for making ahead! We typically stash it in the freezer if it’s going to be more than a few days before we need it, but if you wrap it up well, you should be able to leave it in the fridge for a few days with no ill effects. Signs of the dough being in the fridge for too long include looking off-color, feeling slimy, or smelling funky. Trust your senses and trash it if it’s suspect! But a day or two should be fine if it’s wrapped up tightly!
Is it possible to just use a hand mixer? Thanks!
Hi Kasey! Absolutely—you can use a stand mixer, hand mixer, or a bowl and spoon (along with some elbow grease)!
Can you make this dough ahead of time and put it in the fridge for a 2-3 days?
Hi Alexandra! This dough is great for making ahead! We typically stash it in the freezer if it's going to be more than a few days before we need it, but if you wrap it up well, you should be able to leave it in the fridge for a few days with no ill effects. Signs of the dough being in the fridge for too long include looking off-color, feeling slimy, or smelling funky. Trust your senses and trash it if it’s suspect! But 2-3 days should be fine if it's wrapped up tightly!
Do i have to use a mixer?
Hi Natalie! We like to make ours in a stand mixer, but you can also do it with a hand mixer or with a wooden spoon and some elbow grease! It actually comes together really easily no matter which way you do it. =)
I love your recipes. I'll try all of them.
Thanks so much, Susan!
How long can the dough stay in refrigerator? Could I refrigerate overnight and roll out, cut and bake the next day?
Hi Mindy! You could definitely refrigerate the dough overnight, then come back the next day to roll, cut, and bake. If we need to leave it for longer than that, we typically stash the dough in the freezer. But you should be able to leave it in the fridge for a few days with no ill effects. Signs of the dough being in the fridge for too long include looking off-color, feeling slimy, or smelling funky. Trust your senses and trash it if it's suspect!
Can the cookies be baked on parchment paper? Thinking this will help keep the cookies from burning on the bottom.
Hi Sharon! Using parchment paper should be fine. We don't recommend silicone baking sheets for cut-out cookies because they tend to spread too much on those. Whether you use parchment paper or not, keep an eye on them for doneness, and you should be fine! Please let us know how they turn out for you. =)
Cassie, I live at 6000 ft in a dry climate making baking a challenge. Any suggestions or recommendations to preparing or baking the cookie I should take into consideration?
Hi Gretchen! Whenever we have baking questions, we head over to King Arthur to find the answer! Here's their guide on high altitude baking: https://www.kingarthurbaking.com/learn/resources/high-altitude-baking We hope this helps!
I followed this recipe exactly . I measured the flour then sifted . The dough is more like cake than cookie I can't even roll them . Seems to me that 3 cups of butter is way to much for 5 cups of flour . Very dissapointed
Hi Janet! I'm so sorry the cookies didn't turn out the way you expected. You're right—3 cups of butter is too much! The recipe only calls for 1 1/2 cups of butter, which is 3 sticks here in the US. I hope that helps clear up any confusion! If you give the recipe another go, please let us know how it works out for you =)
The recipe says 3 STICKS, 1 1/2 cups
Can these be made with non-dairy and gf flour subs?
Hi Anna! If you're looking for gluten-free and dairy-free swaps, we recommend giving our Grain-Free Paleo Sugar Cookies with Coconut Butter Frosting a go. They're gluten-free, grain-free, lactose-free (if you use ghee), refined-sugar free, and paleo—but most of all, they're super delicious! The best part is that you won't have to worry about whether or not your subs and swaps will work because this recipe was made to work gluten-free and dairy-free! Let us know how they turn out for you =)
Just made them for a party tomorrow! Best way to store them so they stay soft ?
Hi, Pd! We like storing these in an airtight container stacked between layers of parchment paper. They'll keep out on the counter for about a week.
For future reference, you can find this info in the post under the heading: How do you store iced sugar cookies?
"Once the frosting has hardened, I stack them between layers of parchment paper in a glass food storage container and leave them on the counter for up to a week."
I hope this helps! =)
How long will the cookies last without icing? I would like to bake them on Monday and ice them Saturday for my son to take to work. Thanks for all the great recipes and ideas.
Hi Rosa! They'll keep for a week or more in an airtight container on the counter. Baking on Monday and icing on Saturday should be fine!
Is there a method of freezing/storing the unbaked cookies already cut into shapes?
Hi, Merium! Yes, you can freeze cut but unbaked cookies flat on a baking sheet, and once frozen store them in a freezer bag or container for up to three months. Hope this helps!
Can these be made with an egg substitute such as ground flax/water? Thanks!
Hiya, Shana! This recipe isn't formulated for flax eggs, so we can't say for certain how it would turn out. Typically if there are more than one or two eggs in a recipe, swapping for flax eggs isn't recommended (unless you're using a recipe that tested for that swap). When in doubt, always seek out a recipe specifically made to be egg-free! Good luck!
OMG this recipe is amazing!! I love that the cookie itself is not overly sweet so there is room for that sweet icing. My boyfriend was even eating them off the cooling rack before I iced them! I ended up using my grandma's icing recipe because I didn't have all the ingredients yours called for, and they ended up tasting like I remembered hers tasting as a kid! Brought back memories! I was afraid I would mess them up since it was my first time making cut out cookies so I only made a half batch, but I will definitely be making a bunch more now!
What a sweet story! Thanks so much for sharing, Kimberly!
I made them for my online Christmas cookie decoration activity with my students, everybody loved it ♥️
Thank you for sharing this recipe ⭐
Yay! Thanks so much for telling us about it, Irma. We're so happy everyone enjoyed it!