
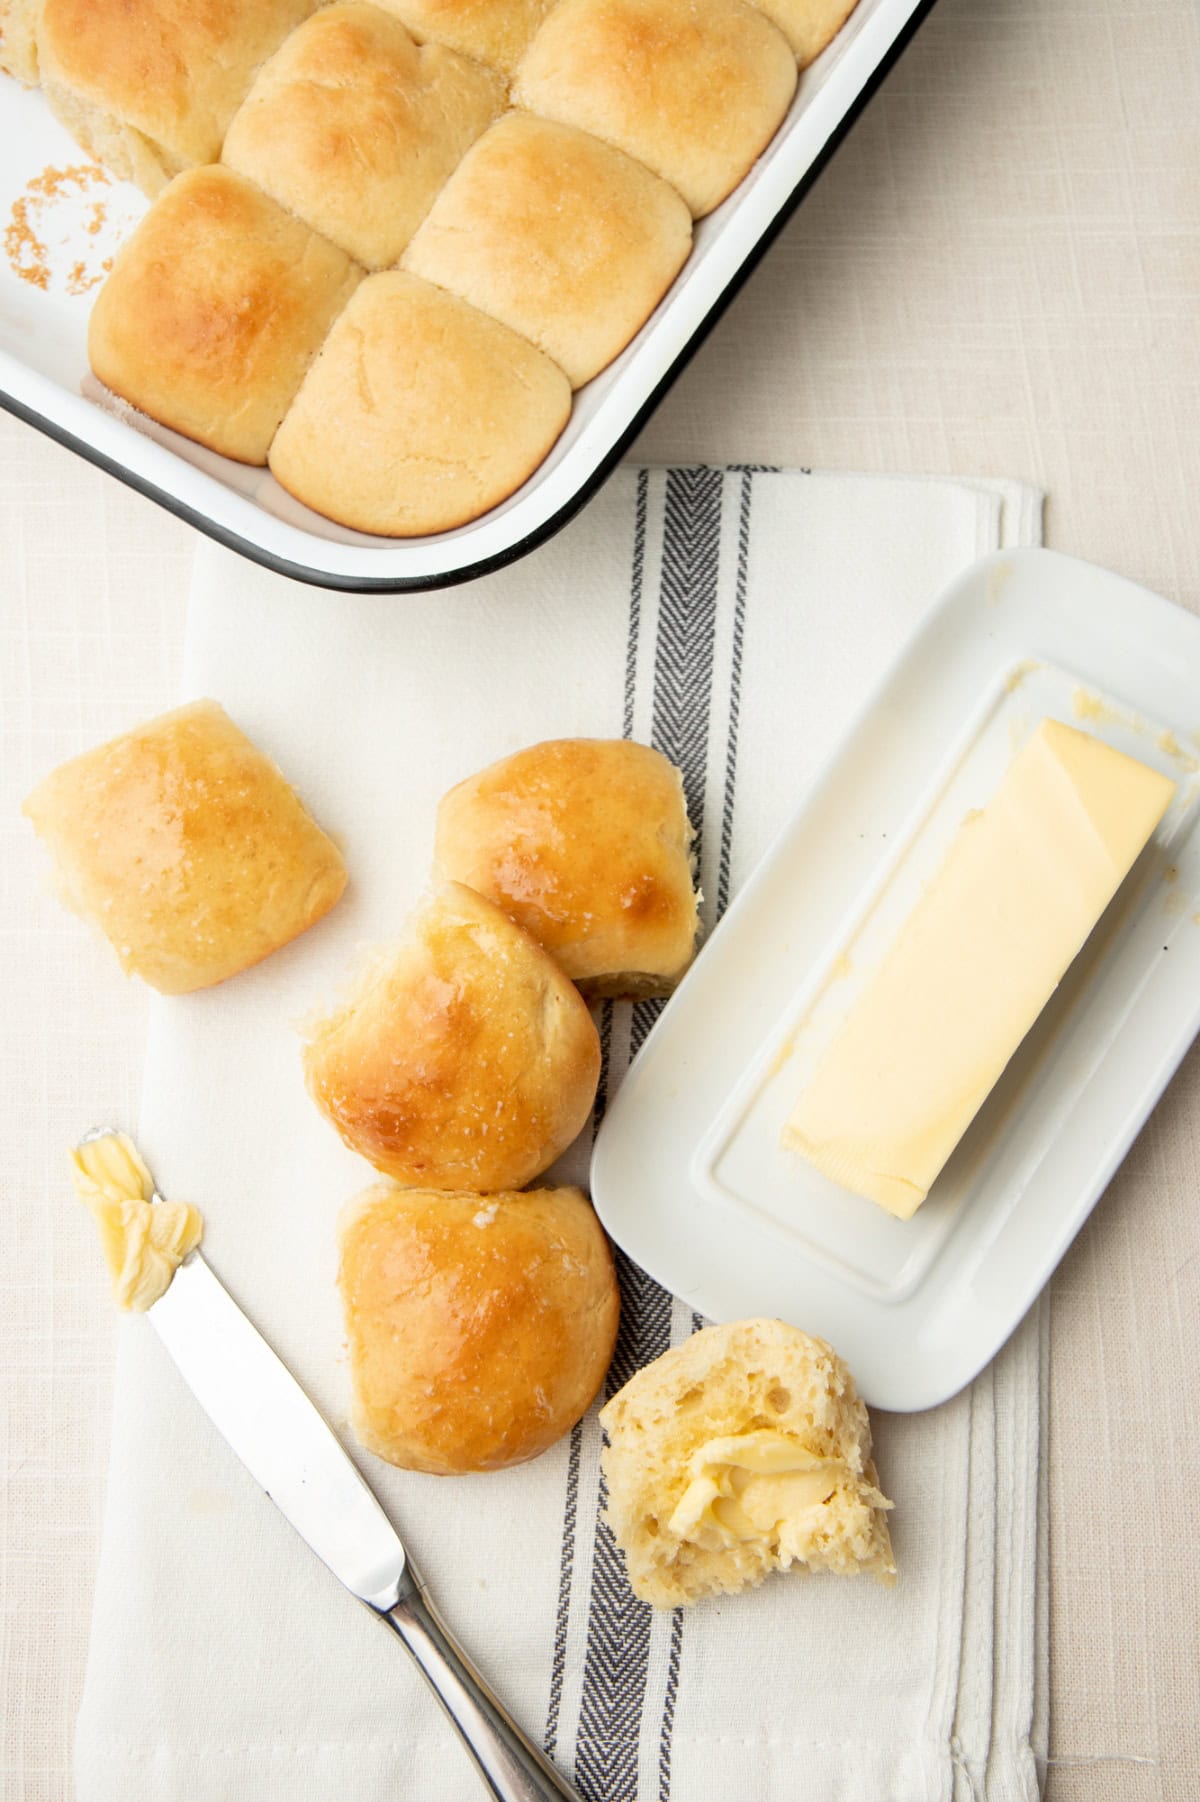
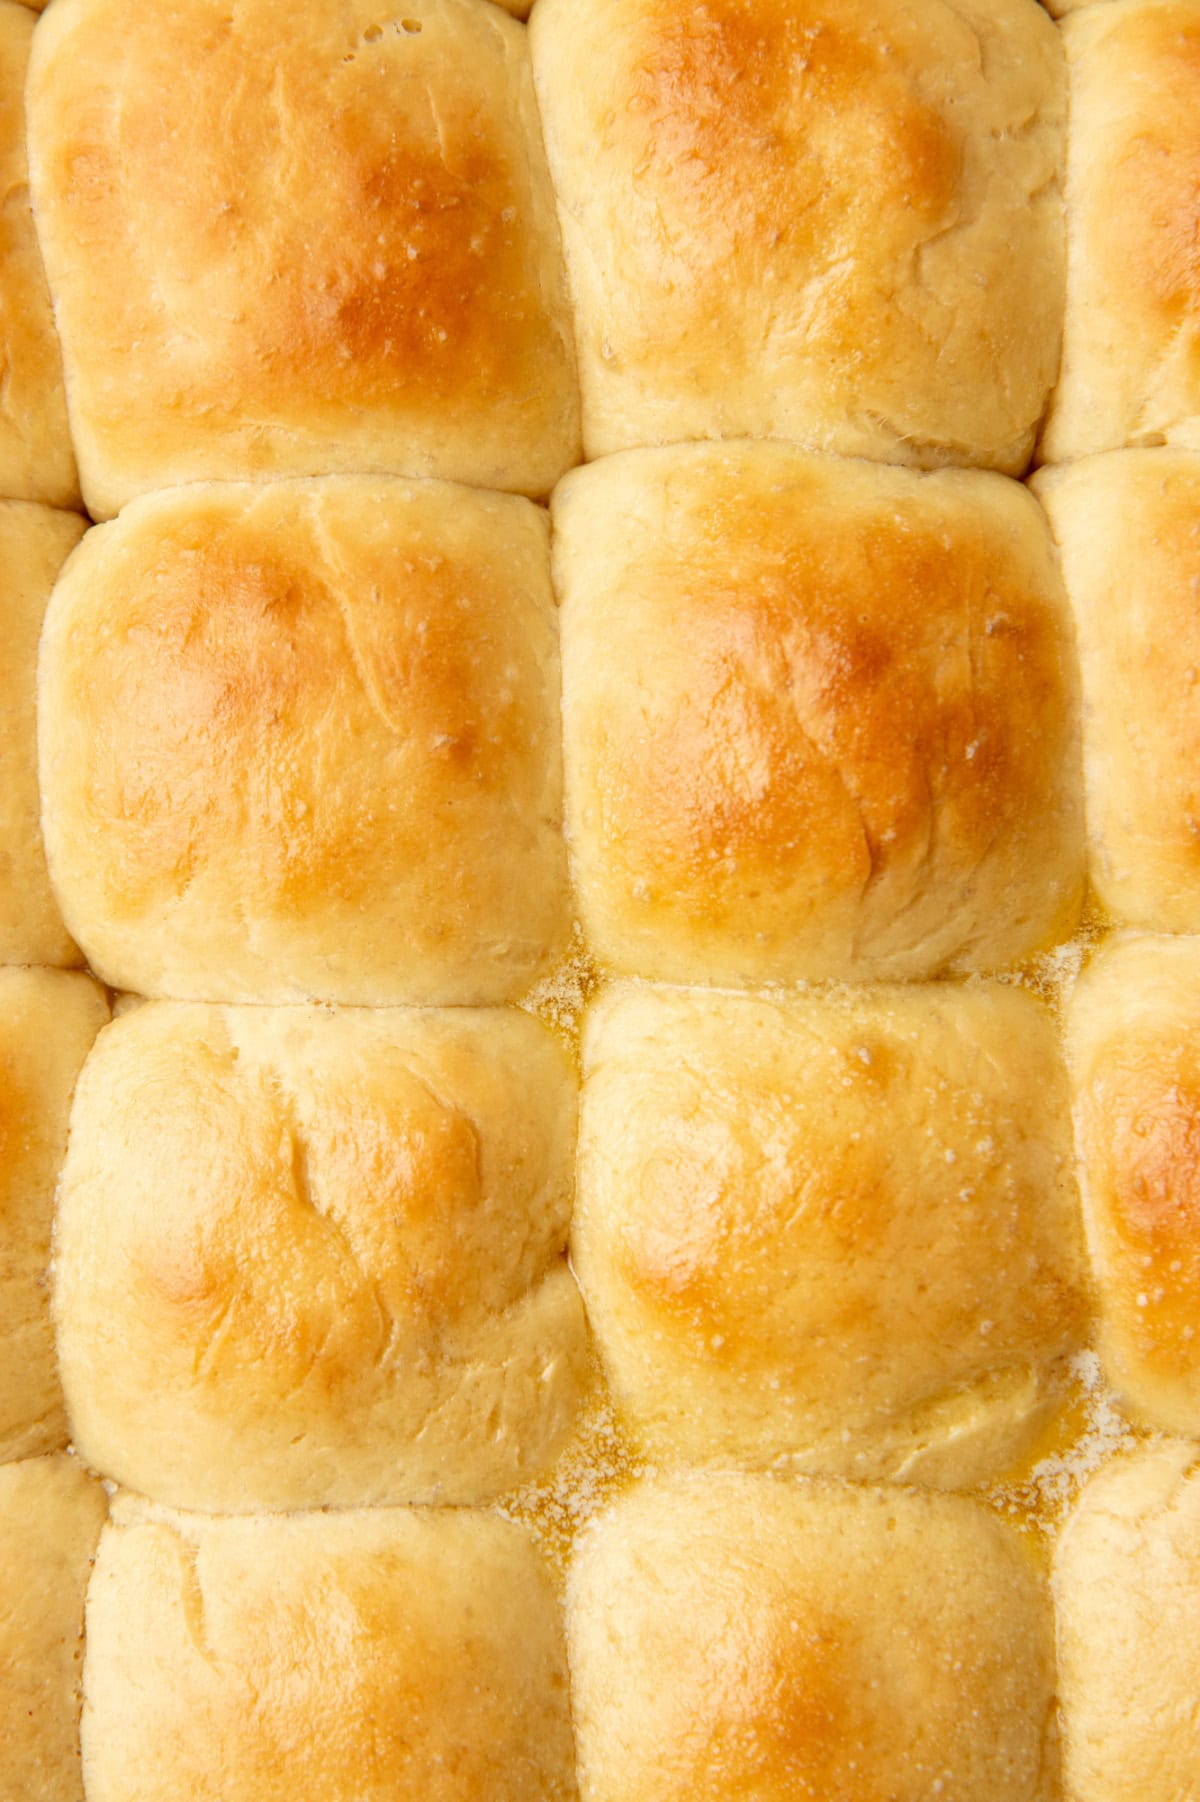
Easy Buttery Yeast Rolls

These Easy Yeast Rolls are soft, buttery, and foolproof-even first-time bakers will feel like rockstars pulling these golden rolls from the oven.
🔍 Recipe At-A-Glance: Easy Yeast Rolls
- 🕰️ Prep Time: 30 minutes, plus 1 hour rising time
- ⏰ Cook Time: 15 minutes
- 💛 Flavor Profile: Buttery, soft, fluffy dinner rolls worthy of the best restaurant.
- 🍽️ Good For: Serving alongside honey garlic chicken, making roast beef sliders, dipping into turkey wild rice soup, or anywhere else you want fluffy delicious bread!
- 🔄 Make Ahead: Make this dough in advance and pop the rolls in the freezer for easy dinners later!
- 🧡 Difficulty: I know working with yeast can be intimidating, but I promise it isn't as hard as you think!

"Made these tonight for dinner and they turned out amazing for my first time making dinner rolls thank you"
- JESSICA -
Summarize and Save this Recipe Using:
🧡 Why You'll Love This Recipe
Hiya friend, I am very fortunate to be in a family of incredible cooks. Like, not to toot our own horns or anything, but we're bordering on gourmet at times (and then at other times, we make chili dogs, but whatev). But I have a confession: for years, we almost always ate frozen dinner rolls with our holiday dinners.
Not anymore, friends, not anymore. Because I have perfected the recipe for EASY yeast dinner rolls from scratch. These no-fail rolls come together in a flash. You can do this!
Here's why you'll love this recipe:
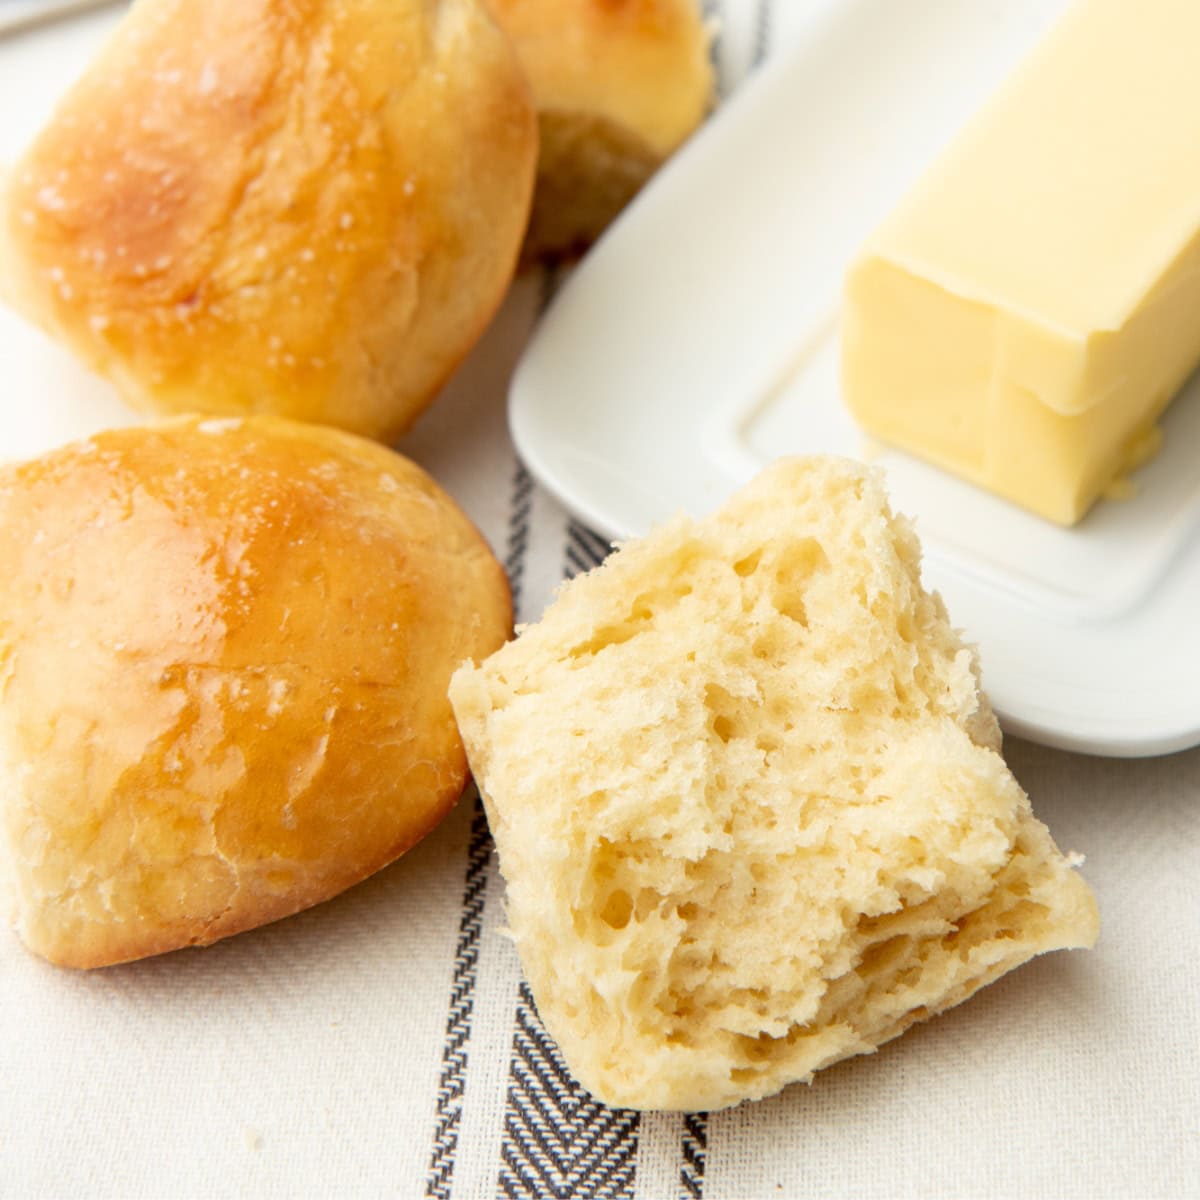
- Tastes like comfort: These rolls are buttery, fluffy, and pillowy-soft enough to pull apart with your fingers...like any good dinner roll should be!
- Beginner-proof: The dough is forgiving and rises like a champ (I'll give you my tips for making that happen below). Follow this recipe, and you'll get beautiful yeast rolls, every time you make them!
- Fits your schedule: Make the dough in advance, bake them later. These rolls are as flexible as a busy cook's schedule needs them to be.
- Versatile: They may be called dinner rolls, but that doesn't mean these babies can only be eaten at dinner. Use them for cute little breakfast sandwiches, serve them at lunch with some chicken and pumpkin soup, or use them for sopping up all the delicious juices from your dry brined turkey, roasted chicken, or slow cooker honey ham. They would also make fun chicken sliders! Split one open and tuck in some leftover Instant pot turkey breast and cranberry orange sauce for the best Thanksgiving leftovers sandwich. The possibilities are endless!
🍞 The Ingredients You Need
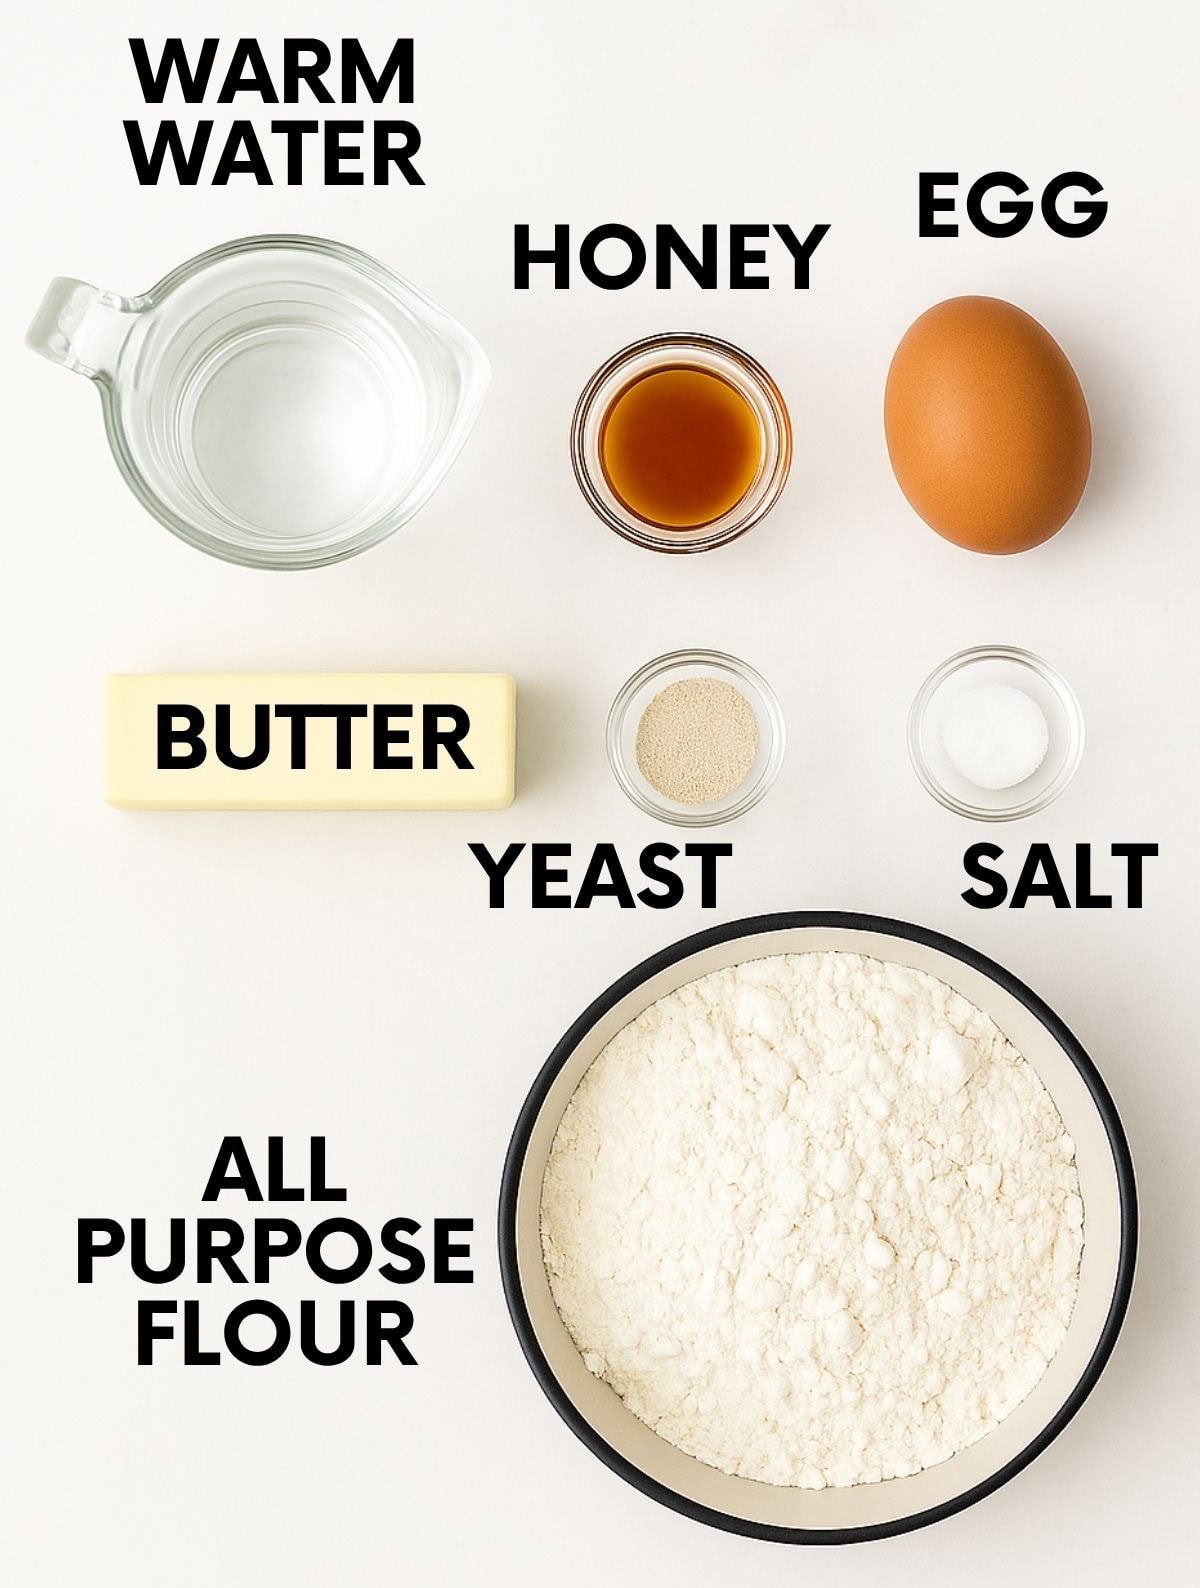
- Active Dry Yeast: Instant yeast has its place, but you'll want the active dry kind for these rolls! I know a lot of folks find baking with yeast intimidating, but once you get the hang of it, you'll wonder why you were ever afraid. There are a lot of hardcore bakers out there that will give you very specific rules and requirements about working with yeast (it can definitely be a science), but I honestly don't think it has to be that complicated. Just make sure your yeast is fresh, and use warm (not hot) water to proof it!
- Honey: This isn't because you're making sweet rolls. It's because the sugar will feed the yeast and help it do its thang!
Make sure to check the recipe card below for the full ingredients list, along with quantities and my expert tips and tricks.
🔁 Variations & Substitutions
- Parmesan garlic rolls: While we usually use plain butter, you could also brush these yeast rolls with Parmesan garlic butter before baking for even more flavor.
- Clover-shaped rolls: When I want to feel a little fancy, I make clover rolls! Pinch off three batches of about 13 grams of dough each, and form into small balls. Drop the three balls into the greased cups of a muffin tin, cover, and let rise until doubled in size.
- Bread machine rolls: I no longer have a bread machine in my kitchen, but I did test making these rolls with one back when I did! See the recipe card below for the full bread maker instructions!
- No stand mixer rolls: If you don't have a stand mixer, no worries! You'll just need to consider today arm day, because you'll be kneading the dough for 7-10 minutes by hand instead of letting the stand mixer do the work. The rest of the recipe should be the same, but check the recipe card below for all the steps in one place.
🥣 Easy Yeast Rolls How-To
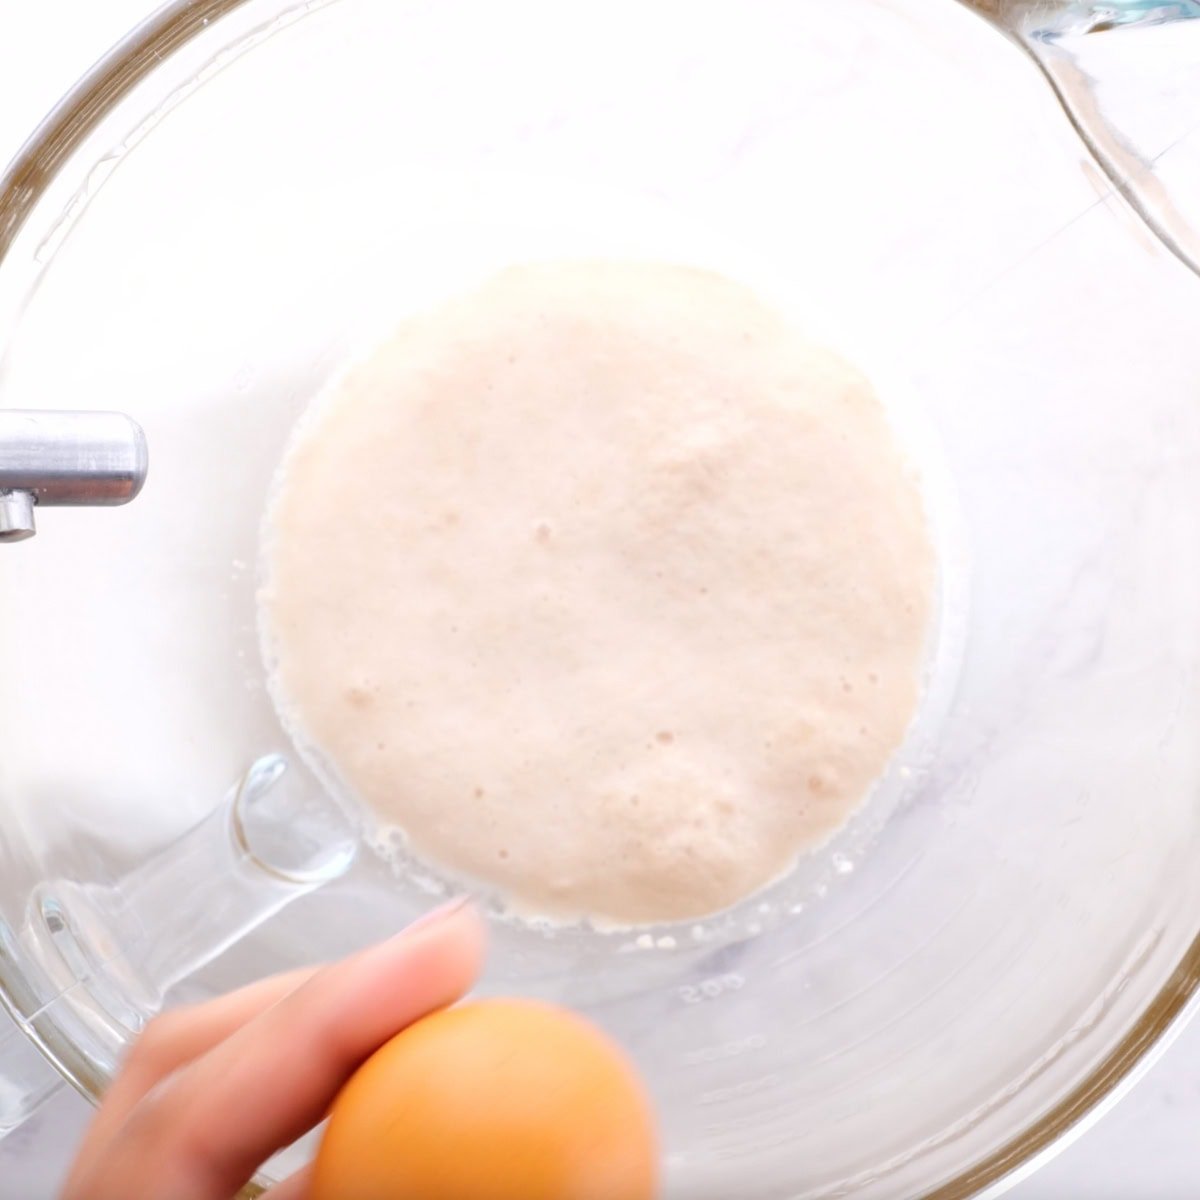
Step 1: In the bowl of your stand mixer, add the water, yeast, and honey. Mix for just a few seconds, then let it sit for five minutes. When the yeast is bubbly and foamy, you can move on to step 2!
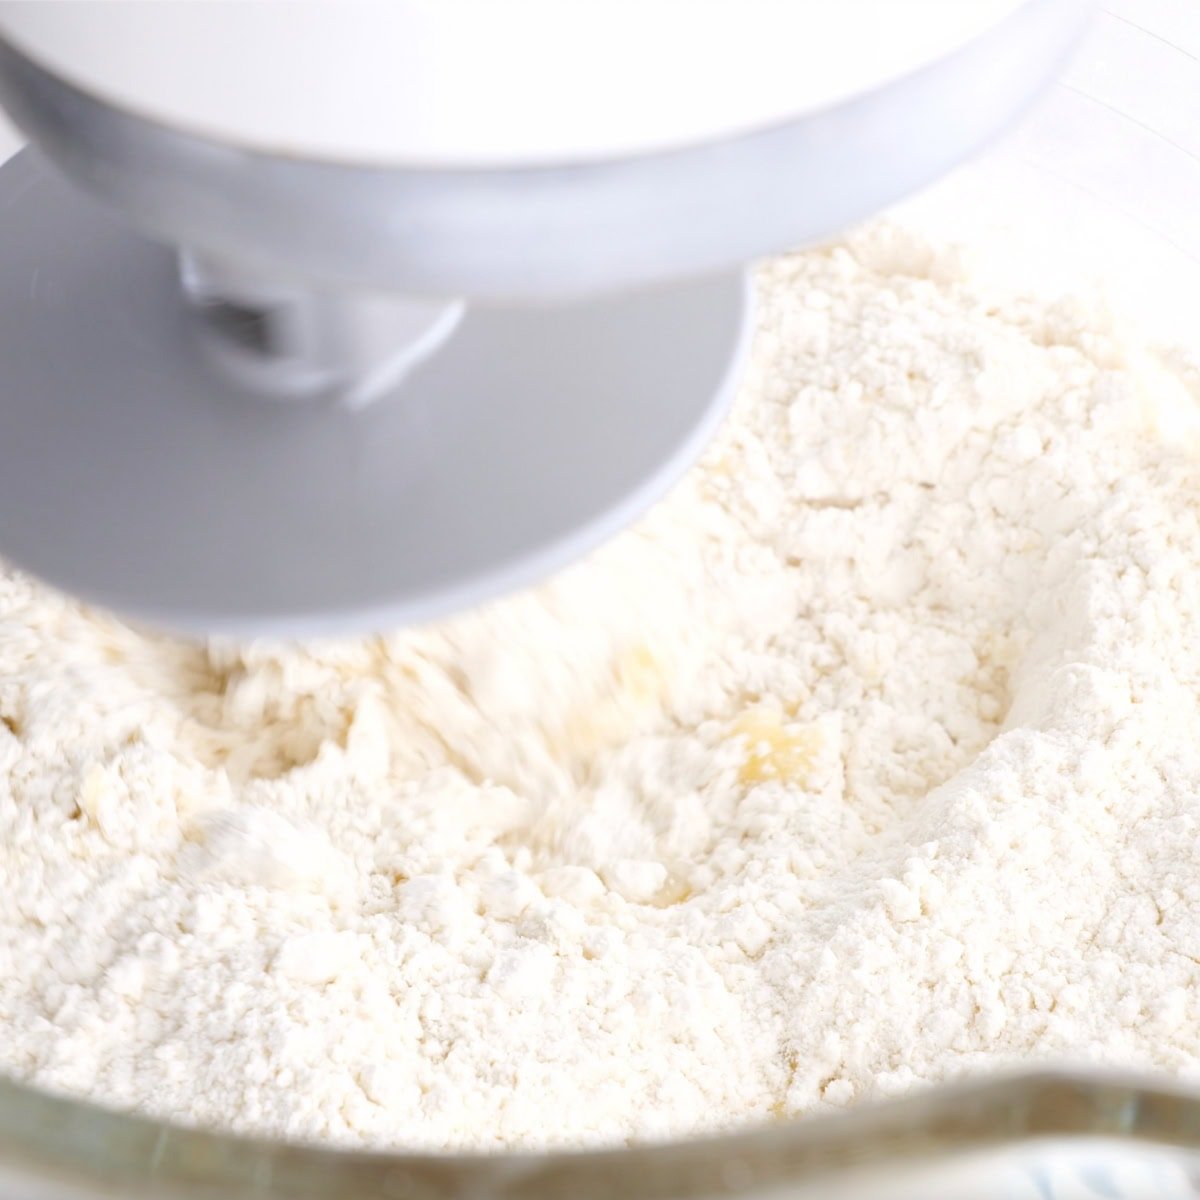
Step 2: Add the egg, butter, flour, and salt. Fit the mixer with the dough hook and mix, mix, mix on low. The dough will start off looking shaggy and dry.
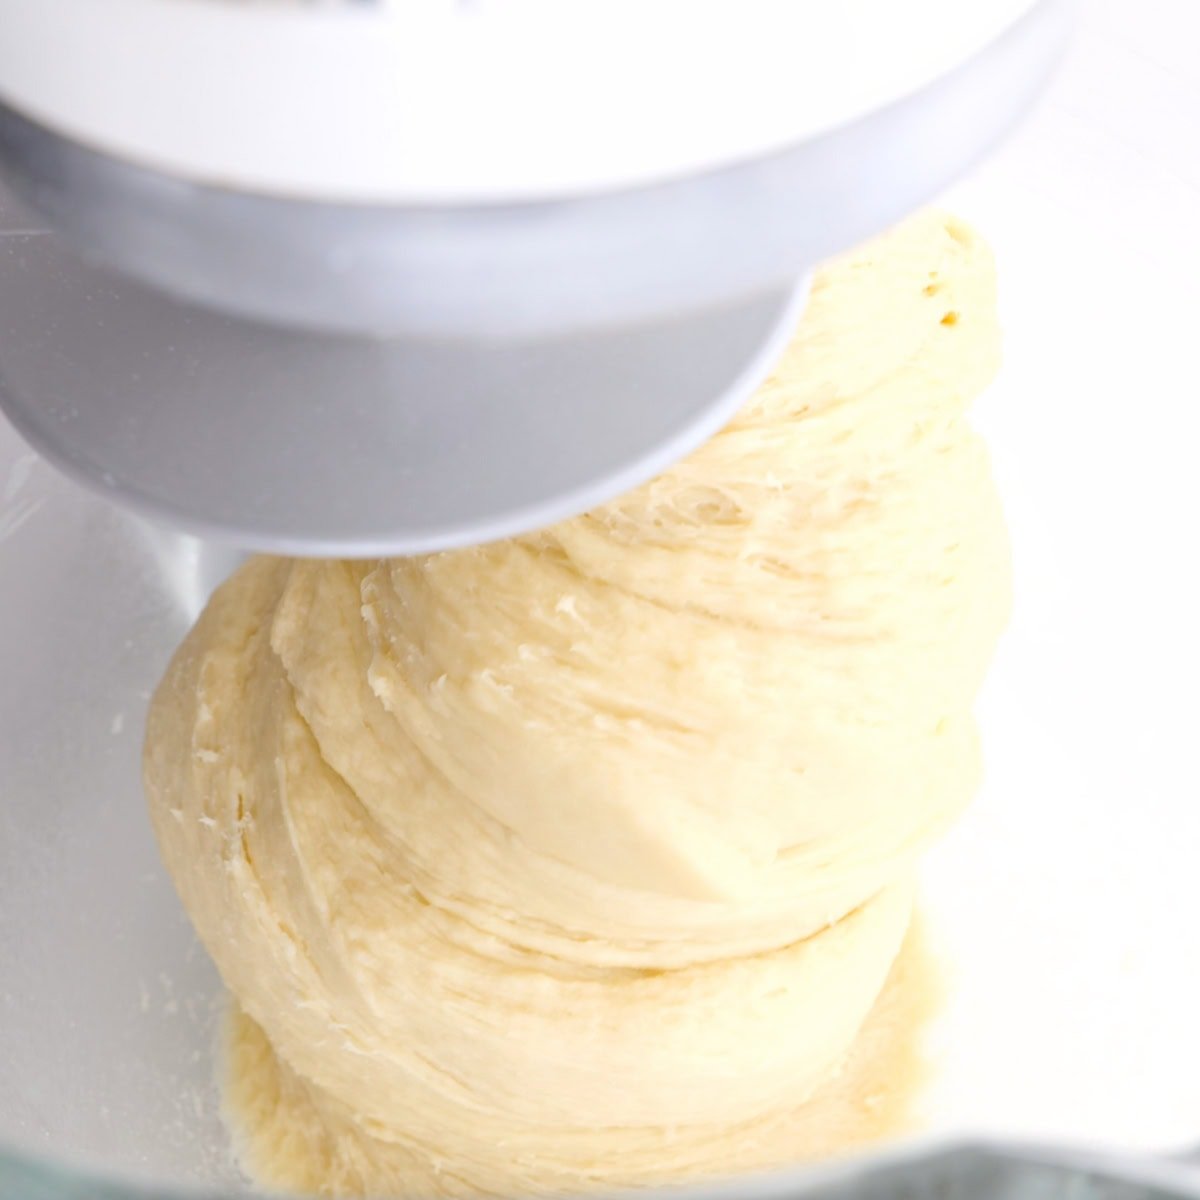
Step 3: Turn the mixer up to medium, and let it run for 5-7 minutes. The dough should start forming a ball that is smooth. The dough should feel tacky and a little springy.
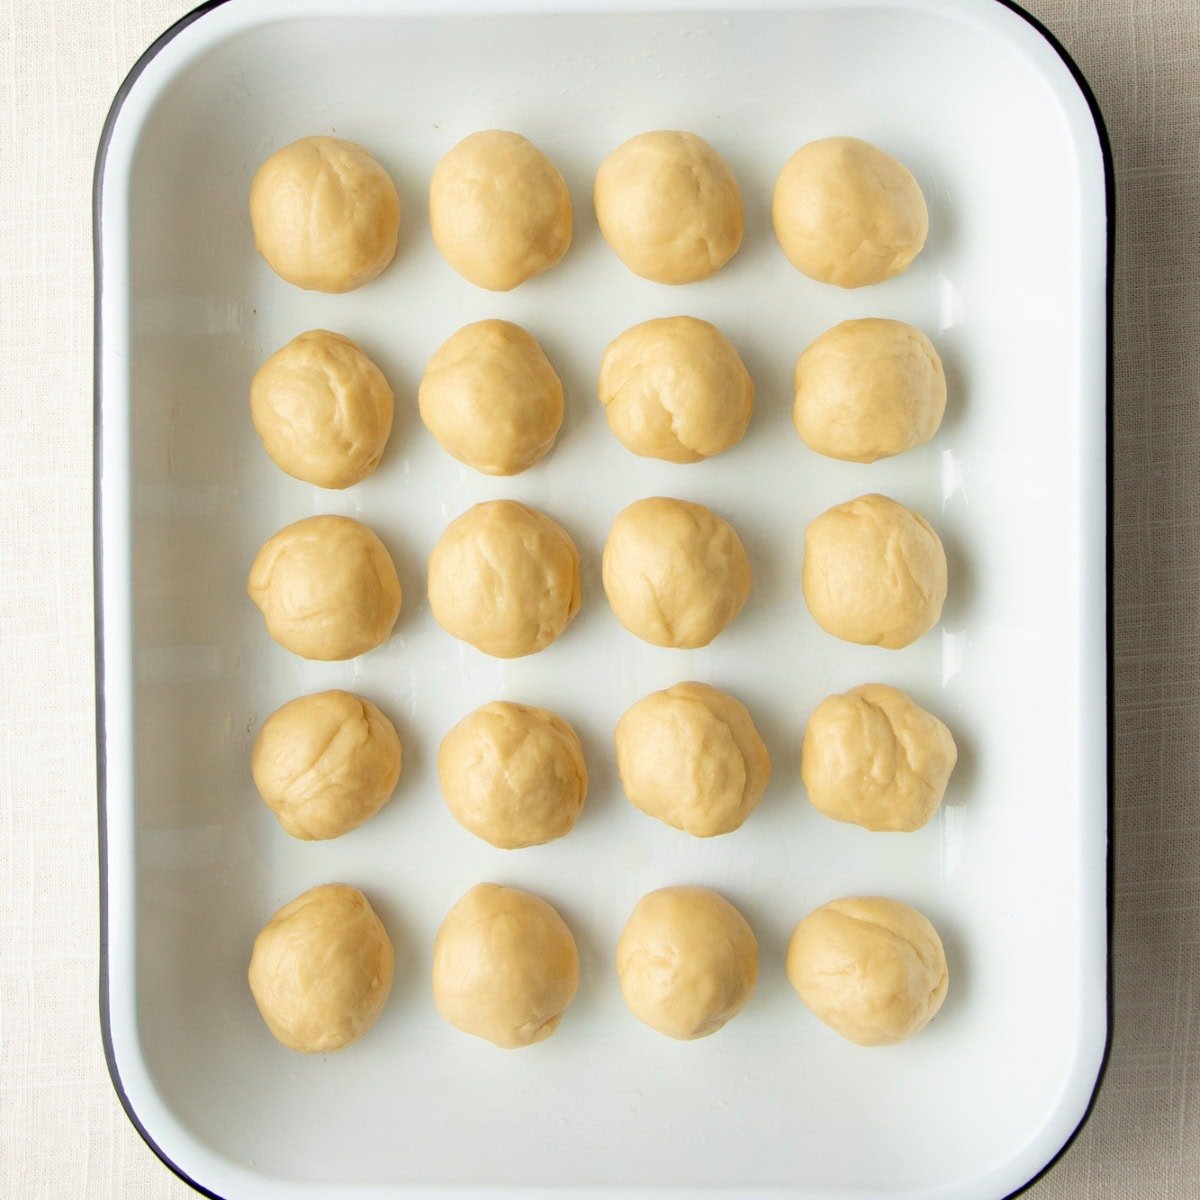
Step 4: Spray a baking dish with cooking spray. Weigh out balls of 40 grams of dough (this is a little bigger than a golf ball) and space them out in the baking dish. Cover loosely with plastic wrap and set the dish somewhere warm for the rolls to rise. When my kitchen is cold, I personally lean on the "set the pan on top of a bowl of hot water" trick (see the FAQs below) to get them to rise!

Step 5: When the rolls have doubled in size, preheat the oven to 350°F. This takes about an hour in my kitchen, but could take longer if your kitchen is cooler.
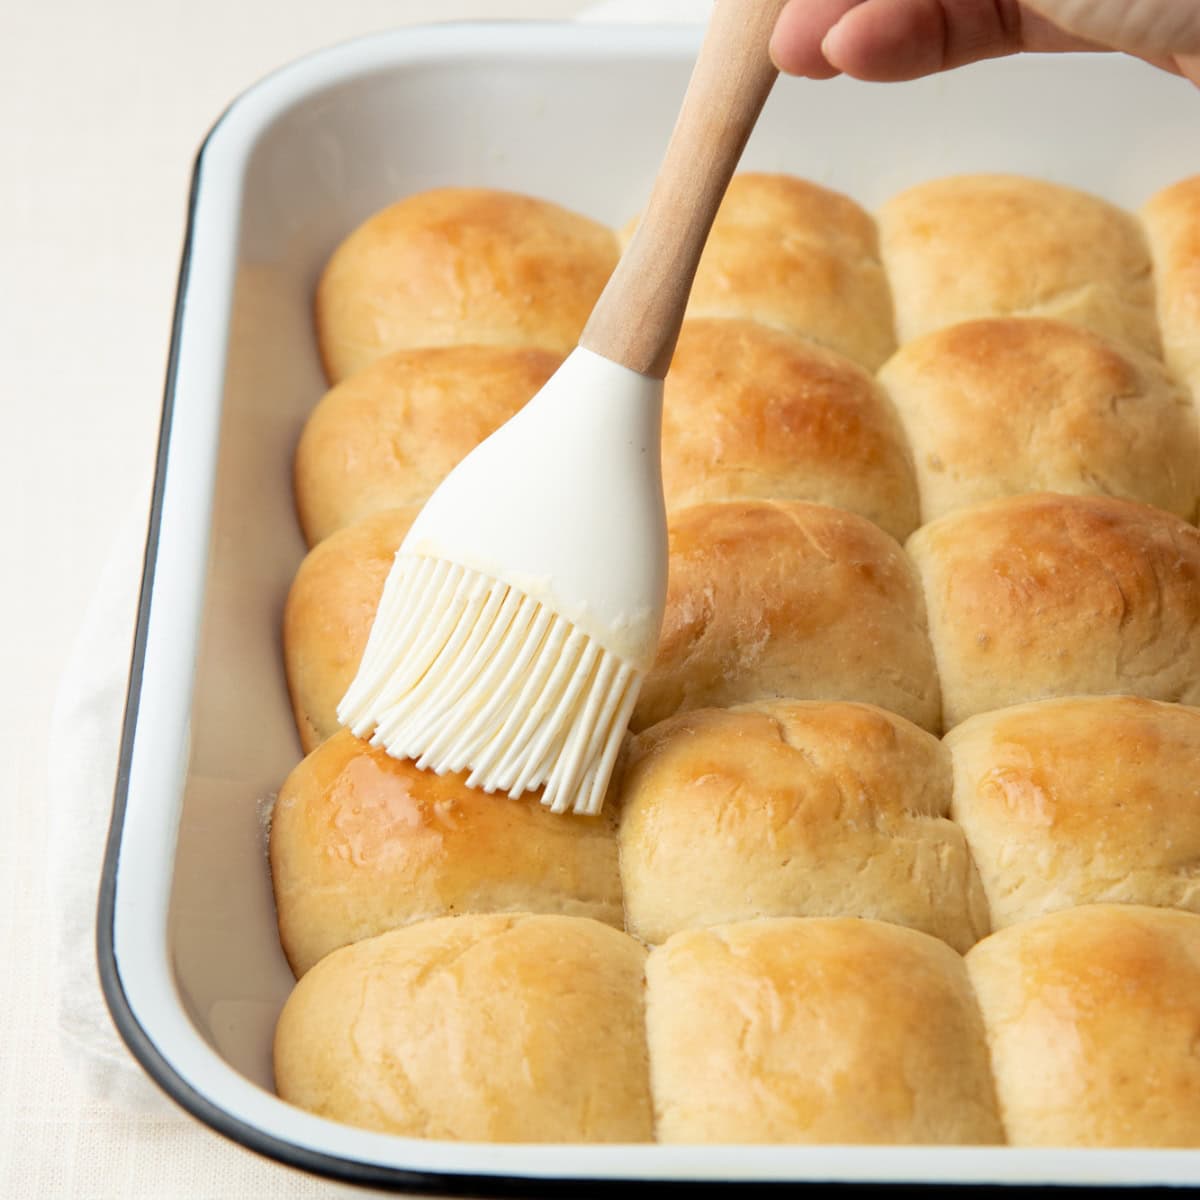
Step 6: Brush with melted butter and bake for 12-15 minutes. When the tops are golden brown, take the rolls out of the oven and brush them with more melted butter just before serving.
🙋🏻♀️ Easy Yeast Rolls FAQs
When it comes to rising yeast dough, there are lots of ways to both speed up or slow down the rising (depending on what you need). If you're pressed for time and need that dough to rise quickly, here are a few options:
Use the oven. Many modern ovens have a "proof" setting. Turn that on and place your covered dough in there to rise. If you don't have that setting, an oven light often pumps out enough heat too. Or, just turn your oven to a low temp (200°F or below) for a few minutes, then turn it off, and put the dough in the warm (but off!) oven.
Use the fire/wood stove/furnace. Our fireplace hearth is an excellent place to let dough rise. Wood stoves, radiators, and other warm (but not too hot) sources of radiant heat are a good option, too. Just make sure to rotate the dough if the heat source is one-directional (like from a fireplace).
Try the top of the fridge. The top of our fridge is nice and toasty! Yours might be, too. Try it.
On top of a bowl of boiling water. This is my favorite tip, and the one that consistently works for me. Boil water in a kettle. Pour into a large mixing bowl. Rest covered pan/bowl of dough on top of the bowl of water. The heat from the steam does wonders to get dough to pop up fast!
On top of a heating pad. This is a great trick! Pull out a heating pad, set it to medium, and place your pan on top of the heating pad.
Try outside. This isn't applicable in November in Indiana, but in August? You better believe I'm putting my dough out in the 90-degree sun on the back deck to rise.
We recommend deciding when your rolls are finished rising by checking the volume rather than the time. You want your rolls to be doubled in size before popping them in the oven-they'll look puffy and swollen. In some kitchens, this may happen as quickly as within the hour. In cooler kitchens, you might need three or four hours. Baking superstars judge when their rolls are ready for baking by appearance, not time!
You sure can! Line up your cooked dinner rolls on a baking sheet, and then freeze until solid. Transfer to a zip-top freezer bag or a glass food storage container and store in the freezer for up to three months. To use, defrost at room temperature for 30-60 minutes, or warm in the microwave for 20-30 seconds.
👩🏻🍳 My Expert Tips & Tricks
- Keep your yeast happy: Cold yeast is a long-lived yeast. I like to store mine in a closed canning jar in the fridge or freezer and get a new package every few months. Honestly, if you keep it in the freezer, it'll last pretty much indefinitely.
- Proof the yeast: Yeast is your new little baking buddy, and it just wants to be cozy and fed in exchange. Give it warm water and a little honey to wake it up before you start baking. If the yeast mixture doesn't bubble and foam after a few minutes, your yeast might be inactive, and you should toss the mixture and try again with fresh yeast.
- Don't kill your yeast with hot water: Yeast will do its thing in warm spaces, at room temperature, or even in cooler temps (albeit much more slowly than at warm temps), but very hot water will kill the yeast. Err on the side of too cool.
- Weigh it out: Weigh each ball of dough before shaping. That's how you get the most equal size rolls, which cook evenly and look bakery-level pretty.
- Freeze 'em: And, of course, to bring this full circle, you can freeze these rolls in the dough stage (before they rise), pop 'em in a bag, and have them ready for a meal whenever you need some bread for sopping. Just freeze them flat on a parchment paper-covered cooking sheet, and then once frozen, store in a labeled zip-top freezer bag. To bake, place the frozen dough balls in a greased baking pan, about ½ inch apart, and then let rise in a warm area until defrosted and at least doubled in volume. Bake as you would if they were fresh.
🥖 More Easy Bread Recipes:
If you tried these easy yeast rolls or any other recipe on my blog, please leave a 🌟 star rating and let me know how it went in the comments!
📖 Recipe
Quick Easy Yeast Rolls
Ingredients
- 1 cup warm, not too hot, water (~105°F)
- 3 tablespoons honey
- 2 ¼ teaspoons dry active yeast 1 packet
- 1 large egg beaten (note: the metric measurement is for the egg out of the shell)
- ½ cup butter, melted plus more for brushing; 1 stick
- 3 ½ cups all-purpose flour plus an additional ¼-1 cup (34-136g) flour
- 1 teaspoon salt
- Cooking spray
Instructions
Stand Mixer Directions
- In the bowl of a stand mixer fitted with the dough hook, add in the water, yeast, and honey. Turn on to low and mix for just a few seconds, until combined. Let proof for about 5 minutes, until bubbly and foamy-this is how you know your yeast is active. If your yeast is not active, toss it out and start again with fresh yeast.
- Add in the egg, butter, 3 ½ cups of flour, and the salt. Turn on low and mix until well-combined. Add in the remaining flour, ¼ cup at a time, until the dough is not too sticky, but still soft and pliable (you may not need all the flour).
- Turn the mixer up to medium, and let it knead the dough for 5-7 minutes, or until the dough is soft, smooth, and not as sticky.
- Spray an 11 x 13 inch baking dish with cooking spray. Form the dough into small balls-about 40 grams worth each, or a little bigger than the size of a golf ball-and then place in the prepared baking dish, spacing them about ½ inch apart.
- Cover the baking dish loosely with plastic wrap, and then let rise in a warm spot until doubled in size (about an hour in my kitchen, but your results may vary).
- Preheat oven to 350°F. Once rolls have risen, brush tops with melted butter, and then bake in preheated oven for 12-15 minutes, or until the tops are golden brown. Brush with more melted butter just before serving.
Bread Machine Directions
- In the pan of a bread machine, mix the water, yeast, and honey. Stir for just a few seconds, until combined. Let proof for about 5 minutes, until bubbly and foamy-this is how you know your yeast is active. If your yeast is not active, toss it out and start again with fresh yeast.
- Add in the egg, butter, 3 ½ cups of flour, and the salt. Turn the machine on the dough cycle. Check after a few minutes of mixing, and add more flour if necessary (you're looking for a slightly sticky, soft dough). You might not need all the flour.
- Once the dough has completed the kneading in the bread machine, turn off the machine and remove the dough.
- Spray an 11 x 13 inch baking dish with cooking spray. Form the dough into small balls-about 40 grams worth each, or a little bigger than the size of a golf ball-and then place in the prepared baking dish, spacing them about ½ inch apart.
- Cover the baking dish loosely with plastic wrap, and then let rise in a warm spot until doubled in size (about an hour in my kitchen, but your results may vary).
- Preheat oven to 350°F. Once rolls have risen, brush tops with melted butter, and then bake in preheated oven for 12-15 minutes, or until the tops are golden brown. Brush with more melted butter just before serving.
Bowl and Spoon Directions
- In a large mixing bowl, mix the water, yeast, and honey. Stir for just a few seconds until combined. Let proof for about 5 minutes, until bubbly and foamy-this is how you know your yeast is active. If your yeast is not active, toss it out and start again with fresh yeast.
- Add in the egg, butter, 3 ½ cups of flour, and the salt. Stir until well-combined. Then, add in remaining flour, ½ cup at a time, until the dough is not too sticky, but still soft and pliable (you might not need all the flour).
- Dump the dough out onto a floured work surface. Knead for 7-10 minutes, until the dough is soft, smooth, and not as sticky.
- Spray an 11 x 13 inch baking dish with cooking spray. Form the dough into small balls-about 40 grams worth each, or a little bigger than the size of a golf ball-and then place in the prepared baking dish, spacing them about ½ inch apart.
- Cover the baking dish loosely with plastic wrap, and then let rise in a warm spot until doubled in size (about an hour in my kitchen, but your results may vary).
- Preheat oven to 350°F. Once rolls have risen, brush tops with melted butter, and then bake in preheated oven for 12-15 minutes, or until the tops are golden brown. Brush with more melted butter just before serving.
Video

Notes
- Keep your yeast in the fridge or freezer to keep it fresh and active.
- If the yeast mixture in step one doesn't get foamy after a few minutes, your yeast might be inactive. Try again with fresh yeast.
- Make sure your water is warm, not boiling hot. Too hot, and you'll kill the yeast!
- If you can, weigh out the dough for each roll. Equally sized rolls = evenly baked rolls.
- You can freeze these rolls before they rise. Freeze them flat on a baking sheet before moving them to a labeled freezer bag. To bake, place the frozen dough balls in a greased baking pan, about ½ inch apart, and then let rise in a warm area until defrosted and at least doubled in volume. Bake as you would if they were fresh.
You'll never be afraid of cooking with yeast again after trying these rolls—they are just so easy!
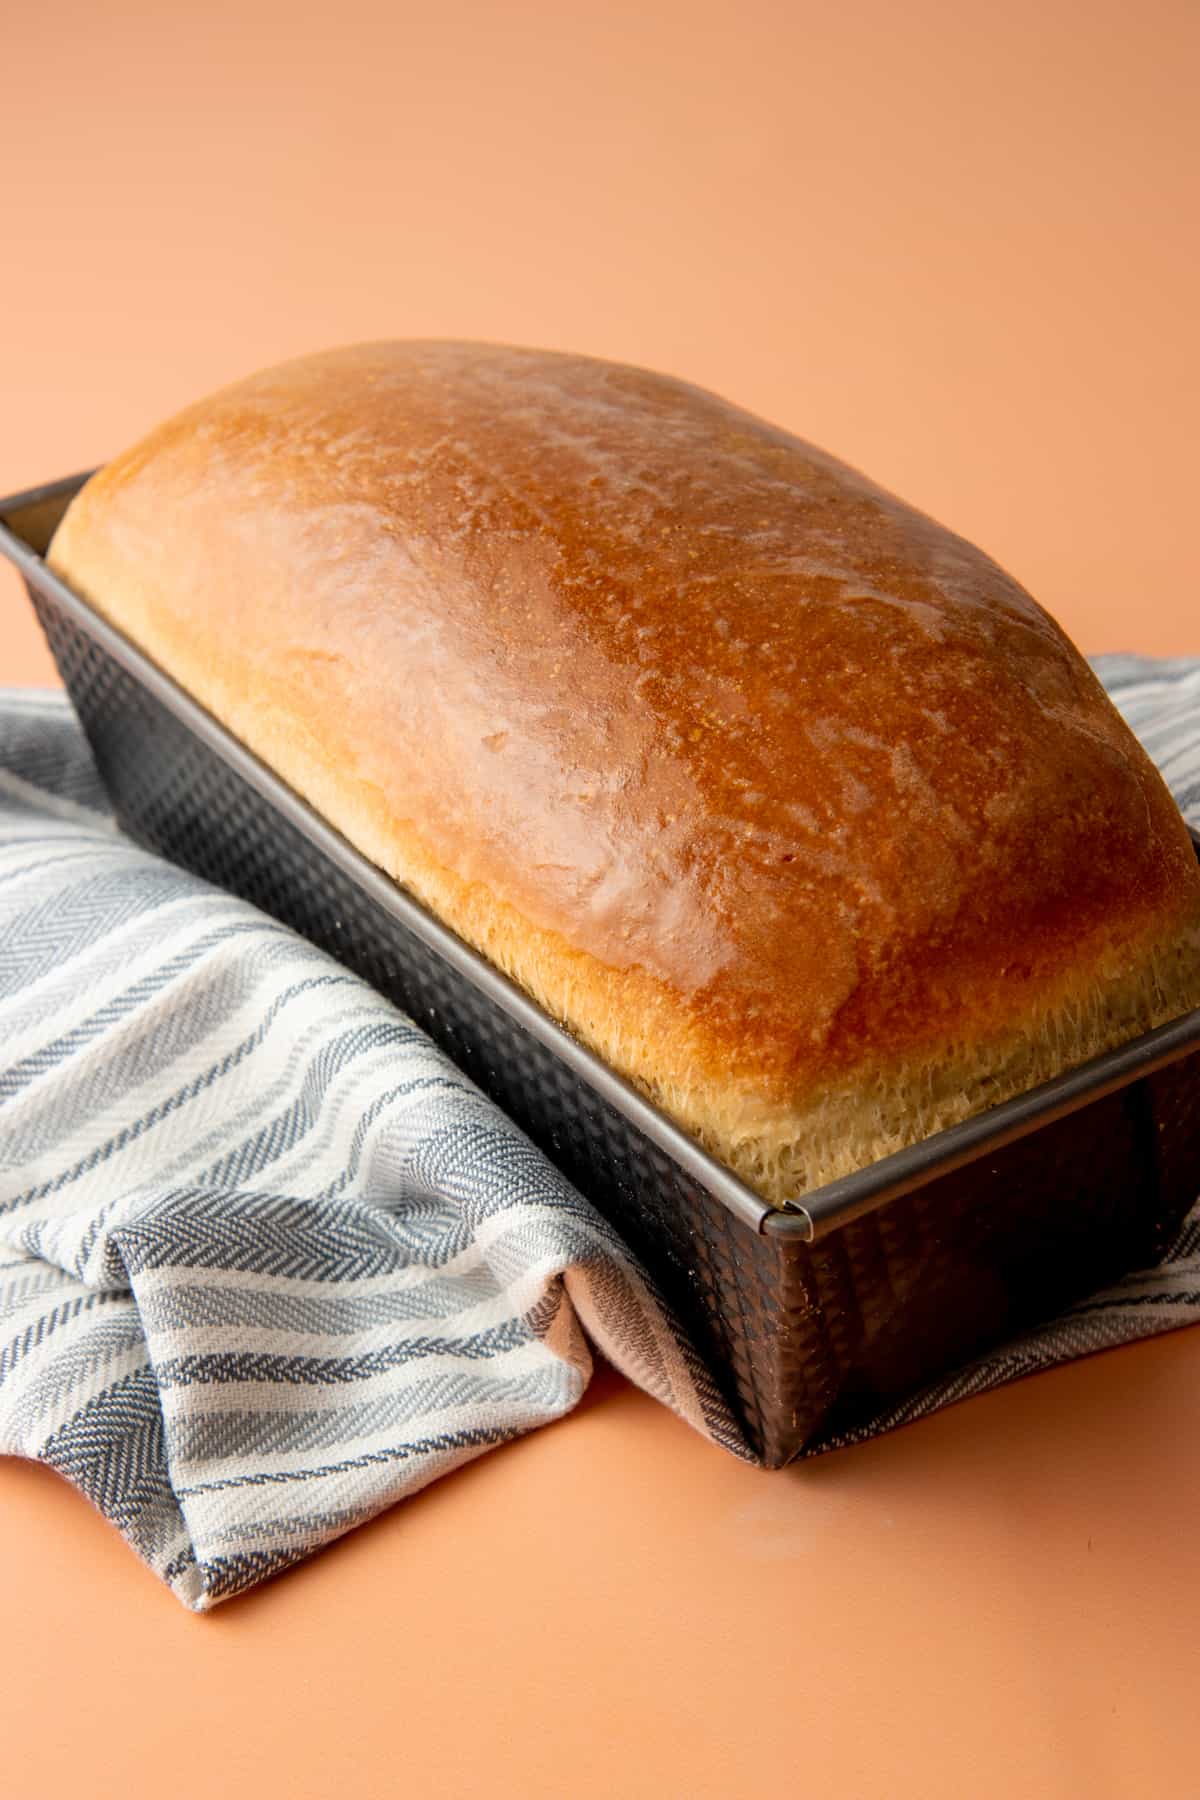
I just made these, but I made them into a bread instead (husband wanted bread not rolls). I put the dough in a loaf pan and I let it rise once. I didn’t put melted butter on top as I was afraid it would make it sink. I baked it for 25 minutes and it turned out terrific. I would like to try it with some melted butter on top next time now. Thanks for the great recipe.
So good to know it works in loaf form, Andrea! Thanks for taking the time to come back and tell us about it! If you're worried about the melted butter, you could rub the top of the loaf with butter after it bakes to soften the crust. We do that with our homemade sandwich bread, and it works great!
These are the best! I did let them rise twice. Once in a buttered bowl and then as rolls. They rose beautifully. So light and fluffy! This is my new go to recipe for rolls!!
I love this recipe. So I made these and when I took them out of the oven to add melted butter to top I opened my microwave and guess what I saw...The stick of butter that I melted but forgot to put in my rolls. So I thought that they would be really bad but actually they weren't. Today I am going to make them again with all the ingredients and I can only imagine how much better they will be. Thank you
A photo of how the yeast, water and honey should look would be very helpful, thanks
Hi Melissa, It should look a lot like the yeast mixture in our sandwich bread post: https://wholefully.com/wp-content/uploads/2020/03/proofed-yeast.jpg Hope this helps!
Made these tonight for dinner and they turned out amazing for my first time making dinner rolls thank you
I was skeptical that they would be so easy and delicious. I've always struggled with yeast bread but these came out amazing. They didn't brown at all but still yummy!
Just made these and took them out of the oven. I did do two rises, once in the bowl covered in oil, and once again when I made them into rolls. These are excellent, double rise people!!
My mom is thrilled, thanks!
These were wonderful! Followed recipe to the "T" & turned out so delicious!!
How long do these rolls stay good after baking?
I wouldn't use this recipe again,
The rolls didn't get large and fluffy.
They are somewhat hard and wouldn't brown lightly.
Sad I tried your recipe for such a special Holiday as Thanksgiving. :/
Do you use salted or unsalted butter?
Is the honey just for flavor?
It tasted good but nearly biscuit. I made it yesterday and mother in law thought it is biscuit and i told it is rolls. 🙁 i followed the recipe and yeast dough rises.
I tried this recipe using bread flour, and A.P. flour, and followed the rest of the directions to a tee... and the rolls were just ok. They seemed a little tough, like they needed a second rising time to make them fluffy. The taste was really good with the A.P. flour, much better than bread flour. My bread-loving son said that these were just ok, but ate 3. I'll try again with a second proofing to see if that makes a difference in the rolls density.
So you don't dissolve the yeast first?
Nope!
I just whipped up a batch of these to go along side some beef stew, and they're amazing! Thank you so much for posting the recipe!
fab, love all your tips! i mentioned this in a comment before but even though i've been baking with yeast for a couple years now i haven't been very adventurous with straying from the recipe in any way (including adjusting rising times, etc). and i don't know how it never occurred to me to make extra rolls and freeze the dough for future use…brilliant!!
Mhmmmmmm, these look delish!!