
How to Make Instant Pot Coconut Yogurt

I first started making this dairy-free coconut yogurt back in 2014. When my daughter was born, she had a Milk and Soy Protein Intolerance (MSPI, for short), meaning that even the slightest bit eaten by me would come through my breastmilk and cause her incredible stomach upset. It only lasted six months, but in that time, I discovered that my body functions better without dairy. It was confirmed later when I did my time on the AIP diet to find food intolerance.
That's how I discovered the amazing versatility of cashew cream. And that's when I started making my own dairy-free Instant Pot coconut yogurt. It's such a great AIP breakfast option (or any dairy-free diet).

Why should I make this coconut yogurt recipe?
Making yogurt in the Instant Pot (dairy-free or otherwise) is so incredibly fool-proof. If you've ever been intimidated by making your own yogurt before, the Instant Pot is your answer. It makes it so hands-off and so simple-it's honestly almost easier than just going to the store to buy premade coconut yogurt.
And my gosh, can you save some serious cash by making your own yogurt at home-especially the dairy-free stuff. At our local grocery store, a five-ounce cup of coconut milk yogurt runs about $1.99. You can make an entire quart-32 ounces worth-of Instant Pot coconut yogurt for less than $4. It'd cost you $12.74 to buy that much pre-made! And when you go through as much yogurt as we do, that adds up fast.
Another (huge) added benefit: you can control everything about your yogurt-the thickness, the tanginess, and most importantly to me, the probiotic levels. Most store-bought yogurts are barely fermented at all-some sources say that yogurt from the store can be fermented for as little as one hour! One hour does not get you much healthy bacteria, but you know what does? Using your Instant Pot to ferment for 24 hours or more. Yogurt that is fermented for 24 hours has more healthy probiotics per cup than any over-the-counter probiotic pill-we're talking billions of good guys helping to keep your gut happy! And it's way more delicious than popping a pill.
Are there any drawbacks to making Instant Pot coconut yogurt?
The one caveat with Instant Pot coconut yogurt-it's never going to get as thick as cow's or goat's milk yogurt without some help. That's because coconut milk just doesn't have the lactose and proteins that transform the texture when fermented.
How do I make thick, creamy homemade coconut yogurt?
If you love good thick yogurt like I do, I highly recommend using any or all of these three ways to get there:
- Use the right coconut milk. Full-fat coconut milk from the can (not "Lite" coconut milk or the coconut milk from the refrigerated cartons) is going to give you the thickest, creamiest yogurt. In fact, if you can find straight-up coconut cream (this is what I usually use), you're going to get the best results.
- Go for a long ferment. Yes, coconut milk won't thicken like cow's milk during fermentation, but it will thicken some. The baseline time I recommend to turn your milk into yogurt is eight hours-but that's not going to thicken your yogurt at all. If you set your fermentation time for closer to 24 or even 36 hours, you're going to get a naturally thicker yogurt.
- Use a thickener and chill. This is absolutely optional, but I usually thicken my yogurt using unflavored beef gelatin (I've also had good results using agar agar for a vegan version). I just add enough to give it a little bit of body-and not turn it into yogurt Jello-and then I chill until completely cold.
It might take you a bit of experimentation to figure out the right combo that makes your family happy. But once you land on it, you'll never go back to buying yogurt again!


What kind of starter do I need for this coconut yogurt recipe?
When you're making your yogurt, you will need to inoculate your batch with either yogurt starter culture or pre-made plain yogurt from the store. I've done both, and they both turn out beautifully. If you choose to use a yogurt starter, this Yogourmet starter is my absolute favorite*. It has very specific strains of bacteria that are great for your tum-tum-my naturopath has actually recommended I eat yogurt only when it's made with the strains in this yogurt starter to protect my gut health.
(*Please note: this starter contains skim milk powder. If you're looking for a completely dairy-free way to start your batch of coconut yogurt, you'll want to use a different starter or a dairy-free yogurt with live active cultures like we mention below!)
The way easier (and cheaper) route is to use premade yogurt as your starter. Just take three tablespoons of whatever plain yogurt you'd like (dairy, soy, coconut, almond-all fine) that has live, active cultures in it-and whisk that in to innoculate your batch of yogurt. Then, when your batch is done, reserve about ¼ cup of it to make your next batch. You'll never have to buy yogurt again! It's the gift that keeps on giving.

What if I don't have an Instant Pot?
Of course, you absolutely don't have to have an Instant Pot to make yogurt. You can do it in the slow cooker or on a heating pad (my preferred method pre-Instant Pot) or even under the light in your oven-basically, any way you can consistently keep your yogurt around 100°F for 8-36 hours while it ferments will do the trick. The Instant Pot just makes keeping the temperature there SO FLIPPING SIMPLE. It removes all the variables and just makes for perfect yogurt every. single. time. Happy yogurtmaking!
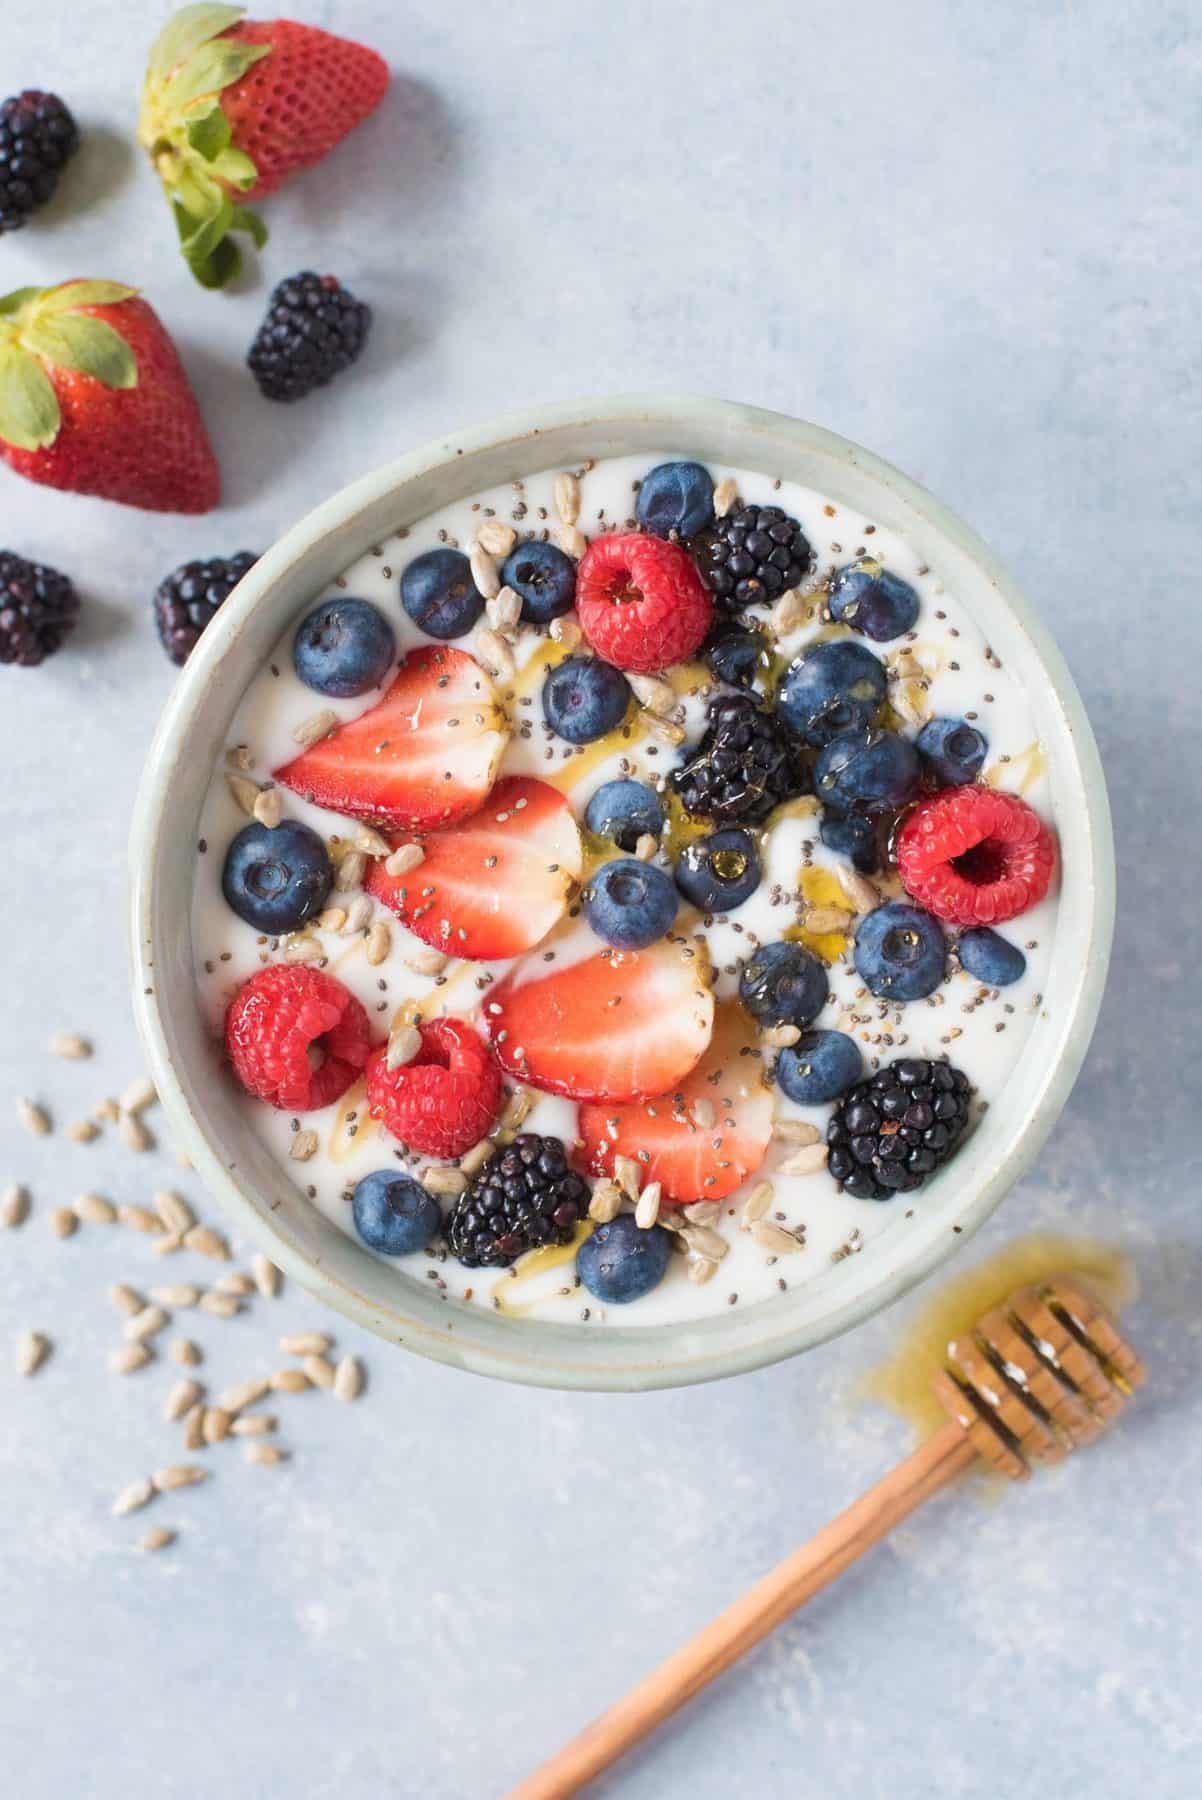
How do I flavor or sweeten homemade coconut yogurt?
When the yogurt is finished and cooled is a great time to stir in any sweetener, jams, fruit butters or flavoring like vanilla extract to add flavor. Here are some good options:
- homemade pumpkin butter
- homemade apple butter
- simple blueberry jam
- strawberry jam
- strawberry-rhubarb jam
You can also obviously use this yogurt in any recipe that calls for yogurt. Here are some good places to try out your new batch of yog:
- healthy overnight oats
- strawberry chia pudding
- yogurt with fruit on the bottom
- fruit and yogurt parfaits
📖 Recipe
Instant Pot Coconut Yogurt
Ingredients
- 1 quart full-fat canned or boxed coconut milk I get best results from this coconut cream, but any full fat coconut milk will work
- ¼ cup maple syrup do not sub in honey-it has its own bacteria that will fight the yogurt culture
- 3 tablespoons plain yogurt with live active cultures dairy, soy, coconut, almond-all fine OR one packet of freeze dried yogurt culture (I like this one)
- OPTIONAL THICKENER: 1 to 2 teaspoons unflavored grass-fed beef gelatin OR ½ to 1 teaspoon powdered agar agar
Instructions
- Pour the coconut milk and maple syrup into the pot of the Instant Pot. Whisk well, then press the "Yogurt" button, and then adjust the setting until you see "boil." Let the Instant Pot run through the process (it's getting the milk up to a temperature of around 185°F), whisking occasionally. No need to place the lid on the Instant Pot during this stage.
- When the Instant Pot beeps that it is finished, allow the milk to cool until it is between 100ºF and 110ºF. This can take upwards of an hour.
- If using starter yogurt: When the milk is at the correct temperature, ladle out about ½ cup of the warm milk into a small bowl, and whisk with the 3 tablespoons plain starter yogurt until smooth. Pour the mixture back into the Instant Pot and whisk well.
- If using freeze-dried yogurt culture: When the milk is at the correct temperature, sprinkle on one packet of the starter culture and then whisk very well to combine.
- If using a thickener, sprinkle on top of the warm milk, and then whisk very well to combine.
- Close the lid of the Instant Pot (no need to seal), and press the "Yogurt" button. Adjust the setting until you see the time display. Set for the desired amount of fermentation time. Eight hours is bare minimum, but I *much* prefer yogurt that has been fermented closer to 24-36 hours. This results in a naturally thick and tangy yogurt-very like regular Greek yogurt. Plus, it has more probiotics! (See notes for more info about time and temp)
- When the fermenting time is up, transfer the yogurt to a glass storage container (I use a wide mouth quart jar) and keep in the fridge. It will thicken up considerably as it cools.
Video

Notes
- If you like thicker, Greek-style yogurt, I recommend using either the gelatin or the agar agar. However, if you want to leave those our, the longer you ferment, the thicker the yogurt gets naturally.
- If you do use the thickeners, the upper range will get you a thicker, Greek-style yogurt, while the lower will just thicken to a "normal" yogurt consistency.
- Since coconut milk doesn't have the same kind of sugars that cow's milk has, the added maple syrup is to give the bacteria a jump-start meal-they eat almost all the sugars and the resulting yogurt isn't sweetened at all.
- My favorite starter (linked in the post and the recipe above) contains skim milk powder. If you're looking for a completely dairy-free way to start your batch of coconut yogurt, you'll want to use a different starter or a dairy-free yogurt with live active cultures.
- Some people recommend using opened probiotic capsules as yogurt starter, and it can work-depending on your probiotic. Proceed with caution though, as some can make yogurt taste really not good.
- When you spoon your yogurt into a container for storage, make sure to reserve a little bit for the next batch of yogurt in a small jar (I just fill one of these quarter-pints). That way, you'll never be without yogurt starter.
- I love my Thermapen for yogurt-making (and honestly, everything else in the kitchen), but if you don't have a thermometer, it's not a big deal. Another trick is to place a (clean!) finger in the milk-when you can hold your finger in the milk while counting to ten, it's cool enough to pitch in the yogurt starter.
- Some folk in the comments mentioned that their Instant Pot only maintained the desired yogurt fermentation temperature (around 110°F) when set for up to 8 hours. Set for longer than 8 hours, their IP used a lower temperature (around 88°F). Our IP doesn't adjust the temperature in this way, so please check your owner's manual before choosing your time setting!
I only have this to use s a starter: https://www.cocojune.co/product/vanilla-chamomile/
Is there a reason why it needs to be plain yogurt?
The fewer ingredients your original starter has, the easier it is to control what is inoculated into your yogurt. But in a pinch, it doesn't hurt to try—if your end result smells or tastes funky, it could be because of the starter though. Good luck!
What would happen if I use peach yogurt as starter?
Mine turned out straight liquid 🙁 should I not have stirred in all the water that was on top of the milk? What did I do wrong?!
Did you use coconut cream?
Can I double this recipe of yogurt to make a bigger batch?
Sure!
Hi! Can you use agave syrup instead of maple?
I haven't tried it, but I don't see why not.
Pretty sure this recipe has not worked for me.
Followed instructions to a T, using probiotic yoghurt.
Has come out so runny like milk; nothing like the video's end result coming out of the IP.
Disappointing!!! Wasted ingredients 🥺
I made this and turned out completely disgusting 😩. I'll not sure what I did wrong. I think the coconut cream may have cooled too much and possibly the powdered ingredients didn't dissolve fully. There was a big chunk of something that looked like plastic floating in it when I opened it and, ya, it tastes just awful.
I made this and the yogurt was SO grainy afterwards, does anyone else have this problem?
Yes, this is the only problem with mine too! It's thick and tastes great, but the texture is very grainy. I used agar agar and coconut cream.
I'm wondering if straining it through cheesecloth before adding the yogurt starter would have helped?
Any recommendations?
My yogurt turned out to be surrounded by liquid with a yogurt-ish center of the pot.
First time making this, so is this normal?
Do I strain it? Do I whisk it?
Did it fail?
Hi, Lisa! It sounds like you could just whisk it back together. But use your best judgement—if it really seems like it's too much liquid, you can always take some out and whisk it back in if it looks like it needs more!
Hi there, making your coconut milk yogurt recipe now. Is there anyway to get nutrition info and any methods to help it contain more protein. Collagen powder?
My instant pot coconut cream yogurt had a hard top after refrigerated, just like when you open the can of milk. It wont stir in. Can I save it?
I just tried this and it didn’t work at all...I followed all of the instructions but it never thickened. I left it in the pot for 18 hours and nothing. It does not look or smell very good either. What did I do wrong....?
2nd try: came out all mouldy an foul smelling. Never gonna try this again I'm afraid. 1st try was ok but not great.
Just tried this and it tasted SO good! Soooo creamy, I did it for 24 hours and it was the perfect tartness. Making this recipe from now on for my whole family ?!!
Thanks for this delicious recipe! I am new to the instant pot. I love coconut yogurt and I am so happy I chose to follow your instructions. It can be overwhelming with so many recipes out there, it’s difficult to choose which one to try. I love the result, it’s just like the most expensive coconut yogurt from the health food store for a third the price. Thanks again!
Always glad to hear it!
Hi! Thanks for this well thought out recipe. I can't wait to make it. I am going to order the Yogourmet starter via your hyperlink in the recipe. However, I did notice that Yogourmet has another option to buy a Freeze Dried "Probiotic" starter (the green one). Do you have any insight as to which one of these may be better?
I haven't tried the Probiotic start, so I can't speak to it. Let me know if you do try it out!
Hi there! The first batch I made came out exactly like your video and was delicious. The second batch I tried almond milk and the end product was rubber. I went back to the coconut milk and it again came out rubber. Any ideas what I am doing wrong? I used the freeze dried starter, maple syrup, and agar agar and let it ferment for 24 hours 🙁
Hey Cassie!
I am getting ready to try out this awesome recipe when my yogurt packets arrive.
You state that the yogurt is unsweetened, Greek-like. How would you suggest sweetening/flavoring!? I kind of want to try a Greek-style piña colada flavor (coconut and pineapple). Any tips/tricks/suggestions!!
I would recommend sweetening and flavoring it after the ferment. So just mix in your favorite flavors once it's chilled!
After following this recipe to the letter (Instant Pot Coconut Yogurt) and 16 hours, I have - guess what? - coconut milk with maple syrup added. I added 3/4 tsp agar agar and it didn't thicken one tiny bit. Very disappointed and feel like I wasted my money on ingredients!
I'm bummed. I didn't look carefully for ingredients on the Yogourmet starter and find it is made with skim milk power. We don't use dairy. Who wants my package?
I would try it.
My IP also does not have the Yogurt function. Wonder if I can use my Anova Sous Vide instead?