
How to Grow Microgreens Indoors

When people ask me if it's possible to grow your own food even without a garden space, I reply with a resounding YES! Because between sprouting and growing microgreens, you can grow a ton of fresh, nourishing food without much space at all.
Growing microgreens at home is incredibly simple, and it can be done without special equipment or much gardening background at all. Fresh microgreens are wonderful in salads, on sandwiches and wraps, and sautéed into hash or stir fry. You can choose whatever greens you enjoy the most-from kale to arugula to radishes-to create your own perfect microgreen mix.
What are microgreens, anyway?
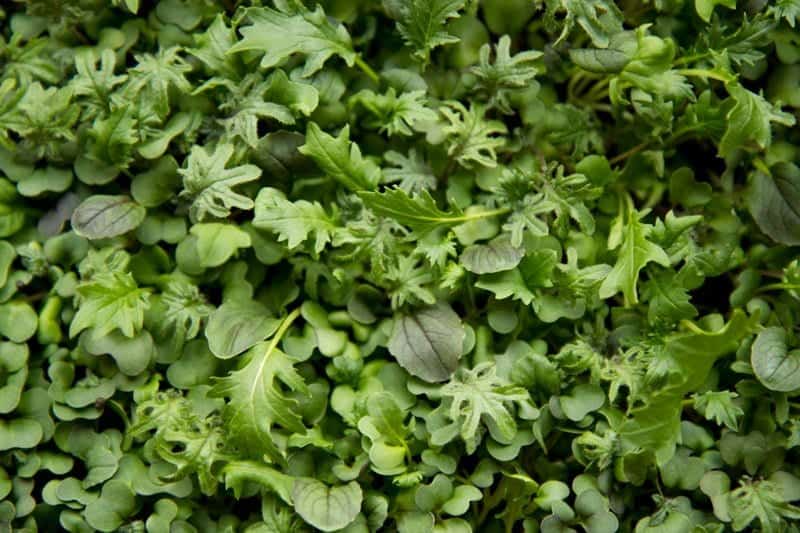
A microgreen is the new, tender shoot of a vegetable plant. It's what happens if you let a sprouted seed go a little bit further into growing, but don't let it completely mature. These small plants are easy to grow indoors because you can pack them in tight, since you'll be harvesting them before they become larger plants. And since you aren't growing them to full maturity, they grow quickly-you can harvest your microgreens in about a week.
What are the health benefits of microgreens?
These greens are tender, sweet, and insanely good for you-they are literally one of the healthiest veggies on the planet! Newly sprouted, tiny microgreens have up to 40 times the nutrient impact as their mature plant counterparts. 40 TIMES! Just a single example: microgreens from red cabbage seeds have 40 times more vitamin E and six times more vitamin C than fully-grown red cabbage. Crazy, right?
How do you eat microgreens?
I like to eat them in place of salad greens in winter salads, on top of sandwiches, folded into wraps, sautéed into stir fries and hash, or mixed into soups and casseroles. You can use them any place you'd use other mild-flavored greens like spinach.
What's the difference between microgreens and sprouts?
While these two types of indoor plants are often lumped together, they are pretty different. Here's a quick primer:
- Sprouts are young seeds that have sprouted, but have not yet grown any leaves. You consume the entire "plant" here-seed, sprout, roots, and all. You grow sprouts without soil in a jar. With sprouting, we tend to focus primarily on sprouting pulses like lentils (although you absolutely can sprout other things-we have a full in-depth sprouting post with more), where you wouldn't normally eat the plant. Because you consume the entire plant and grow in a humid environment, it's important to make sure you work with only incredibly clean materials and specialty sprouting seeds.
- Microgreens are immature plants that you harvest just the leaves and stem from, leaving the roots behind. You can grow microgreens without soil, but we recommend growing them in soil here just for ease. With microgreens, you focus on sprouting greens that you would usually eat-you just do it on a mini-scale. Since you are only eating the aerial parts of the plant (the parts that grow above the soil line), you don't have to worry quite as much about sanitation and seed cleanliness as you would with sprouting.
A rule of thumb is that if you eat the seed (lentils, chickpeas, peas, mung beans), you sprout it. If you eat the green (kale, cabbage, spinach, chard), you grow the microgreens. But that's just a rule of thumb-there is a lot of crossover between the two methods, and we recommend you explore both!
What types of microgreens are not safe to eat?
This is a good place to mention that some plants are not safe to eat in microgreen form. Never grow microgreens (or sprout for eating) of nightshade plants-like tomatoes, peppers, potatoes, and eggplant. They contain toxins in their stems that can make you very ill.
Can you grow microgreens without soil?
You sure can, although we do recommend in our tutorial here working with soil, just because it's easy for most folks to source. Because these plants aren't going to grow for very long, they don't need the long-term nourishment from the soil. A common alternative to dirt is using hydroponic growing mats or coconut coir.
How many hours of light do microgreens need?
Microgreens are pretty flexible, and they'll grow well on a sunny windowsill. For maximum growth, 4-6 hours of sunshine a day is needed, but if you don't have that available, a simple LED grow light will supplement. We use both these gooseneck grow lights and these grow light panels in our shaded house, and they work perfectly for growing microgreens (and houseplants).
Can you grow microgreens outdoors?
Sure can! Just as long as the weather is warm enough for the plants you choose to grow and you have enough sunshine, you can grow them in an outdoor spot. Since these are tiny plants, I do recommend growing them in a place that's protected from the wind and rain. Most microgreens that you grow will be cool-weather crops, so you'll also want to avoid putting them outside if it's very hot.
How long does it take to grow microgreens?
The wonderful thing about growing microgreens is that you can harvest in as little as 10 days. Some seeds take a little longer to germinate and grow, but in general, the 10-12 day mark is where I find the best microgreens grow.
How many times can you harvest microgreens?
Because you're lopping off the entire top of a small plant, you're only going to get one harvest from each mini-plant. However, because you can pack them in so tight in your growing container, you can cut and harvest as you need them-no need to harvest and eat them all at once! We usually grow our microgreens in standard 1020 garden trays, and we harvest from that one tray for an entire week of salads and scrambles.
What materials do you need to grow microgreens?
So, what do you need to get to grow microgreens? Not much, actually:
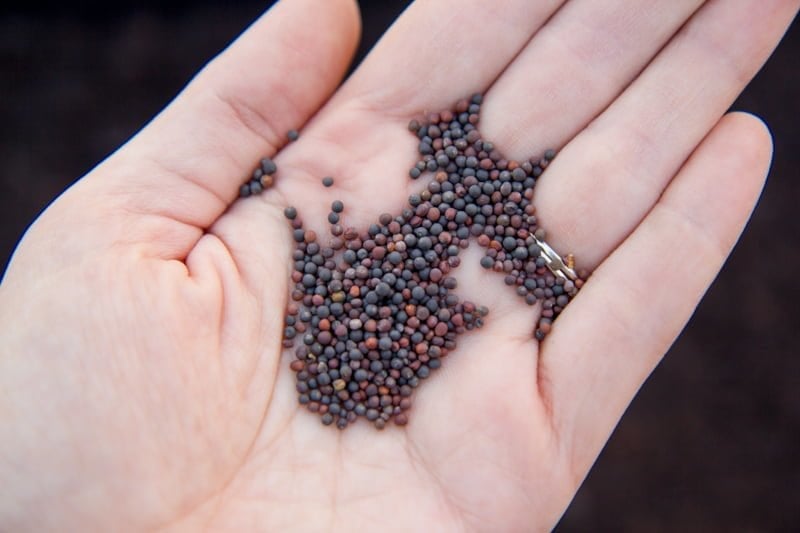
- Microgreen Seeds: You can purchase regular vegetable seeds from the store and use those for sprouting, but a lot of companies offer special microgreen seed mixes that are a great option for first-timers. They have a nice variety of tastes, textures, and nutrition. I really like the microgreen mixes from Johnny's Seeds. If you don't want to go with a mix, then cilantro, kale, radishes, basil, spinach, and beets are all great seeds to start with.
- Soil: Seed starting medium is your best bet, but honestly, you can grab just about any potting mix or garden soil from the store and have good luck. I'd personally steer clear of soils that have fertilizers mixed in-I like to keep my greens as organic as possible. We make our own seed starting mix, but there are some really nice organic options available at most stores this time of year. I even saw an organic potting mix at my grocery store last week! Some people grow microgreens without soil (similar to sprouting), but I find that growing them in soil gives them the best flavor and makes them easiest to grow.
- Tray: You'll need something to grow microgreens in. We use regular seed starting trays-available at most garden centers and hardware stores-but honestly, you can use pretty much anything. These greens aren't going to stay in them very long, so it doesn't have to be anything special. Go dig through your recycling bin-a plastic tote or a berry container or an egg carton would all do the trick. Just make sure to poke a few holes in the bottom of whatever you use, for drainage.
- Light Source: There are two ways of going about this-the natural way or the artificial way. For the natural way, all you need is a sunny window. Easy! If all of your windows are shaded like ours are, you'll need to replicate the sun with grow lights. We use both these gooseneck grow lights and these grow light panels to grow microgreens with excellent success.
- Water: Of course! I recommend using a spray bottle for microgreens.

How do you grow microgreens?
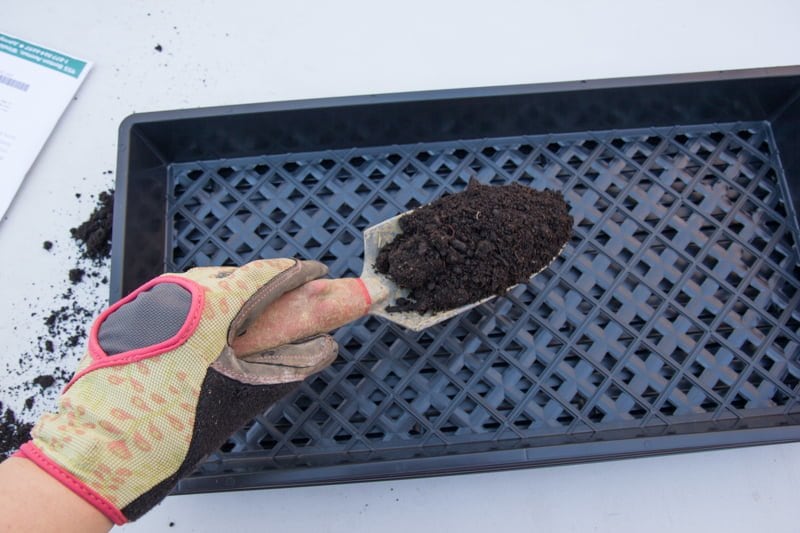
First step is to fill up your tray with soil. Since these plants aren't going to be in there very long (9-12 days), they won't develop a very intricate root system, which means you don't need a whole lot of soil. About two inches worth should be more than enough.
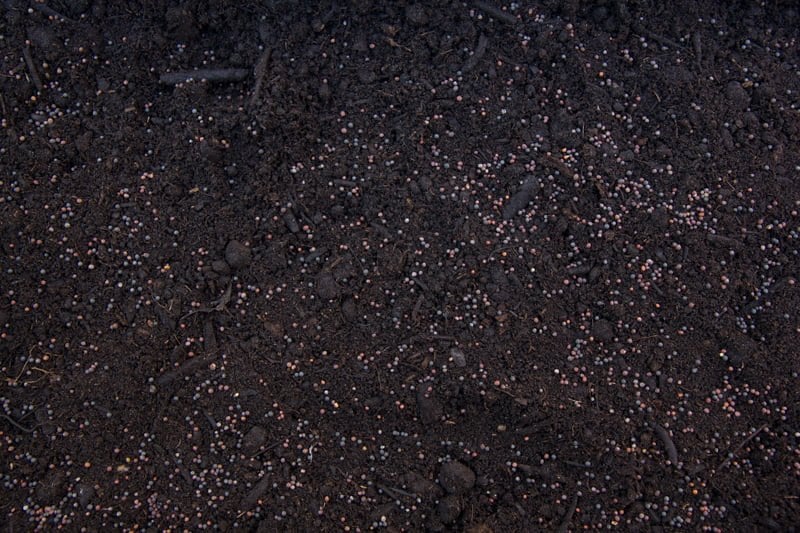
Then you broadcast your seeds across the surface of the soil. No need to worry about getting it perfectly even or spaced out equally.
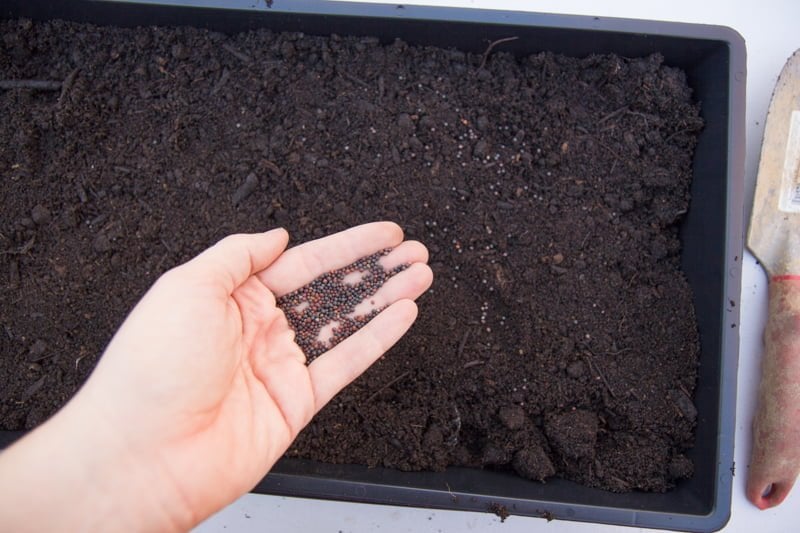
You want to put a pretty thick coating down. Unlike when you're growing a full, adult plant, you don't have to worry about overcrowding with microgreens. Pack 'em in.
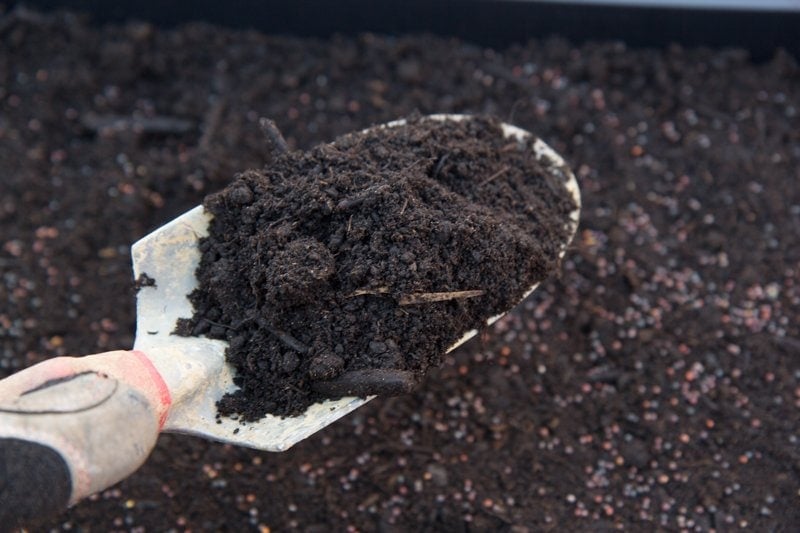
Next, take a little more soil in your hand, and sprinkle it over the seeds. You're just looking for light coverage here. Again, no need to be perfect. You don't have to cover every seed exactly the same.
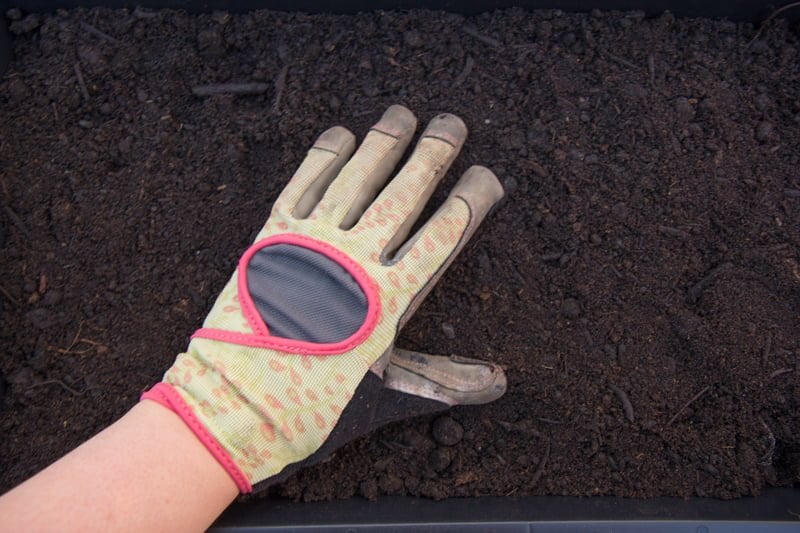
Then take your hand and lightly press down all across the tray to really set the seeds into their new home.
Last planting step: give 'em a good drink of water. The spray bottle is for later-now is the time to use a watering can or the mist option on your hose sprayer. You don't want them swimming in water, but you do want them very, very damp.
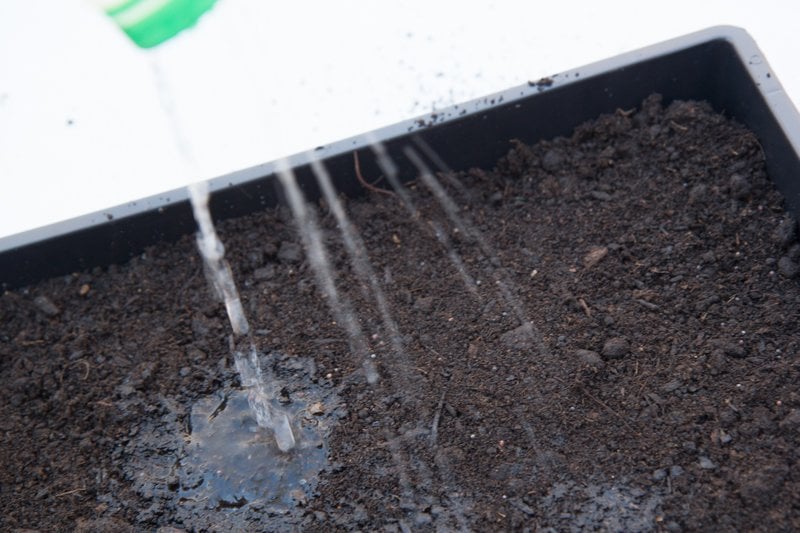
Then put your tray in your sunny spot and wait! Or, if you are putting them under a grow light, place them directly under the light. How close the lights are to your tray depends entirely on the type and strength of the light you're using. Check the instructions that came with your light for more info. It's important to note: many seeds you use for microgreens are light-determinate germinators, which means they need to see light to signal germination. That's why you only cover them with a thin layer of soil and put them under a light immediately.
Do I need a heat mat under my microgreens?
Most seeds like around 70°F for germination, so if you're trying to start your seeds in a spot cooler than that, you might want to think about either cranking the heat for a few days while the seeds germinate, or use a seed starting mat. This is the seed starting mat we use when growing seeds in our cold basement during the winter. No seed starting mat? You can also wrap a heating pad in a trash bag and place it under the tray while it germinates-just make sure to remove the tray to water, and let it drain completely before replacing it on the heating pad.
Most microgreens will happily grow at a lower temperature (you might see slow growth if it's below 50°F), so no need to keep the heat mat or heating pad going after germination.

How often should I water my microgreens?
A few times a day, give the tray a good spritzing with water. And if you see some of your microgreens growing in an irregular pattern, try rotating your tray every few days so all sides get equal access to the light. The seeds closer to the light (this is especially true in a sunny window) might grow faster than the ones further away.
After about three days, you'll see some seeds germinating. Two little circular leaves will pop up first-those are called the cotyledon-they are the extra food reserves for the seed to keep germinating.
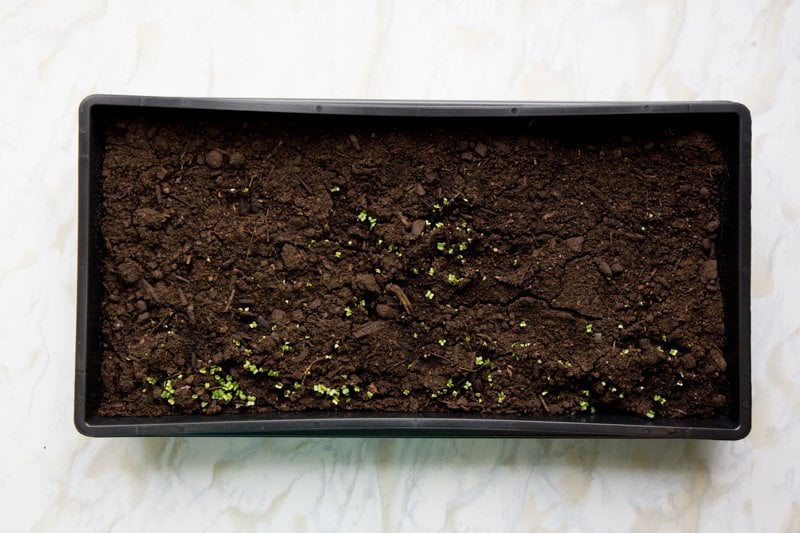
A few days later, you'll see even more seeds germinating, and then the true leaves starting to show. These are the ones that actually start looking like the plants you are used to, albeit really tiny, adorable versions.
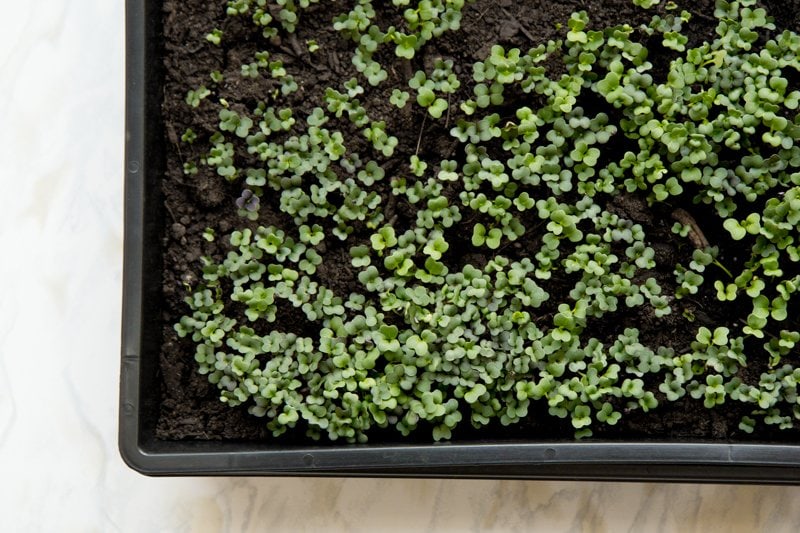
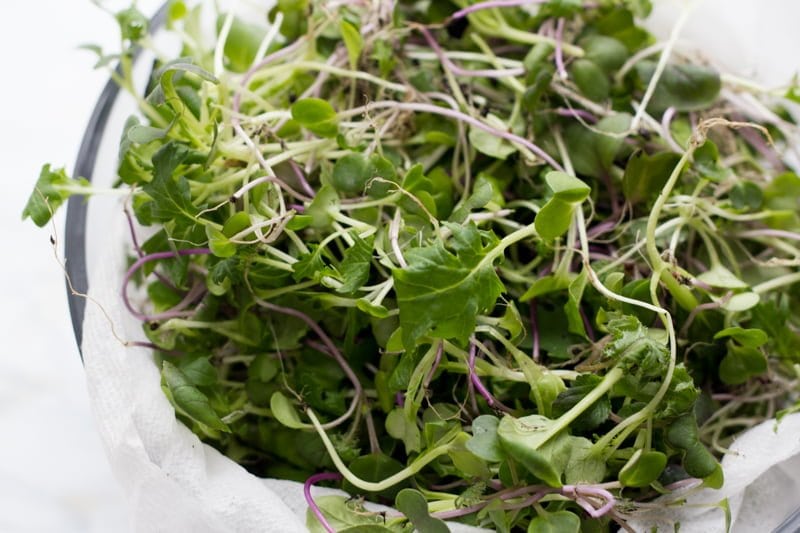
And then after a little over a week, you'll have a whole tray full of beautiful microgreens. You can choose to harvest at any point after the true leaves show up.
I normally let mine go until about the 10 day mark, when the greens are about two inches tall.

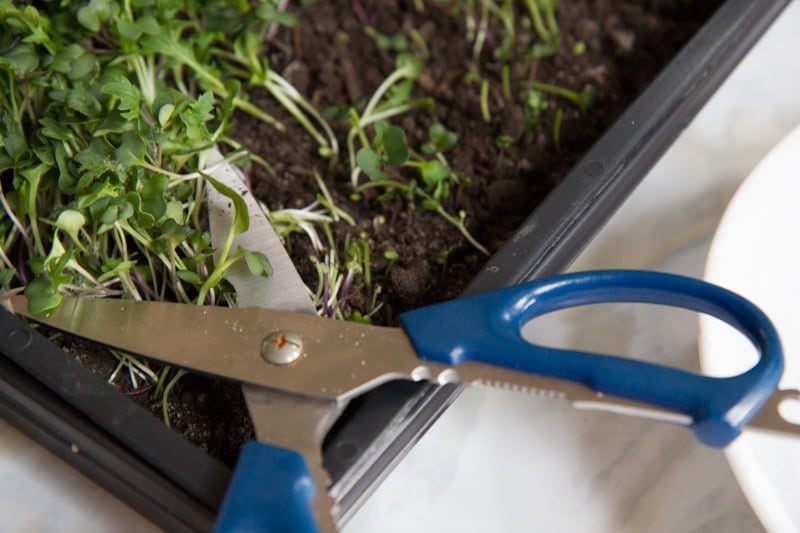
You can harvest in one of two ways. First option: you can pull out the greens and shake off the extra soil. You'll need the soil to be extra dry to do it properly, so stop watering a few days before you're going to harvest. Then, on harvest day, pull up the greens, and shake off the excess soil. Depending on the type of green, it can be tricky to get every ounce of soil out. This isn't my favorite way to harvest.
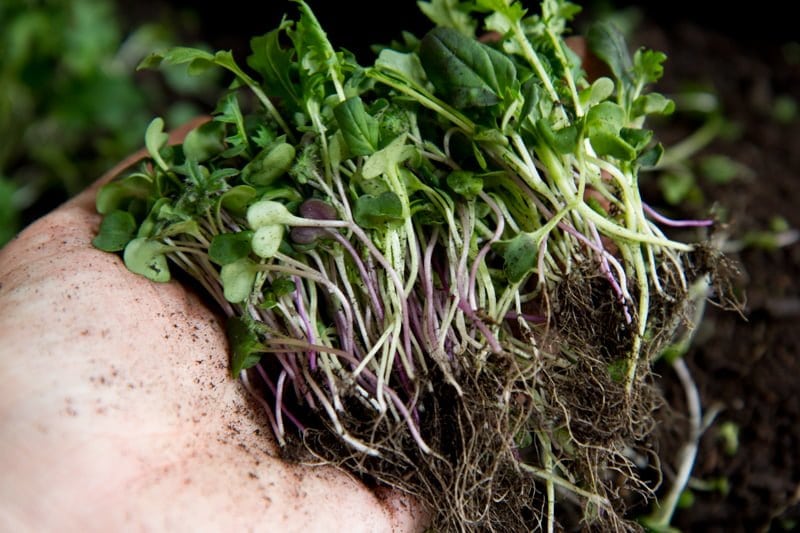
My preferred method of harvesting is to clip the microgreens with sharp kitchen scissors just above the soil line. You lose some of the plant, but it saves a lot of soil-removal headaches.
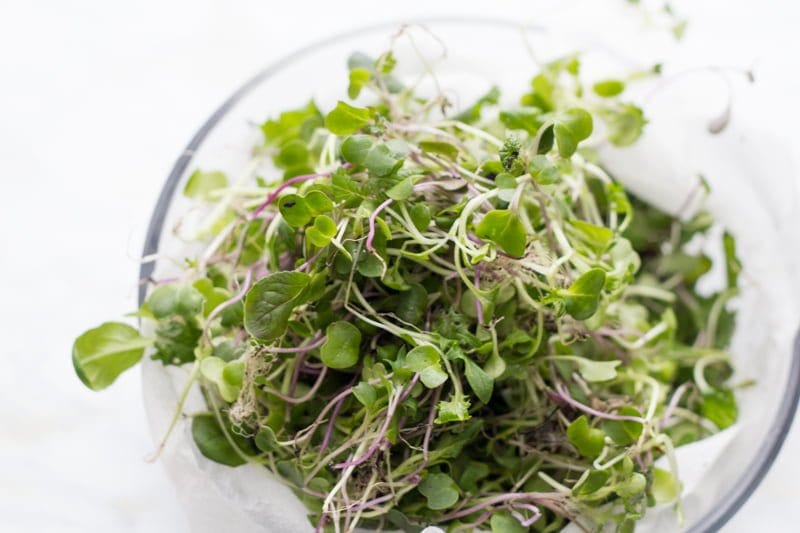
Once they are harvested, do 3-4 wash cycles for the greens, making sure they are fully submerged in cold water each time. Then, spread them out on a towel and dry them off slightly (a salad spinner works, too). To store, wrap the greens in paper towels and place in an airtight container in the fridge.
The soil can then be composted, and you can start all over again! Or, if you're really on top of things, you can have multiple trays going at the same time. I've found that starting a tray each week ends up working out well for us-it takes us about a week to get through the harvest from one tray. Happy growing!
How to Grow Microgreens Indoors
Equipment
- Soil
- Tray
- Light Source
- Water
Materials
- Microgreen Seeds we like the mix from Johnny’s Seeds
Instructions
- Fill the tray with about 2" of soil.
- Broadcast the seeds across the surface of the soil in a dense layer. No need to worry about getting it perfectly even or spaced out equally.
- Sprinkle more soil lightly over the seeds, and use your hand to pat down the soil a bit.
- Water the microgreens until they are very, very damp.
- Place the seeds in sunlight or under grow lights.
- Mist with water a few times a day, until the greens are ready. This should take 10-12 days.
Great article with a very informative information which is more helpful to everyone who wants to know about gardening.
I'd be very cautious to trust this article regarding the seed choice they've chosen, as I just watched a youtuber say that Johnnyseeds are affiliated with Monsanto, which, as we all know is very bad news...Also the reason behind me reading this article was to find a safe food grade microgreens tray and again I was mislead. Reader beware!
Hi, Leah! Thank you for your concern for our readers. We appreciate you taking the time to provide information that may help others browsing our site. I'd like to add a few things to the points you brought up so that everyone can make an informed decision!
The microgreens tray we link to in the post is made from recyclable, food safe, leach resistant, Polypropylene plastic without any harmful plasticizers or additives. Our apologies if this isn't what you were looking for, but we would never mislead our readers or endanger anyone with materials that are not food safe. We take our responsibility to our readers very seriously and work hard to ensure that anyone who comes here for recipes, information, or product recommendations can feel confident that what they've read is trustworthy.
Johnny's Selected Seeds is one of the original nine signers of the Safe Seed Pledge which ensures that they will never knowingly sell genetically modified seeds and they do not breed new varieties using genetic engineering (you can read more about this directly on their website). They do, however, sell seeds from Seminis, which is a seed company that Monsanto bought in 2005. (Monsanto owns approximately 40% of the home garden vegetable seed market because of purchases of seed companies like Seminis.) Seed catalogs such as Burpee, Park Seeds, Territorial Seeds, and Johnny's Seeds (among others) all had established relationships with Seminis before the buyout by Monsanto and many continue to sell those seeds. Treehugger published an article entitled 'Keep Monsanto Out of Your Garden this Spring' back in May of this year which mentions that Johnny's Seeds is phasing out Seminis seeds and labeling them so that consumers can choose to avoid them. You can read that article here.
We always do our research before making a recommendation and we feel confident that we can shop Johnny's Seeds without supporting Monsanto. The Non-GMO Safe Seed Pledge, the fact that the company is 100% employee owned, and that all seeds are 100% satisfaction guaranteed means that we feel confident that our readers will have a good experience with them, too. If you're not comfortable with that, please make the best choice for you!
We hope this helps you and anyone else out there who might be wondering the same thing!
If anyone wants to read more, Northwest Edible Life has two great articles, one from 2012 and an update from 2018, about Monsanto buying Seminis and what that means for the seed catalogs that sell Seminis seeds. There are also full emails from Territorial Seeds and Johnny's Seeds responding to their Monsanto ties and what they've done/are doing about them.
Hi Cassie, hope this finds you as realise last comment was 2015 - love the post. Have a question for you, I'm looking for a stock image of red cabbage microgreens, your one is fab, would you be interested in me offering me a copy? Thanks
Thanks so much for your interest, Kate! We do offer photograph rights for a fee. If you're interested, please send an email to hello@wholefully.com and we'll get back to you with all the info.
This is awesome! I stumbled upon this page and am delighted to have found it. Thank you SO much for the super helpful info about growing microgreens, and thanks also for the link to Johnny's seeds. We just ordered a packet, and look forward to growing our own microgreens.
Thank you, thank you, thank you!!
Do you know if anyone has tried using glass pebbles as a medium? Non-toxic, non-porous, easy to clean and sterilize and use over again and again. And having colored ones means cleaning the microgreens without having to lose *any* of the plant...just shake them loose and comb any remaining ones out with your fingers. That's the route I'd like to try. Do you know of any reason *not* to try it?
I loved this post...so much detail and pictures to show each step! WOW...thank you!!!
Would coconut coir be a better growing medium to not have mold growth?
Yep.. coco peat is a good growing medium for microgreens
Great post! Microgreen seeds do not need soil since all of their nutrients come directly from the seed itself. Soil also increases the chances of bacteria, etc... I recommend using a fiber dense grow medium instead.
Jace, what sort of material would that be?
So question, if i use the scissors, do i need to replant, or can i nurse a new crop from my clipped greens
We’ve never tried to get a second crop out of them, but you could try! Let us know how it works out if you do!