
4 Ways to Perfectly Poach an Egg
So, over on Instagram, I pretty frequently post pictures of my breakfast (Curried Sweet Potato Breakfast Bowls, anyone?). Because that's what people who are obsessed with food do, ya heard? And pretty frequently, that breakfast involves eggs. That's one of the benefits of being able to walk out the door and nab farm fresh eggs from our hen house-gloriously egg-tastic breakfasts whenever I want!
Whenever I happen to poach those eggs, I inevitably get comments asking how in the world I make such perfectly poached eggs! Well, I'm going to let you in on a little secret-I almost always cheat and use an egg poaching pan (affiliate link). I love my egg poaching pan, and I use it multiple times per week!
But, I know not everyone wants to drop almost $50 on a pan that just poaches eggs (worth noting, there are cheaper versions out there, but all of them have a non-stick coating - the price hike comes from having a fully stainless steel pan). So I thought I'd share with you four ways to poach an egg-two of them use "special" equipment, and two of them use stuff you probably already have in your house.
Egg poaching is one of those things that everyone seems to have their own method or trick to getting it just right, so experiment with these and figure out which one is right for you. The first two methods I show below take a little bit of practice, so don't get discouraged if the eggs don't turn out perfect the first time you try it-you'll get better!
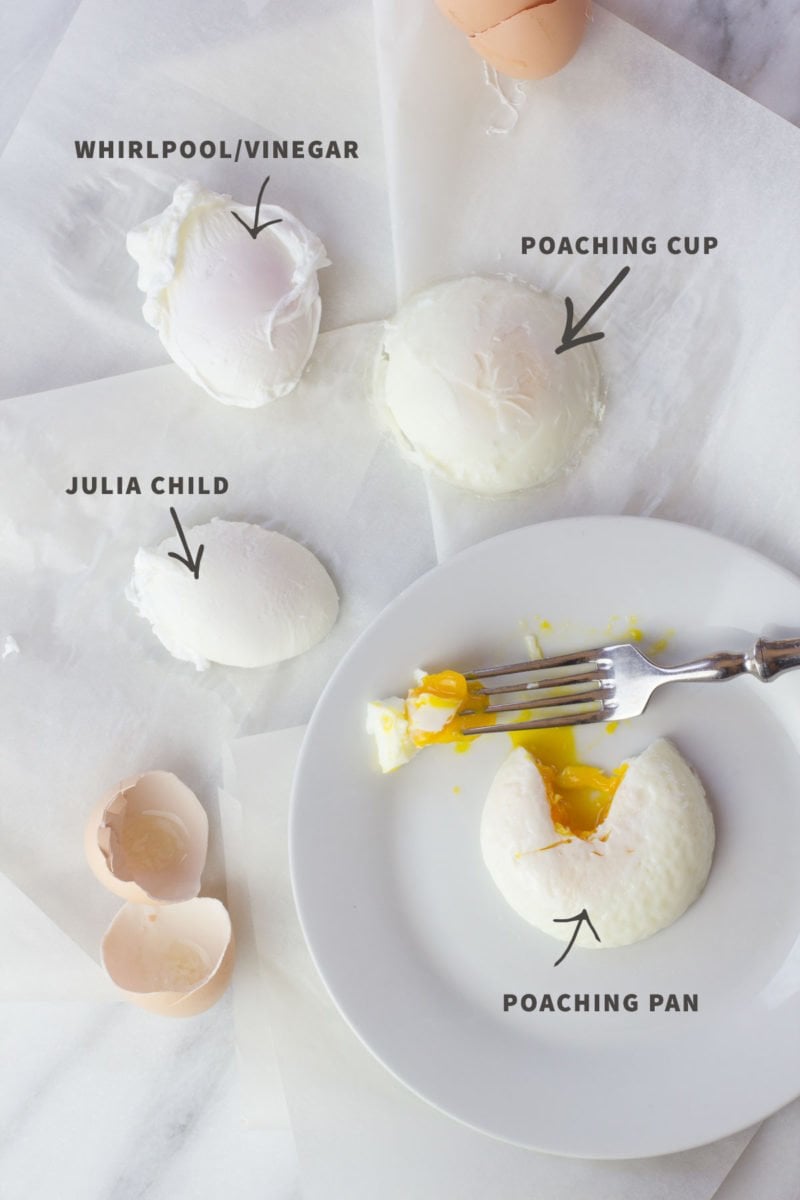
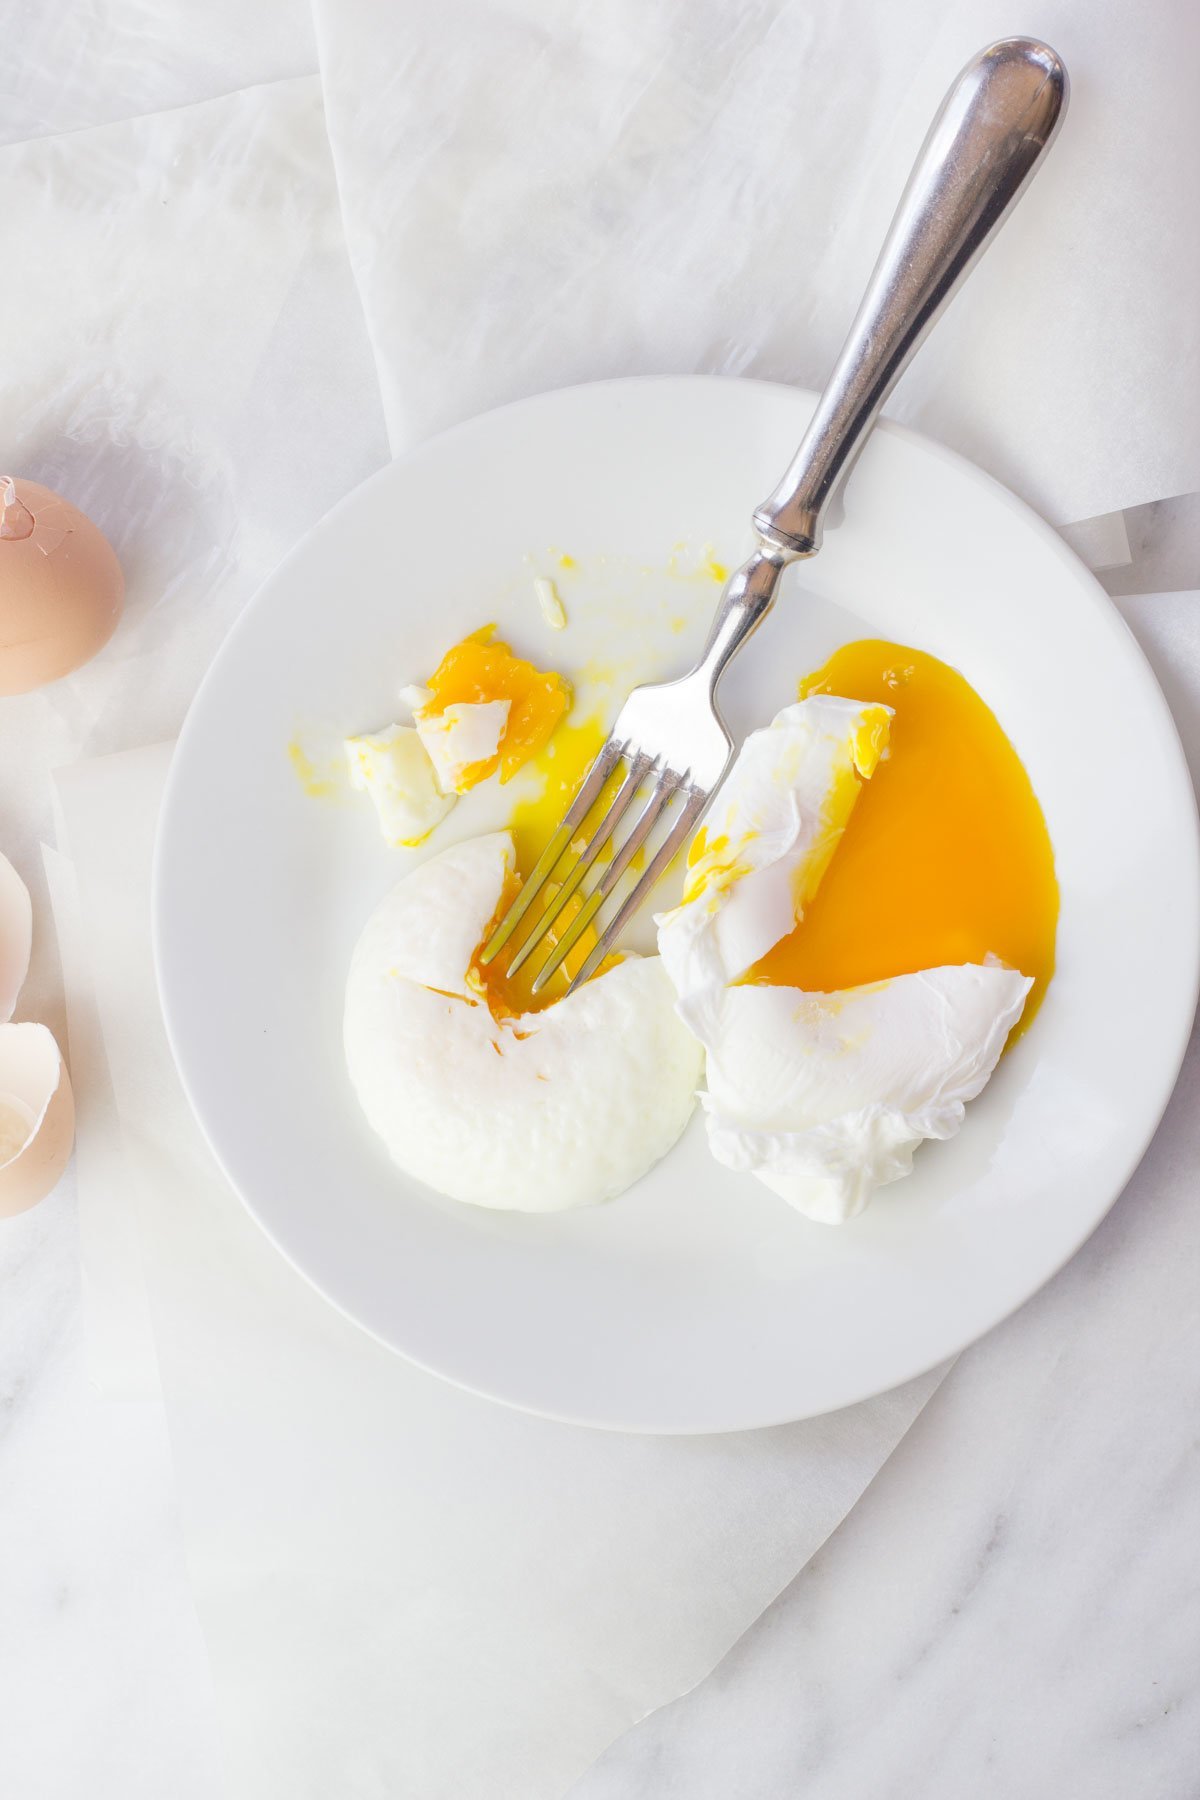
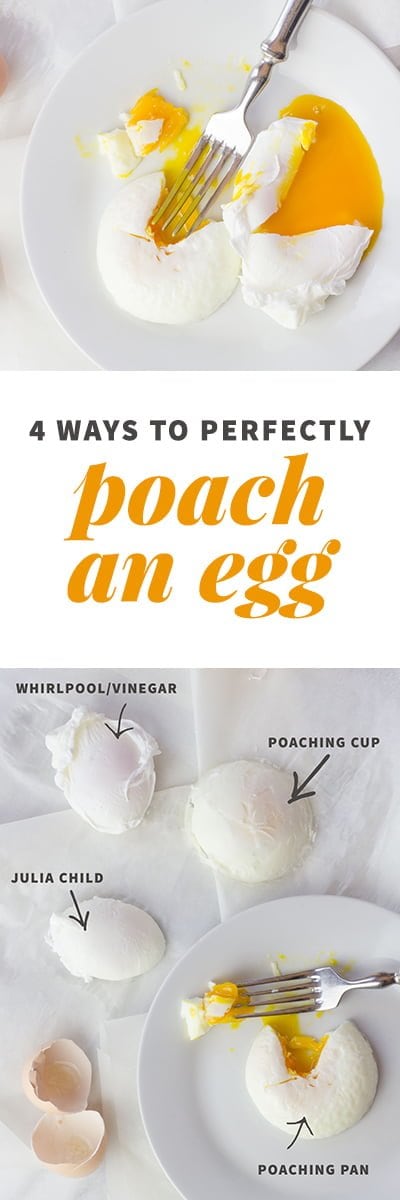
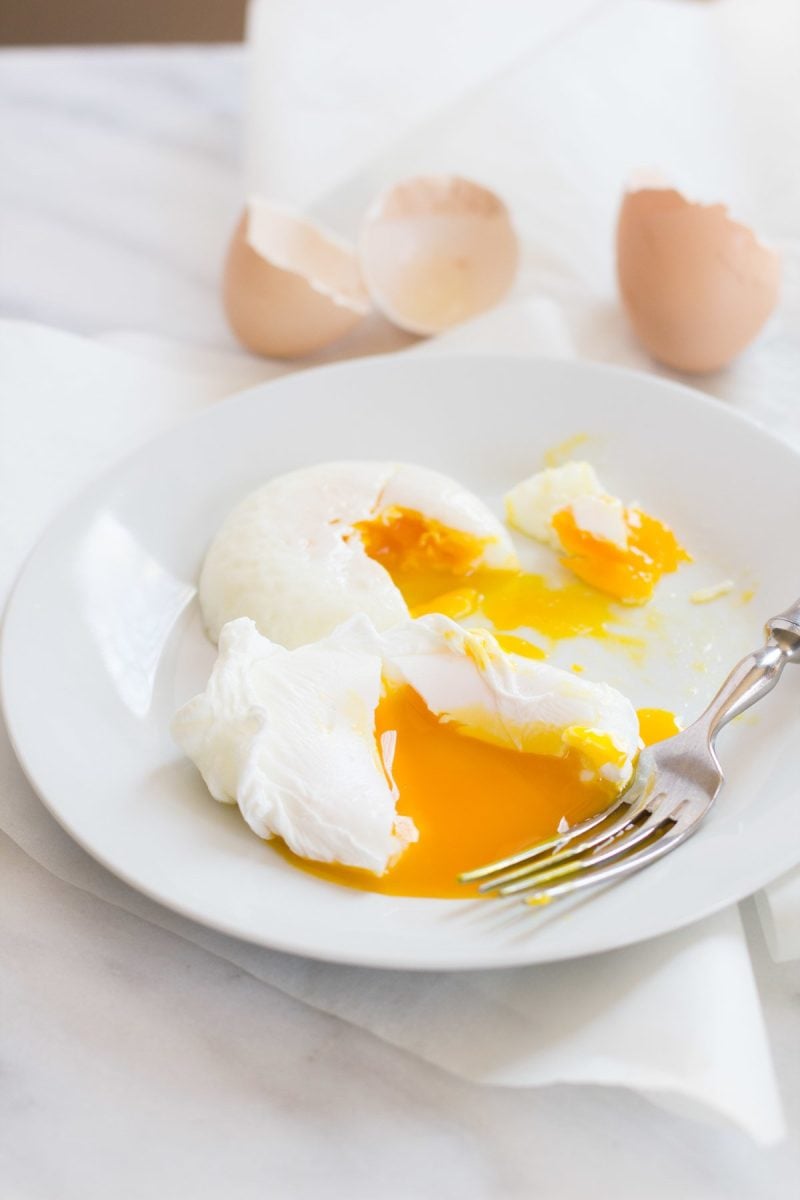
And if appearance of your final egg is important to you, check the image above to see the final product of each method. If you want a perfect circle of a poached egg, an egg poaching pan is your friend, but if you like the organic, rustic look of a traditionally poached egg, one of the first two methods is for you!
Alright, let's dig into the methods. First up, the traditional/normal/regular way to poach an egg.
The Whirlpool/Vinegar Method
This method has two keys to success: first up, you add regular white distilled vinegar to the pot - this helps the egg stay together in the water. Secondly, just before you drop the egg in, you swirl the water with a spoon to make a whirlpool. That way the egg keeps moving in the pan instead of sticking to the sides or the bottom. Okay, let me walk you through it.
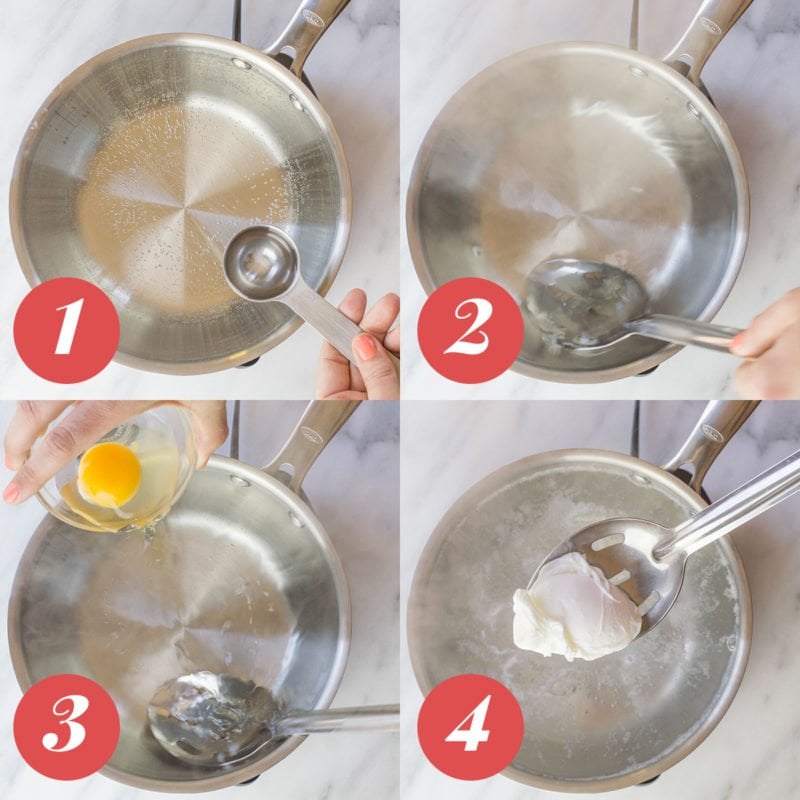
- Fill a medium-sized saucepan with water and bring to a boil over high heat. Then reduce the heat to get a gentle, bubbly simmer. Add in a generous glug of white vinegar (about 2-3 tablespoons).
- Crack the egg into a small bowl, so it's easier to gently pour into the pot. Then, just before putting the egg in the water, use a spoon to swirl the water, creating a whirlpool.
- Gently pour the egg into the swirling water. Keep gently stirring the water to make sure the egg stays moving. Put on an egg timer and cook for three minutes for a soft/runny egg or five minutes for a hard egg.
- Lift the egg out of the pan using a slotted spoon, drain on a plate covered with paper towels.
Tips
- If your egg ends up sticking to the bottom of the pan, don't try to pry it off (you'll end up breaking the yolk). Just vigorously stir the pot until the current of the water releases the egg from the pan.
- The fresher the egg, the fewer of the wispy white strings that come off of an egg. If you're using an older egg, you can trim those whites off if they bug you, or just wrap them under the egg when you serve.
- You can do more than one egg at time in the same pot, but it takes practice. I recommend mastering one egg first, then try to add in another one.
The Julia Child Method
The Queen Bee of cooking herself, Ms. Julia Child, had her own method for poaching eggs. Her method recommends parboiling the egg in the shell first for 10 seconds, and then breaking it into the cooking water. Why? Well, the parboiling helps the egg keep it's shape, and helps keep the wispy white strings from going crazy in the water. Because the egg is already warm and has begun cooking, it also sets up much more quickly, meaning you don't have to worry as much about it sticking to the bottom or the side of the pan.
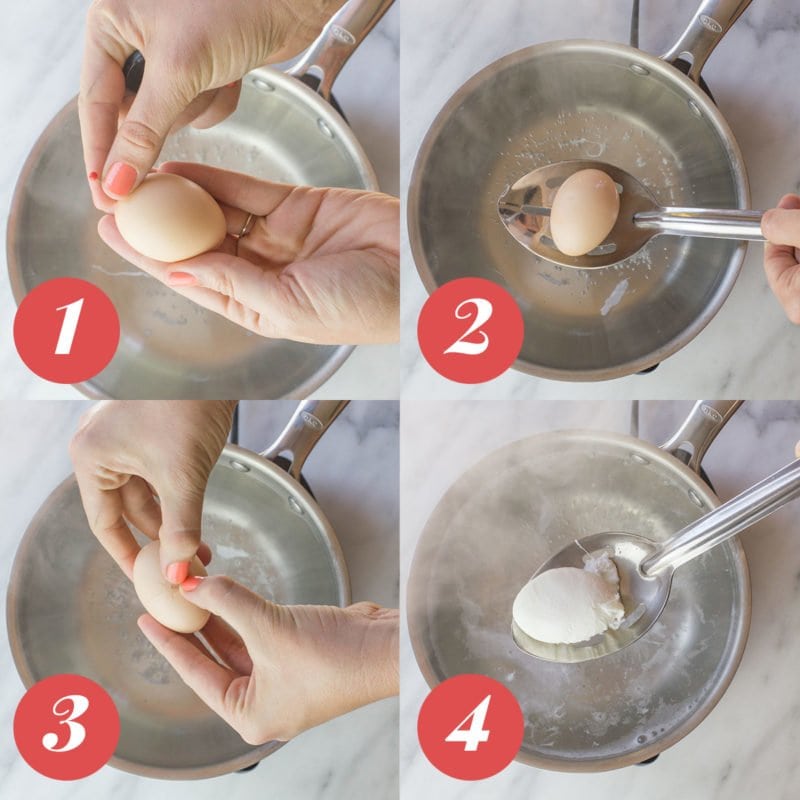
- Using a safety pin or a straight pin, gently poke a small hole in one of the ends of the egg. This is to release any air that is trapped in the egg.
- Using a slotted spoon, lower the egg down into a medium saucepan full of boiling water. Boil for 10 seconds. Then remove with slotted spoon, and let cool until you can handle it (it should only take a minute or two).
- Reduce the heat of pot to where the water is just simmering, then break the egg into the water. Set an egg timer for two minutes for soft eggs or four minutes for hard.
- Lift the egg out of the pan using a slotted spoon, drain on a plate covered with paper towels.
Tips
- Because your egg has already been warmed in the shell, it doesn't take quite as long to cook. You'll have to play with the timing to get it just right for you.
- No need to add vinegar to the water with this method; parboiling the egg in the shell should take care of the wispy whites issues.
Egg Poaching Cups
Now this is where we start to get into the gadgets! Egg poaching cups landed on the scene a few years ago, and they're a really great invention for folks who maybe don't have the space for a full egg poaching pan in their kitchen, but still want an easy and less-fussy way to poach an egg. Most egg poaching cups are silicone, and I've heard you can actually cook eggs in the microwave using them as well, although I've never done it before. You can get them at most kitchen supply stores. Mine are EZE Homegoods brand (affiliate link), and they are bright and colorful and make me smile.

- Bring a medium saucepan full of water to a boil over high heat. Reduce to a simmer, then place an egg poaching cup into the water.
- Gently break an egg into the cup.
- Place the lid over the pot. Set an egg timer for three minutes for a soft egg or five minutes for a hard egg.
- When the timer is up, remove the lid then scoop out the egg cup using a slotted spoon or a ladle. Use a spoon to remove the egg from the cup.
Tips
- Silicone is not a great conductor of heat, so these actually might take longer to get your egg to the right doneness. Also, because of this, you'll need to use a pot with a lid to trap in steam and heat.
- Egg poaching cups are great if you want to do multiple poached eggs at once!
- Some silicone is more non-stick than others, so you might want to err on the side of caution and spray your cups with cooking spray before adding in the egg. I have no problem with eggs sticking in my cups.
Egg Poaching Pan
My parents had an egg poaching pan when I was growing up, and we had poached eggs on toast for breakfast every week! An egg poaching pan makes it so easy to make a bunch of poached eggs at once, and get them perfect. If you love poached eggs (and don't mind being a "cheater"), I highly recommend investing in an egg poaching pan. I'm not normally a big fan of unitaskers in the kitchen, but my egg poaching pan (again, this is mine <---affiliate link), is my true love. The five spots are perfect for our little family-two for Mama, two for Daddy, and one for the adorable egg-loving toddler. They also have smaller or larger poaching pans.
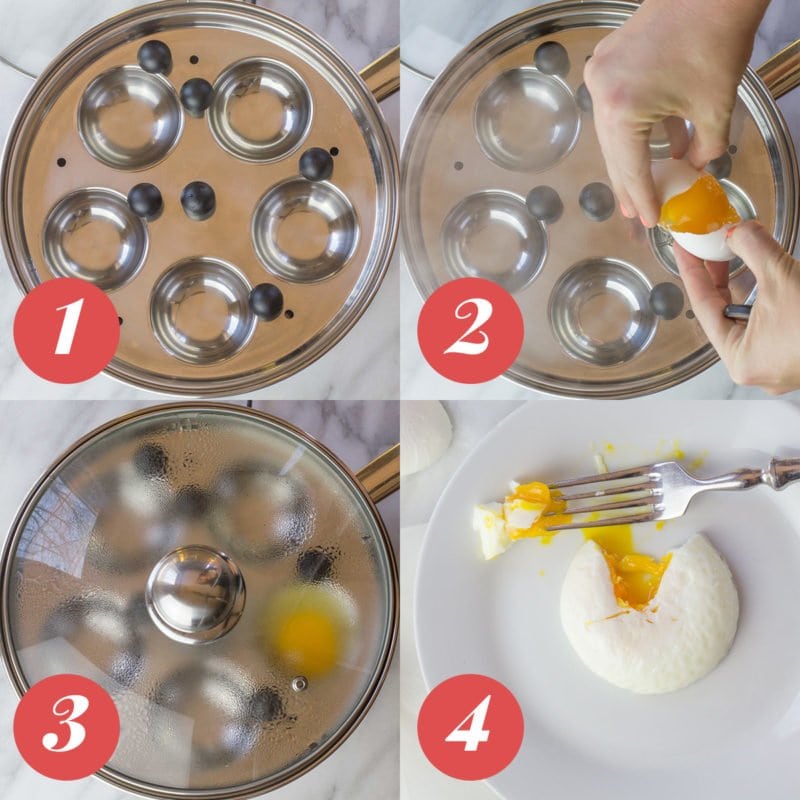
- Fill the bottom of your egg poaching pan with water, then replace the cups. If using a steel pan, spray the cups liberally with cooking spray (not necessary if you have a nonstick one). Bring the pan to boil over high heat.
- Once the pot is boiling, break eggs into the sprayed cups.
- Place lid over pan, and then set a timer for three minutes for soft eggs or five minutes for hard eggs.
- Remove the lid, then using a spoon, lift the egg out of the cup.
Tips
- An egg poaching pan is great for checking doneness, because just a simple shake of the pan can tell you how done your egg is. Really jiggly? Not done yet. Just the yolk looks jiggly? Perfect!
- Once the timer is up, make sure to lift the eggs out of the poaching water immediately-they will continue to cook if left in the pan.
Alright, now there has to be a method in this post that is right for you! And if you have a method or trick that I didn't list in the post, I'd love to hear them in the comments. I'm always a fan of learning new ways to do my favorite kitchen tasks! Happy poaching, friends.
Now i need someone to cook the bacon & eng muffs while I'm doing the eggs! Thanks for all the great tips and my in laws sent us an egg poaching pan a couple yrs ago for which i am completely grateful. I do NOT believe it's cheating it's simply a chef cheffing!!
I have an egg poaching pan but the yolk always cooks hard first while the white is still clear inside. Maybe because the poaching cups are plastic instead of stainless steel? It's so frustrating because I can't do anything to make the yolk cook slower and the white cook faster! Any suggestions please? Thank you
Hi Claire! We've never worked with a poaching pan with plastic cups, so that might be what's causing it!
Arent the egg poaching pans and cups really more like a steamed egg than poached? or even leaning more toward coddled. I love poached eggs; its a texture thing for me.
Hi, Lauren! If you love the texture of normal poached eggs, we'd recommend the pan swirl method. The poaching cups and pans may not give you the same texture.
From the pictures, it appeared that the egg white portion is being "trimmed" off, right? How did you hide the egg white and only the egg york is shown? Your kind advice is much appreciated.
Didn't trim anything. 🙂 These pictures were straight out of the pan/pot.
Thank you so much for this. Was given a poaching pan and had NO idea how to use it Looks like poached eggs for tea!
Thanks for these ways of poaching an egg. It was really very helpful to me.
Love my poached eggs. I grew up with mom using a poaching pan, and we had one for years but I prefer just using a pot of simmering water. On that note, I have also poached them in the microwave. I fill a ramekin with water and put it in the mike to boil. Then I remove it - crack in an egg and pierce the yoke with a fork. Then back in the mike for 35 or 40 sec. Out - drain with a slotted spoon and Bob's you're uncle. I've also placed a raw egg in a small plastic bad, seasoned with whatever I like, seal and boil in the bag.
What?
Sorry a little late on the uptake
But just saw this 😀 I’m wondering if anyone uses a vintage egg poacher pan ? I received a vintage copper poacher that I love but not sure how to do it correctly ? Just a pan no removable cups with the cups built into the pan. It’s probably 100 years old but in great condition but alas no instructions 😂🐣 thanks for any advice !
I poach eggs in the microwave
Put egg in 1/2 cup of water
Cover with saucer
Cook on high 1 min
Perfect every time
Thanks! Another great way
Some great ideas from Jamie:
https://www.youtube.com/watch?v=pAWduxoCgVk