
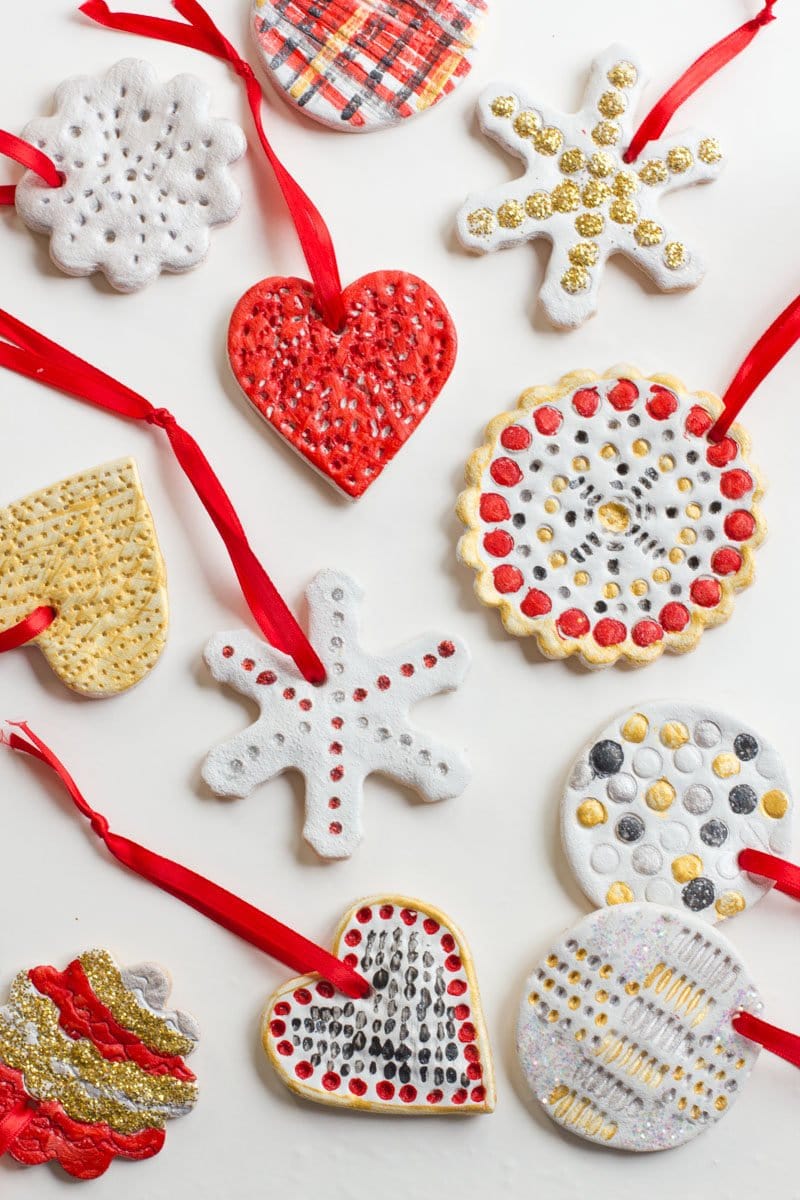
Salt Dough Ornaments


These homemade salt dough ornaments are one of our favorite family crafts during Christmas! This recipe is so easy to follow, and you probably already have all the ingredients you need on hand.
Why You'll Love This Salt Dough Recipe
This is the exact salt dough recipe my family has used for decades! So you can feel good that these ornaments will turn out great every time. Here's a few reason why this is the best recipe out there:
- No speciality ingredients or tools needed here! You probably have everything you need already in your pantry.
- This is such an easy and affordable holiday activity for the whole family. For just a few pennies, you can spend your afternoon connecting over a fun craft.
- Looking for budget-friendly handmade gift ideas? Salt dough ornaments are here to save the day!
- The dough is smooth and easy to work with. No sticky hands, messy counters (okay, maybe a little), or sensory overload.
- You can feel good that these ornaments will last. In fact, I still hang an ornament on my Christmas tree each year that I made as a kiddo in 1987 using this exact same recipe!

What You'll Need
Go ahead and open up your pantry, because I'm pretty sure you have everything you need to make basic ornaments on hand already. You'll need:
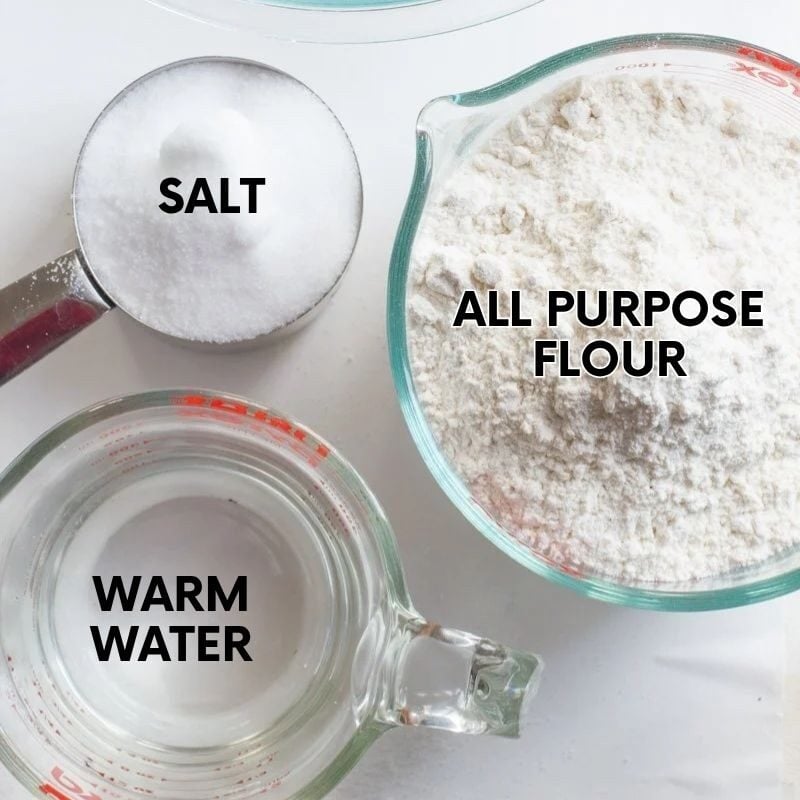
- All-purpose flour-I recommend sticking with all-purpose flour here because it's affordable, it's easy to work with, and it creates the most consistent color. Bleached all-purpose flour is best, but unbleached works, too. Since you aren't ingesting this at all, go ahead and get the bargain basement generic brand flour to save yourself some cash. Save the whole wheat flour for making pumpkin waffles or baking bread!
- Table salt-Again, make sure to add the salt to preserve these ornaments! Just like with the flour, go with the generic brand table salt here-reserve your high-end Himalayan sea salt for cooking.
- Warm water-The warm water helps the dough come together a little bit easier. Plus, you'll knead the dough with your hands, and warm dough is so much more comfortable to knead in the winter!

As far as other tools and materials, chances are, you'll have almost everything already in your house. Here's a list of the exact tools I used to make the ornaments seen in these photos:
- Mixing bowl and large spoon
- Parchment paper
- Rolling pin
- Cookie cutters
- Forks, steel wool, rubber stamps, other textural items-optional, to add texture to the ornaments
- Straw or toothpick-for poking a hole for the ornaments to hang from
- Baking sheet
- White spray paint-optional, for giving the ornaments an even background to decorate
- Glitter, glue, paint, Mod Podge-optional, for decorating, or leave the rustic salt dough ornaments
- Polyurethane spray (like this one) or Mod Podge-optional, for extra preservation power
- Ribbon-for hanging the ornaments
Watch The Video
How to Make Salt Dough Ornaments
Follow along with my numbered instructions and step-by-step photos to see exactly how we make these ornaments each Christmas:
Mix up the dough
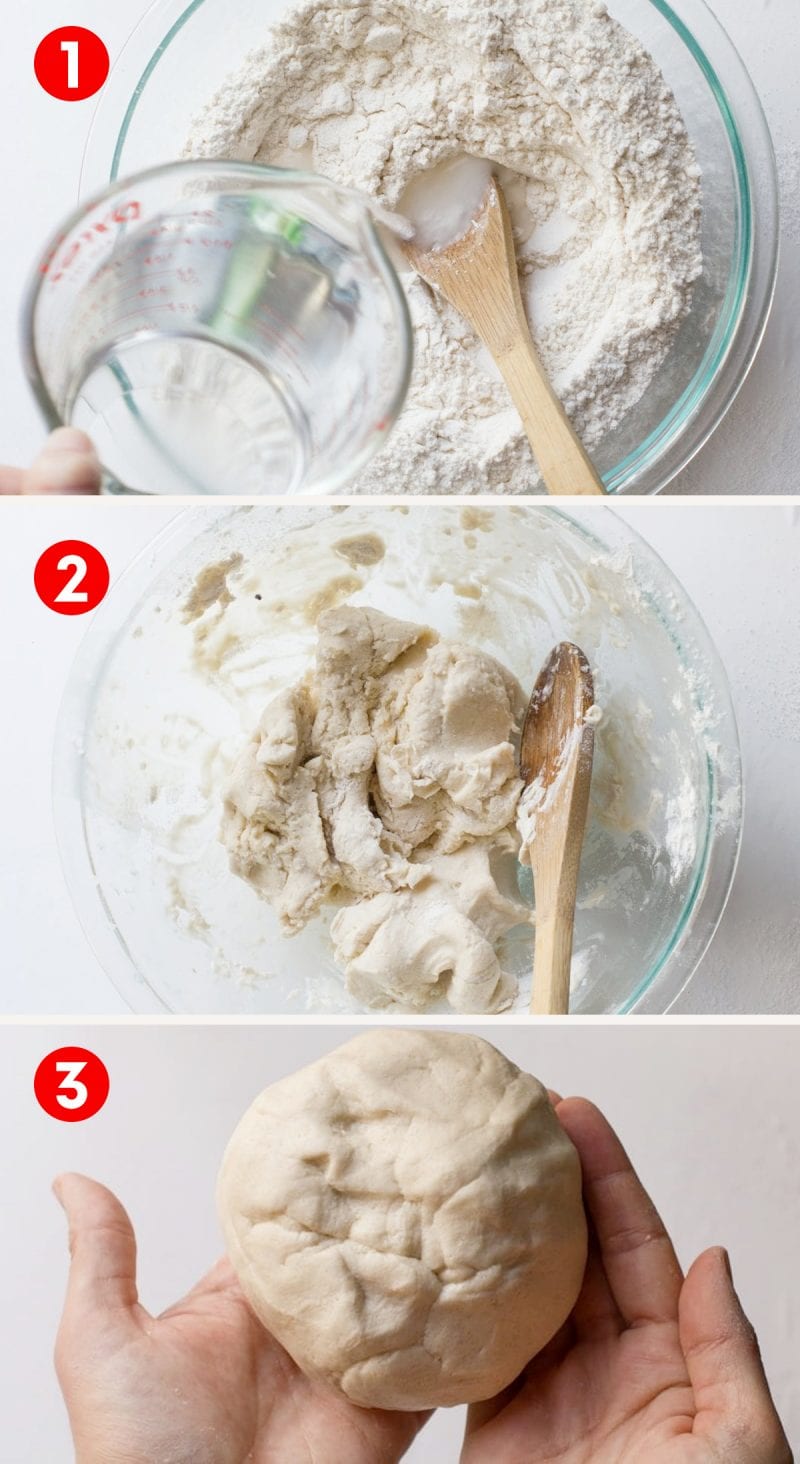
- Grab your large mixing bowl, and add in the flour and salt. Stir until well combined. Then, slowly stream in the warm water while stirring. Keep stirring until you've added all the water.
- You'll get to a point where it is too hard to stir with a spoon. Put it down and use your hands to get in there and mix it well.
- Once the dough starts to come together, keep kneading with your hands for a few minutes until the dough is smooth and pliable.
Form and shape your ornaments
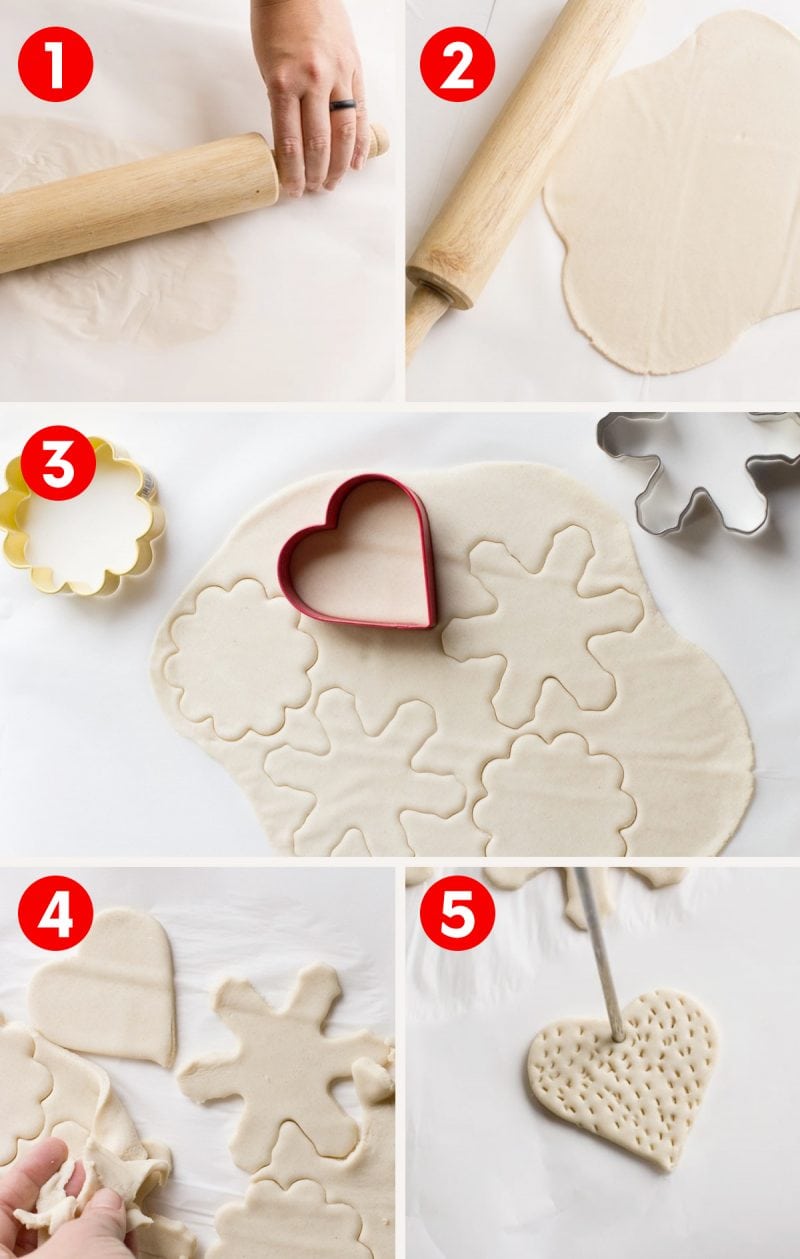
- Put down a large piece of parchment paper, and place a good-sized chunk of dough in the middle. Place another large piece of parchment on top.
- Roll out the dough until ⅛" thick. You want to err on the side of a thinner dough. Too thick, and the ornaments tend to split or break easily because of air pockets that get trapped in the middle.
- Remove the top sheet of parchment, and then and then use cookie cutters to cut into the dough cut into the dough-do not try to remove the cut out pieces! You want those to stay on the parchment.
- When you're finished cutting the pieces, peel away the excess dough, leaving behind the shapes on the parchment. This is a great time to add any texture to the dough if you want to-like by poking holes with a fork or dappling with a straw.
- Take a drinking straw, and poke a hole in the top of each ornament for a ribbon to hang from. Make sure to blow out the plug in the end of the drinking straw before you go to the next ornament. Trust me, I've ruined a good stainless steel straw or two by forgetting the dough inside and having it drying rock-solid inside!
Baking the ornaments

- Preheat oven to 200°F.
- Transfer the whole parchment paper and shapes onto a baking sheet. Bake the ornaments until hard. Start checking at about an hour, but it could take up to two. This isn't an exact science, because inevitably, your shapes won't be 100% even in thickness.
- They are done when they feel hard. They are really done if they start to brown (no worries, that's something we can fix later!).
- Let the ornaments cool completely before proceeding to the next step.
Decorating, preserving, and hanging
If you prefer the rustic, classic look of the salt dough, you can hang the ornaments as-is. But I think part of the fun of making salt dough ornaments is getting out the glitter and making a holiday mess.
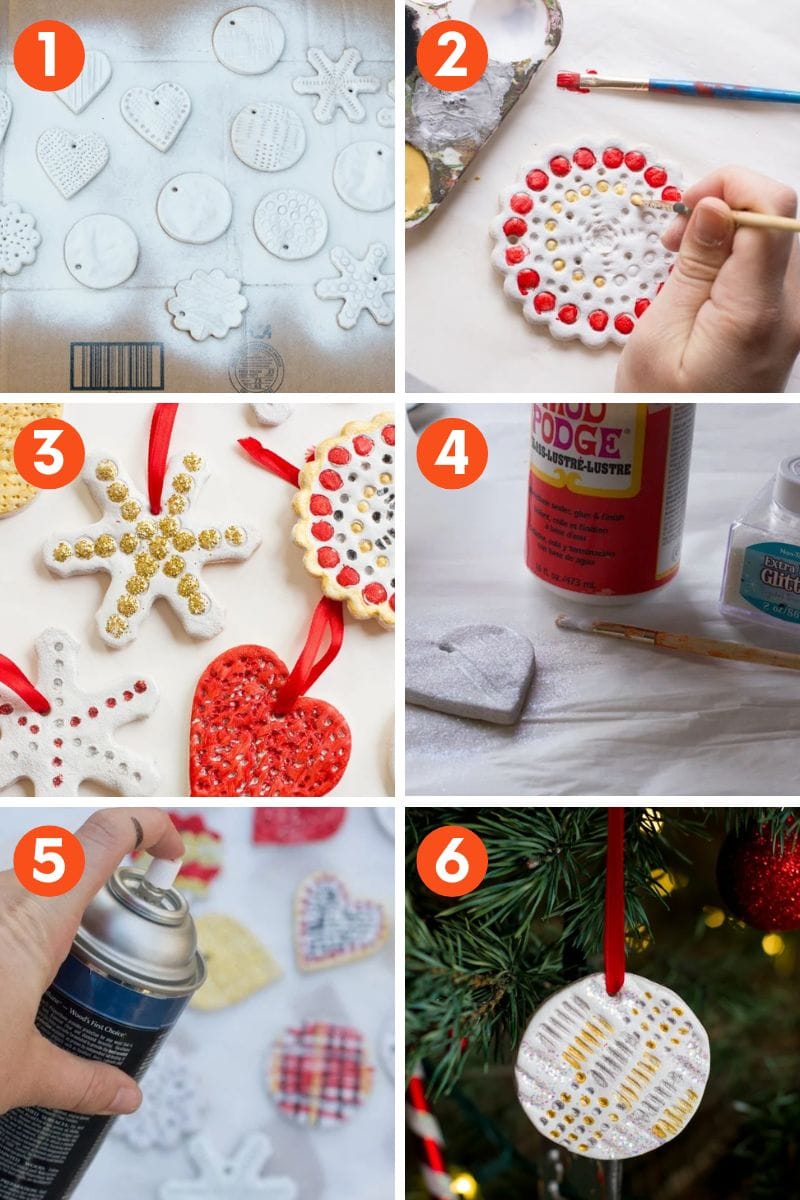
- Optional, but I like to mist all of my cooled ornaments with a thin coat of white spray paint. This helps cover up any irregularities in color (like when some got too brown from baking), and I think it helps the ornaments looks more like clay than hard bread.
- Once the spray paint is dry to the touch, I paint using acrylic paints and brushes (puffy paints would also work wonderfully).
- I like to use the textural spaces to help guide where I put paint-but it's really up to you to get creative on how you want to decorate.
- Where I want glitter, I use Mod Podge or school glue, then add glitter, shaking off the excess onto old newspaper.
- Sealing the ornaments will help keep all the decorations you just lovingly applied looking great for years to come. Once the decorations are dry, I like to use spray poly, but coating each one in a thin layer of Mod Podge would also do the trick.
- String up the ornaments using pretty ribbon or twine, and then put those beautiful new ornaments on your Christmas tree!
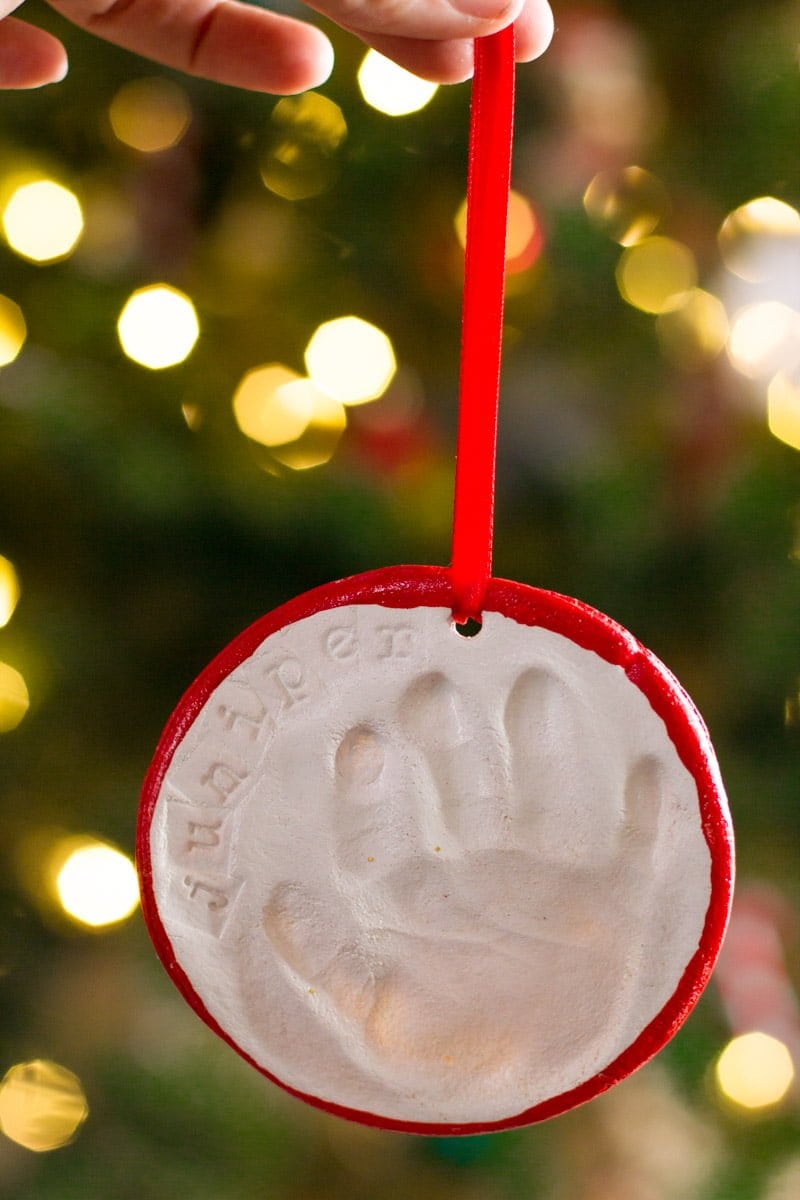
How to Make Salt Dough Handprints
Salt dough handprint ornaments (or pawprints!) are a great way to mark major milestones in your life! Here's how to do it:
- Roll out the dough as directed above, making it very slightly thicker than you would for regular ornaments.
- Evenly press the hand or foot in the dough.
- Cut around the handprint or footprint using the rim of a bowl or glass. You might be tempted to do the other way around (cut out the shape first, then get the handprint), but trust me on this one-wiggly, squirmy babies do not know how to center their hands into a shape! You're better off having a large piece of salt dough to "catch" the print, and then cutting out around it.
- Proceed with the baking, decorating, and sealing steps.
Variations and Substitutions
There are a few ways to make these ornaments your own, here's some of the variations on this method I've tried out over the years:
- Bake it faster: I've baked these at 300°F with good (and fast) results, but you do have to watch them like a hawk to prevent burning.
- Air-dry them: You could leave the ornaments out to air dry, but the drying process will probably take several days, depending on how thick the ornaments are and how humid it is. You'll also need to flip the salt dough ornaments several times to keep the edges from curling.
- Coloring the dough: Add in a few drops of food coloring to your dough before baking will result in a nicely colored dough, just know that the colors will slightly shift in the oven (just like they do when you are baking cookies or cupcakes)

Troubleshooting
Why did my salt dough puff up?
Salt dough projects tend to get puffy or bubble if the dough is too thick or if it isn't rolled out evenly. If the ornaments have air bubbles within them, that can also cause a puffiness.
My salt dough burned on the edges, but is still soft in the middle!
I know I sound like a broken record, but this is typically a result of the dough not being rolled out evenly. Or could be an oven with hot spots. For the next batch, try rotating your cookie sheet in the oven every 10-15 minutes. If you are still getting burnt spots, try covering the cookie sheet lightly with foil while the middle finishes cooking.
Salt Dough Tips and Tricks
Looking for more Christmas crafts and gifts?
- Cinnamon Ornaments. Looking for another easy holiday ornament craft? You can't beat our cinnamon ornaments. They smell great and are a blast to make with kids!
- Bird Seed Ornaments. These simple handmade ornaments will bring all the birds to your yard!
- How to Make Ice Cream From Snow.Lucky enough to have a white Christmas? Make snow ice cream!
- Soup Mixes in a Jar. These affordable gifts in a jar are easy to pull together and make a thoughtful teacher's gifts, hostess gifts, or gifts for friends and family.
- M&M Cookie Mix in Jar. We gave these M&M Cookie Mixes as gifts a few years back, and everyone absolutely loved them! The cookies that are made from the mix are the BEST.
- How to Make Hot Sauce. Give the gift of some heat! We'll teach you just how easy it is to make your own homemade hot sauce.
Love this recipe? Leave a review!
If you love this recipe as much as I do, make sure to leave a 5-star review below to help others.
📖 Recipe

Salt Dough Recipe for Ornaments, Handprints, and Crafting
Equipment
- Glitter, paint, and ribbon for decoration
- Polyurethane spray for preservation
Ingredients
- 4 cups all-purpose flour
- 1 cup table salt
- 1 ½ cups warm water
Instructions
To Make Dough
- In a large bowl, whisk together the flour and salt. Slowly stream in the water while stirring until it comes together. Finish mixing together with hands. Knead until dough is soft, about five minutes.
To Bake Ornaments
- Preheat oven to 200°F. Place half of the dough between two large pieces of parchment paper. Roll out until ⅛" thick. Remove the top sheet of parchment.
- Using cookie cutters, cut shapes (leaving them on the parchment). Peel away the excess dough. Transfer the parchment with shapes to a baking sheet.
- Using a straw or toothpick, poke a hole for ribbon or an ornament hanger. Bake in the preheated oven until hard, starting to check at the hour mark. It could take as much as two hours.
- Once cooled, decorate using glitter and paint. To make sure the ornaments last a long time (I have one from 30 years ago!), spray with a light coat of polyurethane spray. Thread on a ribbon and hang on tree.
Video

Notes
- This recipe was originally posted with an oven temp of 300°F. While we've made many batches at this temperature successfully, some of you had poor results with this higher temperature. So, we adjusted the recipe to use a lower oven temperature for a longer bake time.
I just made 3 hand prints and one foot print but they seem to be puffing out and you can’t really know it’s a foot print what can I do? What would cause this to happen?
They tend to puff or bubble if the dough is a little thick (or maybe not quite evenly rolled out) or if they have air bubbles. I'd recommend trying again!
Did not like this recipe. Was crumbly, hard to kneed, and all my ornaments came out cracked and wrinkled. I would suggest either less flour or more water. Even after lots of kneeding, it wasn't smooth.
So sorry to hear your ornaments didn't turn out well, Samantha! I'd love to help you troubleshoot if you're going to give it another go.
There are so many variables when working with a dough recipe that can contribute to you needing more or less water than the recipe calls for, such as the type of flour you used and the relative humidity in your area (or lack thereof). It sounds like your instincts were spot on—more water most likely would have helped get a smooth and pliable dough. With any dough recipe - edible or not! - it really helps to use those clues and descriptors like "smooth and pliable" to guide you (in addition to the ingredient amounts, of course). The pictures in the post are there to help in this regard, too—giving you an idea of what the dough should look like when it comes together.
I hope this is helpful and that you give the recipe another go! If you do, please let us know how it turns out! Good luck!
Hoping someone here can help. My keepsake salt dough ornaments got molding this year while in a wet basement (dumb move on my part, I know). Any ideas on how I can clean them up and preserve them?
My only suggestion would be to repaint them with a good, sturdy paint and then make sure to seal them well—sorry to hear they molded!
Do you know if this recipe would work with Gluten Free flour?
I think it would!
These are adorable. Perfect activity for the winter school break .Thanks for sharing!
Very useful. thanks for sharing.
Happy Holidays! Approximately how many Salt Dough ornaments do you get from using all of the ingredients? My cutters are large to med size.. To make about 30 or more would I need to make a couple of batches of dough? Also, I live in a small 3rd floor apt and..I thought it would be unsafe to use spray poly or paint.so I got the kind you brush on. Would that work as well or mess up the glitter, ect. on them? Which one is best to store them in, a cardboard box or a plastic container.
You could definitely get 30 out of one batch with medium ones—if you use the larger ones, I'd double the recipe.
I've never tried the brush on kind with the ornaments, but honestly, you're going to have just as much of an off-gassing issue as you would with the spray kind. I *highly* recommend doing either spray or paint-on poly outdoors.
And either is fine for storage. Good luck! 🙂
I have been looking at the different ways to make the dough ornaments and I have run into a resipe that calls for cream of tartar.what is the difference between using it and not? If any.
Apparently it can make the dough a little more elastic and stretchy? That's just what my research found though - I haven't tried it with cream of tartar myself!
Thank you for sharing this wonderful step by step information! I am planning to do this with my class of first graders (ornament gifts for their families). Do you think I could leave these in the classroom to dry out instead of baking (perhaps you answered this above and I missed it). I have tiny school picture stickers for each student... I am wondering if I could get these to stick on the back. THANKS AGAIN!
Hi, Jasmine! What a wonderful project to make with your first graders! You could leave the ornaments out to dry, but it will probably take a few days for them to dry completely depending on how thick they are and how humid it is. You would also want to flip them frequently to prevent curling. We usually recommend baking them because you have more control over the finished product and the exact amount of time it will take for them to harden!
One of our readers had a few ideas for another teacher commenting previously to ask similar questions (thanks, Amber!): She suggested making them ahead and having your students decorate them in class and then leaving them overnight to let the decorations dry. Then they can take them home the next day. Or if you want to make them from start to finish with the students and your school has a kitchen, you might be able to arrange to bake them on the premises instead of transporting them.
The tiny school picture stickers (so cute!) should work on the back, as long as the ornaments are big enough and they stay relatively flat! I hope this helps. Let us know how it all works out for you!
I want to try these but I was wondering I have lace left over from my wedding dress, I made garters for all the girls in my family, my sons wedding for my daughter in law to have, and a couple headbands, for my first grand daughter, i also made some clear glass ornaments stuffed with lace for muy other daughter inlaw. I was wondering if i would take lace, and lay a piece cut out like the salt ornaments anda then spray them with the clear coat would the lace stick?
I'm not sure about that (I haven't tried something like that), but you could definitely press the lace into the dough and get a really good impression—and then the lace pattern is on the ornament. Let me know how either turns out! 🙂
I want to do these over thanksgiving - hand prints for my son and footprints with my infant. Do you just press the hand/foot straight into the dough or did you use parchment paper in between?
Press the hand straight in. 🙂
When you painted them ...what types of paint did you and your children use? I am concerned that if I use just any paint it will soak in and not be distinguishable. Yours are absolutely beautiful! I want to do this with my niece and nephew over Thanksgiving weekend when I babysit! Please advise.
I use acrylics! Puffy paint could be fun, too.
Any tips on doing the handprint? I tried with my 11 month daughter and the handprint is barely noticeable.
You may need to help with some gentle pressure to get a good imprint! Also, make sure you're pressing the hand directly into the dough and not using parchment paper or anything in between. Hope this helps!
Can I use food coloring to the dough before baking?
Hi, Michelle! You could definitely add food coloring to the dough without changing the texture too much. My only concern would be that I'm not sure how well the colors would hold up during baking. I haven't tried it, so I'm not sure if the color would fade or change as it baked. If you give it a try, please let us know how it turns out!
thanks for your tutorial! they all look so great!
I want to use this idea to make decorations to be used outside. Does salt dough crack easily in the frost (like terracotta does)??
I wouldn't recommend this, unless you use a VERY, VERY thick coat of poly over the decorations. The salt dough is very porous, and will swell and shrink with the humidity, causing breakage.
Mine of pudding up and it’s been over an hour and they’re still not hard. What did I do wrong
Hi, Wendi! Is it possible that your ornaments are thicker than 1/8"? That would change the time it would take for them to get completely hard and dry. The baking time isn't an exact science because it can be hard to get everything to exactly the same thickness. The good news is that baking them a little longer until they feel hard to the touch should do the trick! Let us know how it turns out for you.
A gift ornament has mildewed , how to fix?
Interesting, I've never had that happen! I'm not sure there is anything you can do to fix it, sorry. Once something is mildewed, it's pretty hard to remove it.
I've seen these ornaments mildew if they are kept in an area prone to high humidity. They need to be kept in a dry environment.
Hello! I followed your instructions, and my figures "bloated". I baked them for 90mins til they are hard. But, after painting one thin coat of acrylic, and letting them dry for several days, I return to them moist and bread-y and bendable. Huhuhu! Help?
Hi, Shanda! Sorry to hear you're having issues with your ornaments. My first thought was that they were possibly rolled too thick or not baked for long enough. But you mentioned that you baked them until they were hard, so my next best thought is that the area you had them in after applying the acrylic was possibly too humid. These are very porous and until they're really well sealed, they need to be kept away from any places with lots of humidity. If you give it another go, be sure they're rolled out well, baked until completely dry and hard, and then kept away from any humidity until sealed. I hope this helps!
OMG Yours turned out so cute!!! I made these last night with my puppy and had her paw print pushed into the salt dough and it turned out soooo dang adorable. Here's a look at mine! I even zapped it in the microwave at the end to make the drying time quicker!
http://www.livelifeactive.com/2016/12/20/diy-salt-dough-paw-print-ornament/
Just to pass along our knowledge, you can add more salt, and it will give the dough built in sparkles. 🙂 Been making these since I was a child, but have to look up the recipe every year lol
Hi I’m a little stuck here. I’m making a gingerbread ornament and i already started making this recipe before i realized others were using cinnamon to get the right color instead of painting like i was going to. could i add a tablespoon or 2 of plain cinnamon into this mixture to achieve the color or would i mess it up? thank you!
to add to my previous comment- i only have the salt and dough mixed and haven’t added water. i did 2 cups flour and 1/2 cup salt to cut recipe since i don’t need that much. thank you
Hi, Jess! You can definitely add some cinnamon to the flour and salt mixture to give it some color. You might need to adjust the amount of water you use to get the proper consistency for your dough, but it should work out fine. But painting the ornaments to look like gingerbread is also a great choice! And lastly, because we love giving you options, you could also try our cinnamon ornaments which are meant to look like gingerbread and they make your house smell amazing! You can find those instructions here: Super Easy Homemade Cinnamon Ornaments Happy Crafting! =)
Hi! I am a teacher and I am wanting to do this with my class. Could I go ahead and make the dough the night before? can the dough be ok until lI can go home to bake? What would you suggest the steps be ?
If i were you, I would just make the dough and bake them ahead of time and let the students decorate them to take home. That way you don't have to worry about mixing them up or changing shape.
Depending on the school and district, you might be able to work something out with the kitchen staff to let you bake them at school.
Just a thought.
i live in the UK what can i use instead of Polyurethane spray please thank you
Any clear gloss spray paint
So, if you put the salt and water together and heat it until the salt completely dissolves, you'll have a really smooth nice dough that isn't as "rustic" as this stuff. 🙂
About to start trying new things this Christmas with my little ones and family 💖
Thanx for sharing!
This looks so cute! How long will the dough last if you make ahead of time?
Hi, Kimberly! We don't recommend making the dough for this ahead of time. You really want to use it right after making it to keep it from drying out and being difficult to work with. We hope you give it a go this year!
just made a version of these yesterday with Squish. He's not quite into it yet...but i had fun 🙂