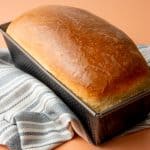
Homemade Sandwich Bread Recipe
This beginner-friendly sandwich bread recipe is so easy, anyone can do it! Make soft, fluffy slices of bread that are perfect for PB&Js or toasting up.
Servings: 18 slices
Calories: 135kcal
Ingredients
- 1 cup hot water (hot from tap, not boiling)
- ⅓ cup milk cold from the fridge
- 2 tablespoons honey or sugar (20g)
- 2 ¼ teaspoons active dry yeast
- ¼ cup melted butter or vegetable oil
- 1 ½ teaspoon salt
- 4 cups all-purpose flour, whole wheat flour, or a combination of both see notes
- Additional oil and flour for rising and forming the dough
- Butter for softening crust, optional, see notes
Instructions
- In the bowl of an electric stand mixer fitted with the dough hook, or in a large mixing bowl if making by hand, combine the hot water, cold milk, and honey or sugar, and whisk until combined. Add in the yeast and whisk until combined. Let sit for five minutes to prove. The mixture is ready when it’s foamy.
- Add in the butter or vegetable oil, salt, and flour. Mix using the lowest setting on the mixer, or by hand, until it forms a soft and sticky dough, about 3 minutes
- Knead by hand on a floured work surface, or by turning up the mixer to medium-low for 5-7 minutes, or until the dough is smooth and elastic. It will still be slightly sticky.
- Oil the inside of a clean medium-sized mixing bowl. Place the dough ball in the oiled bowl, rotating to coat in the oil. Cover with plastic wrap, a bowl cover, or a damp tea towel, and set in a warm place to rise until doubled.
- Oil the inside of a loaf pan. I prefer a 10” x 4 ½” loaf pan to get very high loaves, but you can also use a standard loaf pan. Set aside.
- When the dough has finished its first rise, lightly flour a work surface and dump the dough onto it. The dough should appear light, stringy, elastic, and full of air bubbles/holes.
- Form into a loaf shape and place in the prepared loaf pan. Cover with oiled plastic wrap, a bowl cover, or a damp tea towel, and set to rise in a warm place until it passes the bread proofing poke test—poke in the bread with a knuckle or finger. If the indentation immediately bounces back, the bread needs to rise longer. If the bread collapses, the loaf is over-proofed, and if the indentation slowly fills in, it’s ready to bake! The rise of the bread should also be approximately 1” above the loaf pan.
- In the last few minutes of the final proof, preheat the oven to 425°F. When proofing is finished, remove the cover, and place the loaf in the oven. Close the door, and immediately reduce the oven temperature to 375°F.
- Bake with the oven door closed for 25-30 minutes, or until the crust is golden brown and the bread sounds hollow when tapped. Remove from the oven and cool for 15 minutes before removing from the loaf pan, and transfer to a wire rack to cool completely before slicing.
Video
Notes
- We didn’t include rise times here, because it varies widely based on the strength of your yeast, temperature of your home, and a million other factors. What takes three hours to rise in one home might take 30 minutes in another—you’re better off following our landmarks for when the dough is ready.
- If you choose to measure using the volume measurements, make sure you use the scoop and sweep method for measuring the flour. If you just scoop the flour out of the container, you’ll end up with a very dry dough/bread.
- The high initial temperature is to help give the bread an “oven spring,” where the instant reaction of hitting the heat causes the mixture to expand rapidly, making for a tall loaf.
- Out of milk? No problems, just sub in cold water instead.
- We usually make this bread with avocado oil, because we always have it in the house. Melted butter is wonderful, too!
- We’ve tested this with all whole wheat flour, all all-purpose flour, and a mix of half and half—they are all wonderful! The 100% whole wheat version is a bit denser, but still delicious. The half and half version is the favorite in our house.
- For a soft crust: brush butter over the crust immediately after it comes out of the oven, or wrap the entire warm loaf in a slightly damp tea towel while it cools. Homemade bread tends to have a nice, crispy crust, which is great for serving alongside soup, but less great when you’re going to make a PB&J.
- We’ve never tried this recipe in a bread machine, but there is no reason why it wouldn’t work. Let us know if you try it out!
Nutrition
Serving: 1slice | Calories: 135kcal | Carbohydrates: 23g | Protein: 3g | Fat: 3g | Saturated Fat: 2g | Polyunsaturated Fat: 0.2g | Monounsaturated Fat: 1g | Trans Fat: 0.1g | Cholesterol: 7mg | Sodium: 217mg | Potassium: 42mg | Fiber: 1g | Sugar: 2g | Vitamin A: 86IU | Vitamin C: 0.01mg | Calcium: 11mg | Iron: 1mg
